background image


C H A P T E R   I I :   D r i v e r   I n s t a l l a t i o n   a n d  

C o n f i g u r a t i o n  

 
2-1 Network Card Installation


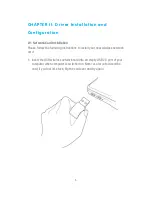
Please follow the following instructions to install your new wireless network 
card: 
 
1.


Insert the USB wireless network card into an empty USB 2.0 port of your 
computer when computer is switched on. Never use force to insert the 
card, if you feel it’s stuck, flip the card over and try again. 


Summary of Contents for 300MBPS

Page 1: ......

Page 2: ...pect to the contents hereof and specifically disclaims any warranties merchantability or fitness for any particular purpose Any software described in this manual is sold or licensed as is Should the programs prove defective following their purchase the buyer and not ICIDU its distributor or its dealer assumes the entire cost of all necessary servicing repair and any incidental or consequential dam...

Page 3: ... off and on the user is encouraged to try to correct the interference by one or more of the following measures 1 Reorient or relocate the receiving antenna 2 Increase the separation between the equipment and receiver 3 Connect the equipment into an outlet on a circuit different from that to which the receiver is connected 4 Consult the dealer or an experienced radio technician for help FCC Caution...

Page 4: ...e with SAR for general population uncontrolled exposure limits in ANSI IEEE C95 1 1999 and had been tested in accordance with the measurement methods and procedures specified in OET Bulletin 65 Supplement C The equipment version marketed in US is restricted to usage of the channels 1 11 only ...

Page 5: ...y of those who install and use it However special attention must be paid to the dangers of electric shock and static electricity when working with electrical equipment All guidelines of this and of the computer manufacture must therefore be allowed at all times to ensure the safe use of the equipment EU Countries Intended for Use The ETSI version of this device is intended for home and office use ...

Page 6: ...existing profile 24 2 3 3 Edit an existing profile 25 2 3 4 Make a copy of existing profile 26 2 3 5 Set as default profile 27 2 4 View Network Statistics General Information and Status 27 2 4 1 General Information 28 2 4 2 Status 29 2 4 3 View Network Statistics 30 2 5 Miscellaneous Settings 31 2 6 Establish secure connection with AP by WPS 32 2 6 1 PIN Code 35 2 6 2 Push Button 37 CHAPTER III So...

Page 7: ...VII 4 3 Glossary 52 ...

Page 8: ...ild your wireless network Other features of this router including IEEE 802 11b g n compatible High transfer data rate up to 300Mbps Support WMM wireless QoS feature Support 64 128 bit WEP WPA WPA2 with IEEE 802 1x functions for high level of security Support the most popular operating system Windows XP Vista 7 Support WPS Wi Fi Protected Setup hardware button for easy connection Support software A...

Page 9: ...as been used for a long time 5 There s no user serviceable part inside the network card If you found that the network card is not working properly please contact your dealer of purchase and ask for help DO NOT disassemble the network card by yourself warranty will be void 6 If the network card falls into water DO NOT USE IT AGAIN BEFORE YOU SEND THE CARD TO THE DEALER OF PURCHASE FOR INSPECTION 7 ...

Page 10: ...e this wireless network adapter please check if there is any of the items missing in the package and contact your dealer of purchase to claim for missing items USB Wireless Network Card 1pcs 1 Driver Utility Quick Guide User Manual CD ROM 1 pcs 2 1 2 ...

Page 11: ...f No wireless network card is installed On Solid light 5 seconds means WPS connection is established successfully Blinking Wireless network card is normally installed Linked to a wireless access point Transferring or receiving data Fast Blinking three times per second means WPS is activated The network card will wait for 2 minutes to establish WPS connection 1 2 3 ...

Page 12: ...lease follow the following instructions to install your new wireless network card 1 Insert the USB wireless network card into an empty USB 2 0 port of your computer when computer is switched on Never use force to insert the card if you feel it s stuck flip the card over and try again ...

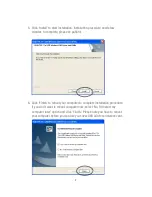
Page 13: ...ert device driver CDROM into the CD DVD ROM drive of your computer and execute Setup exe program in Driver folder For Windows Vista Windows 7 OS you ll be prompted to confirm installation Click Yes to continue ...

Page 14: ...7 3 Please select the language you wish to use then click Next 4 Click Next to continue ...

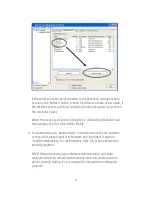
Page 15: ...lease be patient 6 Click Finish to reboot your computer to complete installation procedure If you don t want to reboot computer now select No I ll restart my computer later option and click Finish Please note you have to reboot your computer before you can use your new USB wireless network card ...

Page 16: ... show the quick menu of configuration utility This icon also uses different color to show the status of wireless connection Wireless network card not detected No connection with access point is established black Connection with access point has been established green For detailed instructions of wireless network configuration utility please see next chapter HERE ...

Page 17: ...e follow the following instructions to use Realtek configuration utility to connect to wireless access point 1 Left click the Realtek configuration utility icon located at lower right corner of computer desktop and configuration menu will appear 2 Wireless utility will appear Click Available Network menu to search for wireless access points nearby 3 Please wait for a while and all wireless access ...

Page 18: ...e list left click it and then double click it or click Add to Profile 4 If a password a k a Network Key is required to access the wireless access point please input it in Network key and input it again in Confirm network key for confirmation Click OK when password is properly inputted NOTE Network security type Network Authentication and Data encryption will be selected automatically based on wire...

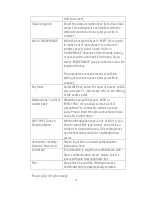
Page 19: ...s the access point you selected when SSID is not hidden and grayed out If SSID is hidden you have to input correct SSID you yourself This is a computer to computer ad hoc network Check this box if you wish to connect to another computer network device by ad hoc method When not accessing to wireless access point you have to check this box Channel Select wireless channel for ad hoc connection This o...

Page 20: ...ct 1 but please refer to the setting of the access point Network key Confirm network key When the encryption type is WPA or WPA2 PSK it s required to input a set of passphrase to connect to wireless access point Please input the same passphrase in two boxes for confirmation EAP TYPE Tunnel Provision Mode When authentication type is any of 802 1X you have to select EAP type tunnel and provision mod...

Page 21: ...nutes please be patient When the Status become Associated your computer is connected to access point you selected Click Close to close configuration menu NOTE If you connected to an access point but the connection has been dropped soon please check security settings and re check password spelling ...

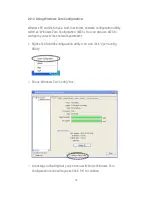
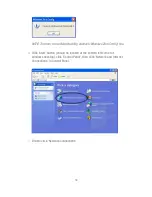
Page 22: ...s Windows Zero Configuration WZC You can also use WZC to configure your wireless network parameter 1 Right click Realtek configuration utility icon and click Open Config Utility 2 Check Windows Zero Config box 3 A message indicating that you ve been switched to Windows Zero Configuration mode will appear Click OK to continue ...

Page 23: ...ility uncheck Windows Zero Config box 4 Click Start button should be located at the bottom left corner of windows desktop click Control Panel then click Network and Internet Connections in Control Panel 5 Double click Network Connections ...

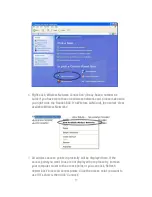
Page 24: ...Wireless LAN Card then select View Available Wireless Networks 7 All wireless access points in proximity will be displayed here If the access point you want to use is not displayed here please try to move your computer closer to the access point or you can click Refresh network list to rescan access points Click the access point you want to use if it s shown then click Connect ...

Page 25: ...e here It must match the encryption setting on the access point If the access point you selected does not use encryption you ll not be prompted for security key or passphrase 9 If you can see Connected message the connection between your computer and wireless access point is successfully established ...

Page 26: ...an store the connection parameters encryption passphrase security etc etc as a profile for every access point so you don t have to input these parameters every time when you want to connect to a specific wireless access point To manage profiles right click the Realtek configuration utility icon located at lower right corner of computer desktop then click Open Config Utility Click the Profile menu ...

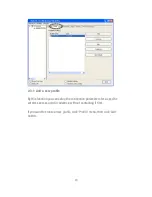
Page 27: ...w profile By this function you can setup the connection parameters for a specific wireless access point in advance without contacting it first If you want to create a new profile click Profile menu then click Add button ...

Page 28: ...21 ...

Page 29: ...al with the SSID of the access point you wish to connect This is a computer to computer ad hoc network Check this box if you wish to connect to another computer network device by ad hoc method When not accessing to wireless access point you have to check this box Channel Select wireless channel for ad hoc connection This option only appears when you re using ad hoc connection Network Authenticatio...

Page 30: ...ng of the access point Network key Confirm network key When the encryption type is WPA or WPA2 PSK it s required to input a set of passphrase to connect to wireless access point Please input the same passphrase in two boxes for confirmation EAP TYPE Tunnel Provision Mode When authentication type is any of 802 1X you have to select EAP type tunnel and provision mode from dropdown menu This setting ...

Page 31: ...an existing profile When you no longer need an existing profile you can remove it If you want to remove a profile click Profile menu then select an existing profile which you wish to remove and then click Remove button ...

Page 32: ...ou wish to change the content of the profile you can use this function Please select a profile from the list first then click Edit button You ll be provided with the contents of selected profile and you can edit them Click OK to save changes or click Cancel to discard changes ...

Page 33: ...s function This function is very convenient when you need to build a new profile which parameters are similar to any existing profile To do this select an existing profile then click Duplicate button You ll be prompted to input a profile name please use an identical name that does not exist in profile list ...

Page 34: ...ection and Realtek configuration utility will attempt to connect to selected access point 2 4 View Network Statistics General Information and Status The configuration utility provides information about network statistics and link status If you want to know how your wireless network card works you can use these functions to get detailed information about the wireless connection you re using ...

Page 35: ...re connecting to click General menu All general information like signal strength and link quality will be displayed here These information are very useful when you encounter some problem on connecting to access point If you wish to get a new IP address from DHCP server you can click ReNew IP button ...

Page 36: ...29 2 4 2 Status If you want to know the status of your wireless network card click Status menu ...

Page 37: ...tatistical data of wireless network card click Statistics menu and the statistics of wireless connection will be displayed All connection related statistics is displayed here You can click Reset button to reset the statistics of all items back to 0 ...

Page 38: ...on are listed as follow Show Tray Icon Check this box to show an icon on system tray Uncheck this box to hide it Radio Off Switch wireless radio off Wireless network functionalities are disabled Disable Adapter Disable wireless network adapter All functionalities of configration menu will disappear To resume unckeck Disable Adapter Windows Zero Config Use Windows Zero Configuration to manage HERE ...

Page 39: ...a firmware upgrade to become a WPS enabled access point Since they may not have a hardware button to press for WPS setup you can use an alternative WPS setup method input the pin code Every WPS compatible wireless network card support pin code configuration method you can just input the code to wireless access point and the wireless access point and wireless network card will do the rest for you T...

Page 40: ...t Setup menu 3 You can use PIN code or Push Button configuration and WPS compatible wireless access point must use the same type of WPS For instructions on setup each type of WPS see next 2 chapters for detailed instructions ...

Page 41: ...34 ...

Page 42: ...button You ll be prompted to select an access point you wish to connect If you know its SSID click Yes otherwise click No If you select Yes a list of all WPS compatible AP nearby will be displayed you can click Refresh to rescan then select an AP and click Select button ...

Page 43: ...you select Yes or No in previous step network card will attempt to connect to WPS compatible AP and an 8 digit number will appear Please input this number to AP s configuration menu within 2 minutes and network card will establish secure connection with AP automatically To stop this procedure before connection is established click Cancel ...

Page 44: ...ase click Push Button Config PBC button This is the easiest way to establish secure connection by WPS but if there re more than one WPS compatible AP using Push Button config please use PIN Code instead After you click Push Button Config a message box will appear ...

Page 45: ...38 Please activate Push Button function on wireless access point now and wireless network card will establish secure connection with access point within one minute ...

Page 46: ...computers and wireless devices can connect to your computer wirelessly even share the internet connection you have Please follow the instructions in following chapters to use the AP function of your wireless card 3 1 Switch to AP Mode and Station Mode The operating mode of the wireless card is Station Mode becoming a client of other wireless access points by default Please follow the following ins...

Page 47: ...40 2 Select Mode and then select Access Point It requires few seconds to switch to AP mode please be patient ...

Page 48: ...41 After mode switch is complete you ll see general information of software AP which shows AP s SSID and connected wireless clients ...

Page 49: ...42 3 1 1 Configure SSID and Channel To configure software AP click Config button ...

Page 50: ...p items are listed below Network Name SSID Please input the SSID the name used to identify this wireless access point here Up to 32 numerical characters can be accepted here excepting space Channel Please select the wireless channel you wish to use from 1 to 13 To save changes click OK otherwise click Cancel to leave this menu and keep settings untouched ...

Page 51: ...ity are listed below Network Authentication Select network authentication mode from dropdown menu Data Encryption Select data encryption method from dropdown menu ASCII PASSPHRASE If the encryption method is WEP check either ASCII or PASSPHRASE box and input it in the box as WEP passphrase Key Index Select WEP key index 1 4 If you don t know which one you should use select 1 ...

Page 52: ...put WPA passphrase in both box To save changes click OK otherwise click Cancel to leave this menu and keep settings untouched 3 2 Advanced Settings If you want to setup advanced settings of software access point select Advanced menu If you don t know the meaning and affects of these ...

Page 53: ...e Mode Select wireless frame preamble mode long or short from dropdown menu Set Defaults Reset all settings back to factory default value Apply Save changes If you changed any setting here and cause problem on communicating with wireless clients click Set Defaults to reset all settings back to default setting 3 3 Wireless Statistics Select Statistics menu and the data statistics about software acc...

Page 54: ...47 Click Reset to reset the value of every item back to 0 ...

Page 55: ... clients to get connected to Internet If you have only one network card except this software access point you don t have to select network card here if you have more than one network card select the one you wish to be used as Internet gateway Click Apply to save changes Apply is grayed out when no changes are made in this page ...

Page 56: ...5 11Mbps 11g 6 9 12 24 36 48 54Mbps 11n 20MHz MCS0 15 Up to 144Mbps 11n 40MHz MCS0 15 Up to 300Mbps Securities WEP 64 128 WPA WPA2 and IEEE 802 1x Antenna Internal Antenna 2T2R Drivers Windows XP Vista Windows 7 LED Link Activity Transmit Power 11b 16 1 5dBm 11g 14 1 5dBm 11n 13 1 5dBm Dimension 9 1 H x 17 8 W x 35 8 D mm Temperature 32 104 F 0 40 C Humidity 10 95 Non Condensing Certification FCC ...

Page 57: ...e to move your computer if you re using a notebook computer and click Rescan button for few more times If you can find the wireless access point or wireless device you want to connect by doing this try to move closer to the place where the wireless access point or wireless device is located Nothing happens when I click Open Config Utility 1 Please make sure the wireless network card is inserted in...

Page 58: ...s to establish connection Please go to Status menu and write the value of MAC Address down then present this value to the owner of access point so he she can add the MAC address of your network card to his her access point s list The network is slow having problem when transferring large files 1 Move closer to the place where access point is located 2 There could be too much people using the same ...

Page 59: ...1b including CCK for 11 and 5 5 Mbps and Barker code modulation for 2 and 1 Mbps B A protection mechanism called RTS CTS that governs how 802 11g devices and 802 11b devices interoperate 2 What is the IEEE 802 11b standard The IEEE 802 11b Wireless LAN standard subcommittee which formulates the standard for the industry The objective is to enable wireless LAN hardware from different manufactures t...

Page 60: ...facturers implement AES at the hardware level 10 Can Wireless products support printer sharing Wireless products perform the same function as LAN products Therefore Wireless products can work with Netware Windows 2000 or other LAN operating systems to support printer or file sharing 11 Would the information be intercepted while transmitting on air WLAN features two fold protection in security On t...

Page 61: ...th is consumed than in the case of narrowband transmission but the trade off produces a signal that is in effect louder and thus easier to detect provided that the receiver knows the parameters of the spread spectrum signal being broadcast If a receiver is not tuned to the right frequency a spread spectrum signal looks like background noise There are two main alternatives Direct Sequence Spread Sp...

Reviews: