background image

19

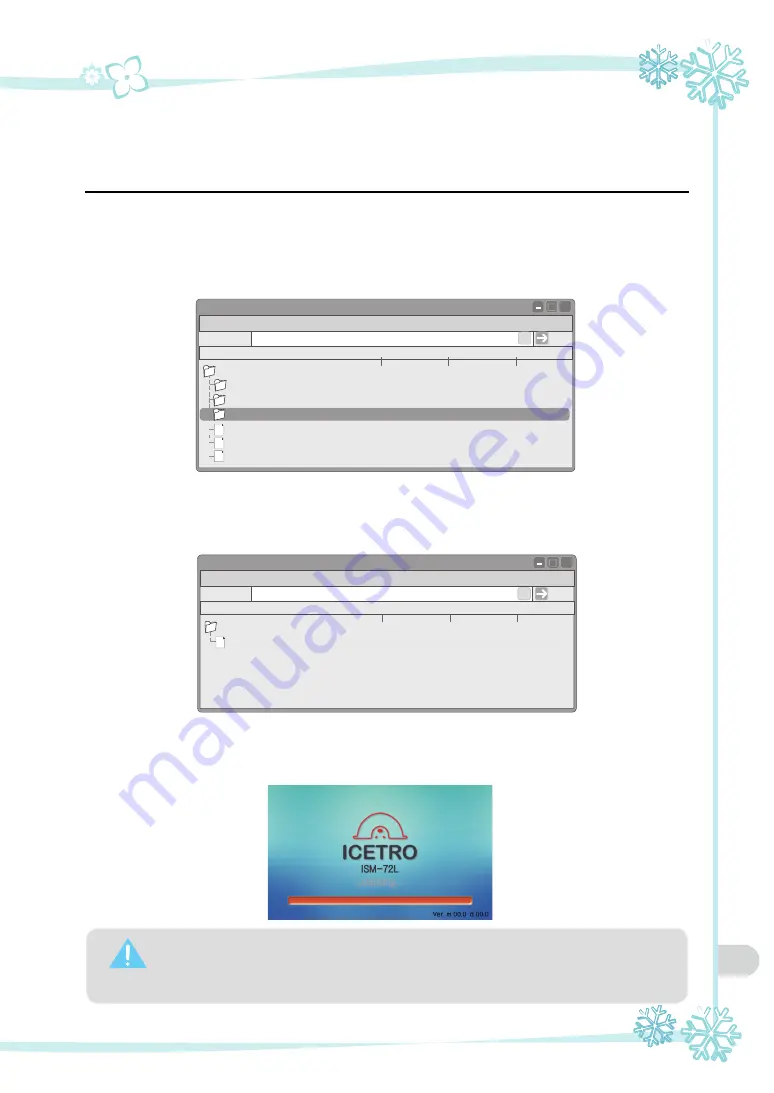
① Connect the USB memory stick and open the "slush" folder.
② Open the "slush_mov" folder.

③ Open the folder 'slush_mov' and add the video clips you want the machine to play on. 
    Please make sure you change the names of the video files to 'slush_mov1'~'slush_mov5'. 
    (You can upload upto 5 video clips and remember to keep the names as instructed.) 

④ Turn the machine off and insert the USB memory stick to the USB port on the machine. 
    Turn on the machine now. 
    You will see the screen like below and see the main menu after, then the upgrade is done.

Caution

- File specification: 640 X 480px, Smaller than 30MB 
                          Up to 5 video clips can be added (smaller than 150MB).
- Video codec : MPEG

- File format : mpg

8.3 How to add video clips


 USB STORAGE

(F:)

       slush_mov                                                           

File folder

         2015-04-07...

×

       slush_mov1                                                     

Vedioclip 

         2015-04-07...


 F: 

\ USB STORAGE                                                                                                                

 Address(D)

 USB STORAGE

(F:)


Move

  File(F)      Edit(E)      View(V)        Tool(T)      Help(H)

  File(F)      Edit(E)      View(V)        Tool(T)      Help(H)

   Name                                                          Type          Date of revision            

       slush                                                                   

File folder

            2015-04-07...

           slush_img                                                       

File folder

            2015-04-07...

           slush_boot_img                                              

File folder

            2015-04-07...

           slush_mov                                                      

File folder

            2015-04-07...

×

 F: 

\ USB STORAGE                                                                                                                

 Address(D)


Move

       IIB-52-DISPLAY_ICEBEER_Ver1000          

Application

            2015-04-07...

       IIB-52-MAIN_ICEBEER_Ver1000.hex                hex                 2015-04-07...
       IIB-52-STARTER_Ver10                              

Application

            2015-04-07...

   Name                                                          Type          Date of revision            

Summary of Contents for ISM-72L

Page 1: ...er s Manual ISM 72L FROZEN BEVERAGE This product is designed for indoor use Make sure to install it indoors The appearance design color and parts of the product are subject to change without prior notice ...

Page 2: ...escription 9 12 7 2 Operations 13 7 3 Cleaning and sterilization procedure 14 7 3 1 Cleaning the product 15 7 3 2 Sterilizing the product 16 7 3 3 Assembling the product 16 17 7 3 4 Sterilizing the site 17 8 Daily Check 18 8 1 Repairing the product 18 8 2 Updating the software and video 18 8 3 How to add video clips 19 9 Specifications 20 10 Circuit diagram 21 11 Before Calling Service 22 12 Part ...

Page 3: ...3 1 Names of Parts CANISTER COVER Key IMAGE PC 52 CANISTER BASE CANISTER PIN LEVER TENSION BOLT LCD LEVER SHAFT ICEBEER SUPPLY POWER SWITCH USB PORT LEVER DRAIN BOX DRAIN BOX COVER ...

Page 4: ...ntial risk of injuries To evade from the risk of injury or death comply with the safety requirements for the symbol If you neglect this symbol and wrongly use the product it may cause death or serious injury If you neglect this symbol and wrongly use the product it may cause a potential risk of death or serious injury If you neglect this symbol and wrongly use the product it may cause a potential ...

Page 5: ...ove the power plug from the outlet It may cause an electric shock or fire Do not connect multiple products to a single outlet It may cause a fire When the power plug is damaged do not replace it arbitrarily and contact the service agency It may cause an electric shock or fire Do not connect the power plug arbitrarily or nor modify it It may cause an electric shock or fire For your information Use ...

Page 6: ...the house Keep at least 30 cm distance for the side and rear of the product Do not install the product on a weak or uneven floor It may cause vibration and noise Adjust the vertical balance of the product not to shake and then adjust the horizontal balance Firmly fix the product Check any damage of the product If found contact the delivery agency to request claims on it The drain hose is located o...

Page 7: ...ioned of gases When gas leak happens do not touch the product If you open the door or remove the power plug it may cause an explosion due to spark Do not touch the product Fully close the gas burner Open the window for ventilation For food sanitation clean and sterilize the product every day Before cleaning remove the power plug from the outlet Do not spray water and wipe the product with a clean ...

Page 8: ...t stay powered on as freezing is automatically stopped when beer is slushed The spiral keeps rotating In case of using other materials such contact the service agency or distributor for inquiry Mount gutter on the bracket drain box and place the gutter cover 7 Operation Procedure Caution This product must not be used by the persons with poor mental or physical condition or the persons without expe...

Page 9: ...N OFF screen Temperature control button 5 5 5 5 5 5 This menu appears when the loading is complete Ice beer generation button Product cleaning button It activates the spiral only Configuration button Lamp ON OFF button Refrigerating button ON OFF the advertisement backlight ON OFF the backlight for front advertisement and ingredient tank Switch to previous menu button Press the ingredient temperat...

Page 10: ... setting These values should be adjusted to avoid errors when using the AUTO REFRIGERATION function Press the SLUSH button to select between left and right Select the TEMPERATURE button to set the managing temperature When selecting the setting by torque not by temperature please refer to the page 13 Select the language Korean or English Configuration screen Control configuration screen Date confi...

Page 11: ...Ex Please set as below if you want the machine to start auto refrigeration function from 9 10PM tonight and to end at 10 30AM in the next morning Select the ADVERTISING SCREEN and the display above will come up The advertising video clip will start playing automatically after the WAITING TIME MINUTE that the user has set up Maximum 5 video clips can be saved in data and you can set several among t...

Page 12: ...the SETTING button and the PASSWORD SETTING button next to get into the PASSWORD CHANGE Please touch the edges of the screen in order as shown in the picture Press new passwords and press the check mark It will turn off the password function and the password will be reset as the default value 0000 You can activate the password input screen when no touch on the screen is occurred for a while This f...

Page 13: ...ctivity it is recommended to use the refrigerated materials To reduce the granita forming time and increase the productivity when the remaining material level drops below half fill the material in the canister To preserve the material safely be sure to operate the product in soft drink mode To leave the material in the canister during all night without refrigeration operate the product for at leas...

Page 14: ...canister cover with the key 7 3 Cleaning and sterilization procedure Caution Before disassembly and cleaning remove the power plug to block power supply Canister Cover Key Canister Canister B Remove the spiral by pulling out and remove the packing cushion and rubber cushion Rubber Cushion Spiral Packing Cushion Lever Unlock the latch Pin Lever Spring Packing Down Drain Box Packing Piston Lever Sha...

Page 15: ...he condenser clean the filter with lukewarm water about 25 or neutral detergent solution dry it and attach it back to its original position If ventilation is not made due to accumulated dust slush is not smoothly formed and machine failure may follow When the troubles are caused by careless use or user faults such as no filter cleaning you can get a charged service When cleaning the product be car...

Page 16: ...quid on the cover of the motor that is on the rear of the product Attach the drip tray to its original position Paint two piston rings and spiral with the grease provided by the manufacturer or the approved edible grease Attach the slush supply in the reverse order of disassembly Attach the rubber cushion Caution Be sure for the wide border of the gasket to face the wall Attach the packing cushion...

Page 17: ...d the lower area of the canister cover with the solution Assemble the canister cover and press WASH so that the solution is mixed for about 2 minutes Drain the mixture from the canister Use fresh material to remove the remaining sterilization solution on the surface of the canister Afterwards do not rinse the product Use fresh material to remove the remaining sterilization solution on the surface ...

Page 18: ...se images to be displayed on the LCD screen The folder slush_mov is the one users should add video clips into If you do not see the folder slush_mov please make this folder on your own The folders and the file names given by the manufacturer should NOT be changed Please keep the names as instructed Warning Caution If the power cord is damaged only the qualified person must replace it to prevent el...

Page 19: ... Caution File specification 640 X 480px Smaller than 30MB Up to 5 video clips can be added smaller than 150MB Video codec MPEGⅠ File format mpg 8 3 How to add video clips USB STORAGE F slush_mov File folder 2015 04 07 slush_mov1 Vedioclip 2015 04 07 F USB STORAGE Address D USB STORAGE F Move File F Edit E View V Tool T Help H File F Edit E View V Tool T Help H Name Type Date of revision slush File...

Page 20: ...sumption 4 0A Geared Motor 2 EA Fan Motor 10 W Freezing Compressor Fully Closed Condenser Pin tube type Evaporator Tube launched Drum Type Cooling Type Capillary Tube Refrigerant R 134A Miscellaneous Proper Material Quantity 3 0ℓ 2TANK Maximum 5ℓ Control Method LCD BUTTON MICOM Control Provisions Manual 1 EA Edible Grease 1 EA Rubber Ring 2 EA Rubber Packing 2 EA Operation Environment Ambient Temp...

Page 21: ...21 10 Circuit diagram ...

Page 22: ...w on the motor cover on the back of the product If slush is not made properly Too little slush is made considering the amount of ingredient Be sure to use the appropriate amount of ingredient in the tank Slush 3ℓ Too much ingredient or the control strength is set at 1 Make sure that the amount is appropriate and that the control level is higher 2 4 Cold storage does not work The product has to be ...

Page 23: ...denser Assy 12 Column Back 21 Drain Box Cover 4 Fan 13 Bracket cable for USB 22 LCD PCB 5 Fan Motor 14 Rocker Switch 23 Assy LCD Module 6 Fan Motor Bracket 15 BKT Main S W 24 Rubber LCD 7 Assy PCB 16 Side Panel R 25 Protector LCD 8 Assy Control box 17 Assy Side Panel L 26 9 Drain Hose Conector 18 Back Panel 27 19 17 20 2 23 21 16 18 13 14 24 25 22 ...

Page 24: ...sy Drum 21 Lever Shaft 4 Packing Back 13 Base Canister 22 Lever Spring 52 5 Dasher Shaft 14 Packing Cushion 23 Lever 6 Tension Bolt 15 Redenar 24 Insert Joint Spring 7 Joint Spring 16 Redenar Bushing 25 Key Canister Cover 8 Motor Spring 17 Packing Redenar One Two 26 Joint Dasher Shaft 9 Motor Cover 18 Pin Lever 27 12 Part list 24 25 2 1 26 ...

Page 25: ...25 12 Part list NO ITEM NO ITEM NO ITEM 1 Base wood 3 Pad L 5 Carton Box 2 Wood Top 4 Pad R 6 ...

Page 26: ...26 MEMO ...

Page 27: ...27 MEMO ...

Page 28: ...3240311 01 Online Internet Service http www icetro com ...

Reviews: