


Remote Condenser
Installation
Page 12
Precharged Line Set Routing
CAUTION: Do not connect the precharged tubing until all routing and forming of the tubing is
complete. See the coupling instructions for connecting information.
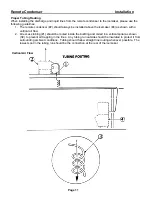
1. Each set of preharged tubing refrigerant lines consists of a 3/8 diameter liquid line (#5) and a 1/2 inch
diameter discharge line (#6). Both ends of each line have quick connect couplings and Schrader valve
connections.
Note:
The openings in the building ceiling or wall, listed in the next step, are the minimum sizes
recommended for passing the refrigerant lines through.
2. Have the roofing contractor cut a minimum hole for the refrigerant lines of 1.750 inch. Check local codes,
a separate hole may be required for the electrical power to the condenser.
CAUTION: DO NOT KINK OR CRIMP REFRIGERANT TUBING WHEN INSTALLING IT.
3. Route the refrigerant lines through the roof opening. Follow straight line routing whenever possible. Any
excess tubing MUST remain within the building.
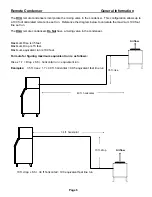
4. Spiral the excess length of precharged tubing inside the building. Use a horizontal spiral (does not need
to be as tight as illustrated) to avoid any traps in the lines.
5. Have the roofing contractor seal the holes in the roof per local codes.
CAUTION: The couplings on the sets of precharged lines are self sealing when installed properly.
Carefully follow the instructions:
.
Summary of Contents for RCA1001
Page 2: ......


