background image


42

xSeries 440:Option Installation Guide


e.

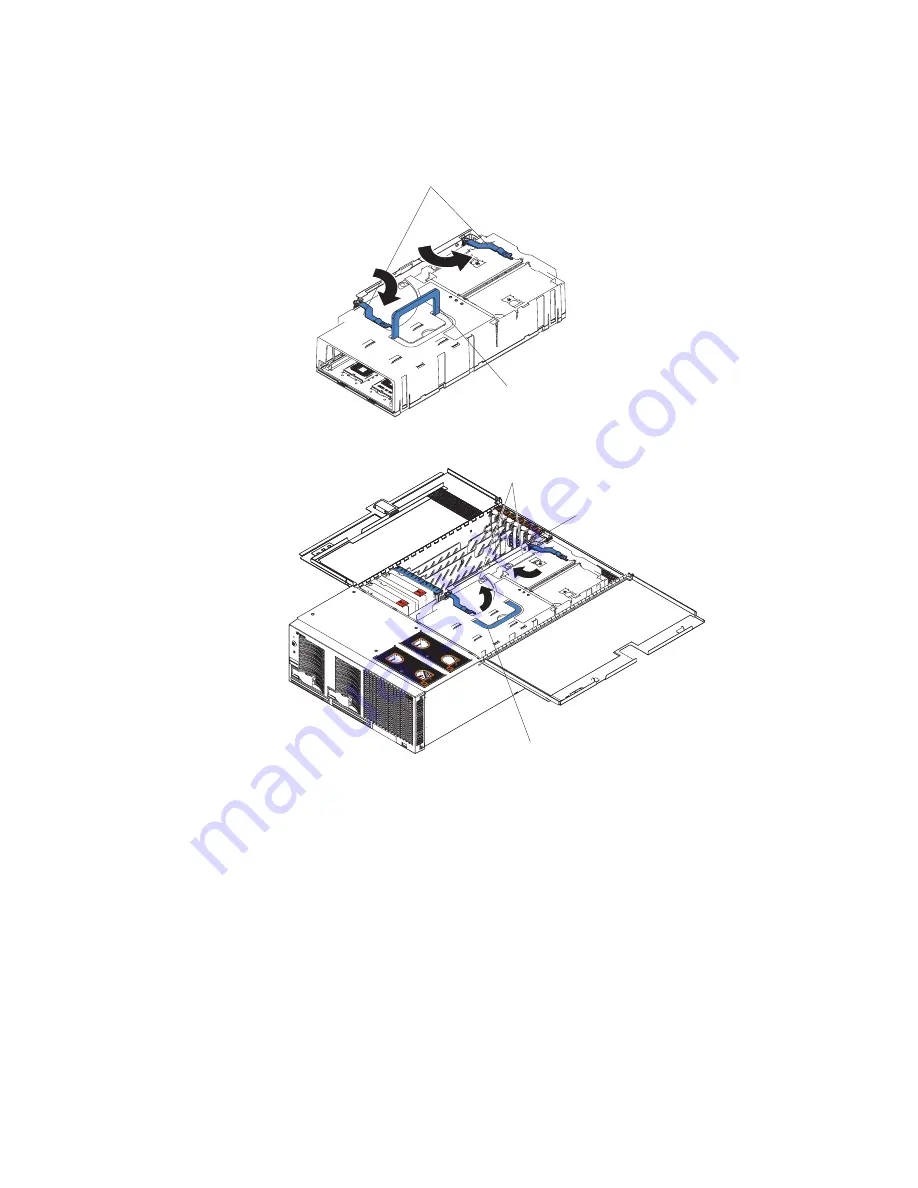
Lift slightly on the locking levers and rotate them back until they stop.

Note: The illustrations in this document might differ slightly from your hard-

ware.

2.

Install the SMP Expansion Module into the server.

a.

Lift the SMP Expansion Module by its handle and use the finger relief to hold 
the SMP module steady.

b.

Being careful not to damage the components on the center plane, place the 
SMP Expansion Module into the server.

c.

Release the handle and slide the SMP Expansion Module toward the center 
plane until it stops.

Locking

levers

Handle

Locking

levers

Handle

NO

TE

:

FO

R P

RO

PE

R A

IR

FLO

W,

 R

EP

LA

CE

 FA

N

W

IT

HIN

 2 M

IN

UT

ES

FR

ON

T O

F B

OX

NO

TE

:

FO

R P

RO

PE

R A

IR

FLO

W,

 R

EP

LA

CE

 FA

N

W

ITH

IN

 2 M

IN

UTE

S

FR

ON

T O

F B

OX

Center plane

Summary of Contents for xSeries 440 8687

Page 1: ...Option Installation Guide xSeries 440 Type 8687...

Page 2: ......

Page 3: ...IBM xSeries 440 Option Installation Guide SC59 P651 40...

Page 4: ...he general information in Appendix A Notices on page 57 Third Edition July 2002 Copyright International Business Machines Corporation 2002 All rights reserved US Government Users Restricted Rights Use...

Page 5: ...a ServeRAID adapter 22 Installing or replacing a drive 24 Hot swap hard disk drive 24 Diskette drive 25 CD ROM or DVD ROM drive 26 SMP Expansion Module 27 Removing an SMP Expansion Module and cover 2...

Page 6: ...t 59 Industry Canada Class A emission compliance statement 60 Australia and New Zealand Class A statement 60 United Kingdom telecommunications safety requirement 60 European Union EMC Directive confor...

Page 7: ...uin asennat t m n tuotteen lue turvaohjeet kohdasta Safety Information Avant d installer ce produit lisez les consignes de s curit Vor der Installation dieses Produkts die Sicherheitshinweise lesen Pr...

Page 8: ...Do not connect or disconnect any cables or perform installation maintenance or reconfiguration of this product during an electrical storm Connect all power cords to a properly wired and grounded elec...

Page 9: ...l ordinances or regulations Statement 3 CAUTION When laser products such as CD ROMs DVD drives fiber optic devices or transmitters are installed note the following Do not remove the covers Removing th...

Page 10: ...ton on the device and the power switch on the power sup ply do not turn off the electrical current supplied to the device The device also might have more than one power cord To remove all electrical c...

Page 11: ...t that has the following label attached Hazardous voltage current and energy levels are present inside any compo nent that has this label attached There are no serviceable parts inside these component...

Page 12: ...x xSeries 440 Option Installation Guide...

Page 13: ...also provided in PDF format on the IBM xSeries Documentation CD Safety Book This multilingual publication is provided in PDF format on the IBM xSeries Docu mentation CD It contains translated version...

Page 14: ...R O P E R A IR F LO W R E P LA C E FA N W IT H IN 2 M IN U T E S F R O N T O F B O X N O T E F O R P R O P E R A IR F LO W R E P LA C E FA N W IT H IN 2 M IN U T E S F R O N T O F B O X EMC Shield Fo...

Page 15: ...This center plane is used to connect the power and signal paths for the SMP Expansion Module I O board and the Remote Supervisor Adapter Lightpath Power Power Power VRM Thumbscrews SCSI power I O erro...

Page 16: ...4 xSeries 440 Option Installation Guide SMP Expansion Module connectors and lights The following illustrations identify the connectors switches and lights on the SMP Expansion Module...

Page 17: ...2 VRM error LED Microprocessor 3 VRM error LED Microprocessor 3 error LED Microprocessor 1 error LED Microprocessor 1 VRM error LED VRM error LED DIMM error LED 16X SMP Expansion Module board error L...

Page 18: ...owing illustration identifies the internal connectors and LEDs on the PCI X pla nar This planar enables you to install adapters in the server PCI X slot 1 66 MHz PCI X slot 2 66 MHz PCI X slot 3 100 M...

Page 19: ...illustration identifies the connectors and lights on the Remote Supervi sor Adapter Power Reset connector Media bays connector Fans 1 and 2 connectors Fan 4 connector Fan 3 connector I O VRM SCSI A co...

Page 20: ...8 xSeries 440 Option Installation Guide...

Page 21: ...ou make changes to disk drives For a list of supported options for the xSeries 440 refer to http www ibm com pc us compat on the World Wide Web Note Some preconfigured servers have a unique list of su...

Page 22: ...If it is necessary to set the device down place it in its static protective package Do not place the device on your system unit cover or on a metal table Take additional care when handling devices du...

Page 23: ...n Ennen kuin asennat t m n tuotteen lue turvaohjeet kohdasta Safety Information Avant d installer ce produit lisez les consignes de s curit Vor der Installation dieses Produkts die Sicherheitshinweise...

Page 24: ...Do not connect or disconnect any cables or perform installation maintenance or reconfiguration of this product during an electrical storm Connect all power cords to a properly wired and grounded elec...

Page 25: ...red by local ordinances or regulations Statement 3 CAUTION When laser products such as CD ROMs DVD drives fiber optic devices or transmitters are installed note the following Do not remove the covers...

Page 26: ...on on the device and the power switch on the power sup ply do not turn off the electrical current supplied to the device The device also might have more than one power cord To remove all electrical cu...

Page 27: ...or any part that has the following label attached Hazardous voltage current and energy levels are present inside any compo nent that has this label attached There are no serviceable parts inside thes...

Page 28: ...minutes with the cover open might damage server components Removing and replacing the bezel Complete the following steps to remove and replace the server bezel 1 Remove the bezel a Press on the two ta...

Page 29: ...ed for proper operation and cooling If you install or remove a power supply observe the following precautions Statement 8 CAUTION Never remove the cover on a power supply or any part that has the foll...

Page 30: ...pen position and pull the power supply out from the server 4 To install the new power supply a Place the handle on the power supply in the open position b Slide the power supply into the chassis and p...

Page 31: ...pter Video adapters are not supported Some long adapters have extension handles or brackets installed Before install ing the adapter you must remove the extension handle or bracket You can install bot...

Page 32: ...ontroller Note You can use the Configuration Setup Utility program to change the boot prece dence for your server Select Start Options from the Configuration Setup Util ity program main menu Installin...

Page 33: ...the divider along the top edge and lifting it from the server c Push the orange adapter retention latch toward the rear of the server and open the tab d Remove the expansion slot cover e Carefully gr...

Page 34: ...lete instructions on installing a ServeRAID adapter in your server and for additional information on ServeRAID adapters Servers without an optional IBM ServeRAID adapter installed come with two SCSI c...

Page 35: ...ble and connect it to the SCSI backplane 8 Reinstall fans 3 and 4 9 If you have other options to install or remove do so now 10 Close the cover on the server then reinstall the server in the rack and...

Page 36: ...e for any signs of damage 2 Review the information in Before you begin on page 9 and Safety Information on page 11 3 Check the instructions that come with the drive for more information about install...

Page 37: ...ght 4 Using the tab pull the diskette drive partially out of the server then grasp the drive and remove it from the server 5 Install the new diskette drive a Inspect the drive for any signs of damage...

Page 38: ...pable 2 Turn off the server and disconnect the power cords from the back of the server 3 Push the CD ROM or DVD ROM eject button to the right 4 Using the tab pull the CD ROM or DVD ROM drive partially...

Page 39: ...ion Module must contain at least one microprocessor and four DIMMs If it becomes necessary to remove or install DIMMs do so through the DIMM access doors on the SMP Expansion Module Refer to the Remov...

Page 40: ...om the server a Remove the shipping thumbscrews from the right side of the server b Open the cover c Grasp the retention bracket by the removal handles and lift it up and out of the server Note If the...

Page 41: ...center plane For use with one SMP Module For use with two SMP Modules EMC shields Thumbscrews N O T E F O R P R O P E R A IR F L O W R E P L A C E F A N W IT H IN 2 M IN U T E S F R O N T O F B O X N...

Page 42: ...of the server Note The illustrations in this document might differ slightly from your hardware 8 Remove the SMP Expansion Module cover a Place the SMP Expansion Module on a flat level surface b Rotate...

Page 43: ...devices on page 10 and the DIMM considerations 32 Your xSeries 440 server supports up to sixteen 3 3 V 168 pin 133 MHZ ECC SDRAM DIMMs in each SMP Expansion Module With both SMP Expansion Modules inst...

Page 44: ...DIMMs it must be done in banks of four and in the following order 1 Bank 1 DIMM connectors 1 3 5 7 2 Bank 2 DIMM connectors 9 11 13 15 3 Bank 3 DIMM connectors 2 4 6 8 4 Bank 4 DIMM connectors 10 12...

Page 45: ...tup appears press F1 c From the Configuration Setup Utility main menu select Advance Fea tures d Select and enable Memory Mirroring e Save and exit the Configuration Setup Utility program How does Mem...

Page 46: ...ones This section includes the instructions needed to properly remove and replace DIMMs from the SMP Expansion Module in your server Attention When working with DIMMs or other options you might need...

Page 47: ...ed position when the DIMM is firmly seated in the connector c If a gap exists between the DIMM and the retaining clips the DIMM has not been properly installed In this case open the retaining clips an...

Page 48: ...fter you install a replacement or an additional microprocessor use a microprocessor that has the same cache size and type clock speed and internal and external clock frequencies as the microprocessors...

Page 49: ...ropro cessor is to be installed For details see Removing an SMP Expansion Module and cover on page 28 Important Before continuing you should determine which type of microproces sors are installed in y...

Page 50: ...f of the microprocessor then you can loosen the other captive mounting screw and remove the heat sink b Using a screwdriver loosen the two captive mounting screws on the heat sink alternating between...

Page 51: ...roprocessor locking lever is in the open position to permit plugging in the microprocessor b Remove the protective tape from the microprocessor socket c Align the triangle icon on the microprocessor w...

Page 52: ...ove do so now 12 Close the cover on the server then reinstall the server in the rack and connect all external cables For details see Closing the cover on page 49 13 Turn on the server Important If you...

Page 53: ...tall the SMP Expansion Module cover 1 Install the cover on the SMP Expansion Module a Set the cover on top of the expansion module b Extend the locking levers as shown in the illustration then let the...

Page 54: ...er relief to hold the SMP module steady b Being careful not to damage the components on the center plane place the SMP Expansion Module into the server c Release the handle and slide the SMP Expansion...

Page 55: ...stall or remove do so now 4 Close the cover on the server then reinstall the server in the rack and connect all external cables For details see Closing the cover on page 49 5 Turn on the server Note W...

Page 56: ...ating that there is a problem and guide you to the defective fan When this occurs first identify the defective fan then using the appropriate procedure remove and replace the fan Replacing fans 1 and...

Page 57: ...n 3 and fan 4 are located in front of the I O board and the PCI X slots They are used to cool the hard disk drives I O board and PCI X slots These fans are redundant meaning that if one fails the rema...

Page 58: ...t side of the server 4 With the handle raised push the replacement fan assembly into the server until it clicks into place 5 Push the handle down until it clicks into place under the latch release 6 I...

Page 59: ...recommended by the manufacturer If your system has a module containing a lithium battery replace it only with the same module type made by the same manufacturer The battery contains lithium and can e...

Page 60: ...clip is touching the base of the battery socket by pressing gently on the clip 5 Insert the new battery a Tilt the battery so that you can insert it into the socket under the battery clip b As you sl...

Page 61: ...econnect all external cables and power cords to the server then plug the power cords into properly grounded electrical outlets Refer to I O connectors and indi cators on your server on page 51 for con...

Page 62: ...ble management arm that came with the server are in the Rack Installation Instructions provided with the server Notes 1 The illustrations in this document might differ slightly from your hardware 2 Se...

Page 63: ...SMP Expansion Ports Remote Supervisor Adapter ports One ASM interconnect peer to peer port RJ 14 One Ethernet port remote server management using network RJ 45 One serial port remote server management...

Page 64: ...s and a maximum signal distance of 5 meters 16 ft per segment USB port connectors There are two USB port connectors on the rear of the server and one USB port connector on the front These USB port con...

Page 65: ...he pin number assignments for the SMP Expansion Port on the end of the cable Remote Supervisor Adapter communication ports The server has four communication ports that are used by the Remote Superviso...

Page 66: ...able to this port to enable a LAN connection or TELNET session The Ethernet port LEDs on the Remote Supervisor Adapter indicate the link is good and activity is taking place on the network Management...

Page 67: ...et local area network LAN When you connect your server to the network the Ethernet controller automatically detects the data transfer rate 10 Mbps 100 Mbps or 1000 Mbps on the network and then sets th...

Page 68: ...56 xSeries 440 Option Installation Guide...

Page 69: ...ANY KIND EITHER EXPRESS OR IMPLIED INCLUDING BUT NOT LIMITED TO THE IMPLIED WARRANTIES OF NON INFRINGEMENT MERCHANTABILITY OR FITNESS FOR A PARTICULAR PURPOSE Some jurisdictions do not allow disclaime...

Page 70: ...United States other countries or both UNIX is a registered trademark of The Open Group in the United States and other countries Java and all Java based trademarks and logos are trademarks or register...

Page 71: ...with respect to non IBM products Sup port if any for the non IBM products is provided by the third party not IBM Some software may differ from its retail version if available and may not include user...

Page 72: ...der approval number NS G 1234 J 100003 for indirect connection to public telecommunication systems in the United Kingdom European Union EMC Directive conformance statement This product is in conformit...

Page 73: ...sting of a minimum 18 AWG Type SVT or SJT three conductor cord a max imum of 15 feet in length and a parallel blade grounding type attachment plug rated 15 amperes 125 volts For units intended to be o...

Page 74: ...Sweden Syria Togo Tunisia Turkey former USSR Vietnam former Yugoslavia Zaire Zimbabwe 13F9997 Denmark 14F0015 Bangladesh Burma Pakistan South Africa Sri Lanka 14F0033 Antigua Bahrain Brunei Channel Is...

Page 75: ...ts location of 2 Remote Supervisor Adapter 7 configuration hardware cabling for 50 connector and port locations 51 connectors Ethernet 55 cooling 10 cover close 49 removing 16 D DIMMs 31 consideration...

Page 76: ...hard disk drive IDE 24 installing 24 hardware major 2 hot swap and hot plug devices power supplies 17 hot swap power supply installing 17 I I O board internal connectors 7 I O connectors 51 installati...

Page 77: ...5 pointing device connector 53 port Ethernet 54 55 Remote Supervisor Adapter 53 USB 52 USB connector 52 power cords 61 power supply installing 17 operating requirements 17 R reinstalling the SMP Expan...

Page 78: ...44 SMP Expansion Module reinstalling the cover 41 reinstalling the SMP Expansion Module 41 system reliability 10 T trademarks 58 U United States electronic emission Class A notice 59 United States FC...

Page 79: ......

Page 80: ...IBM Part Number 59P6514 Printed in U S A 59P6514...

Reviews: