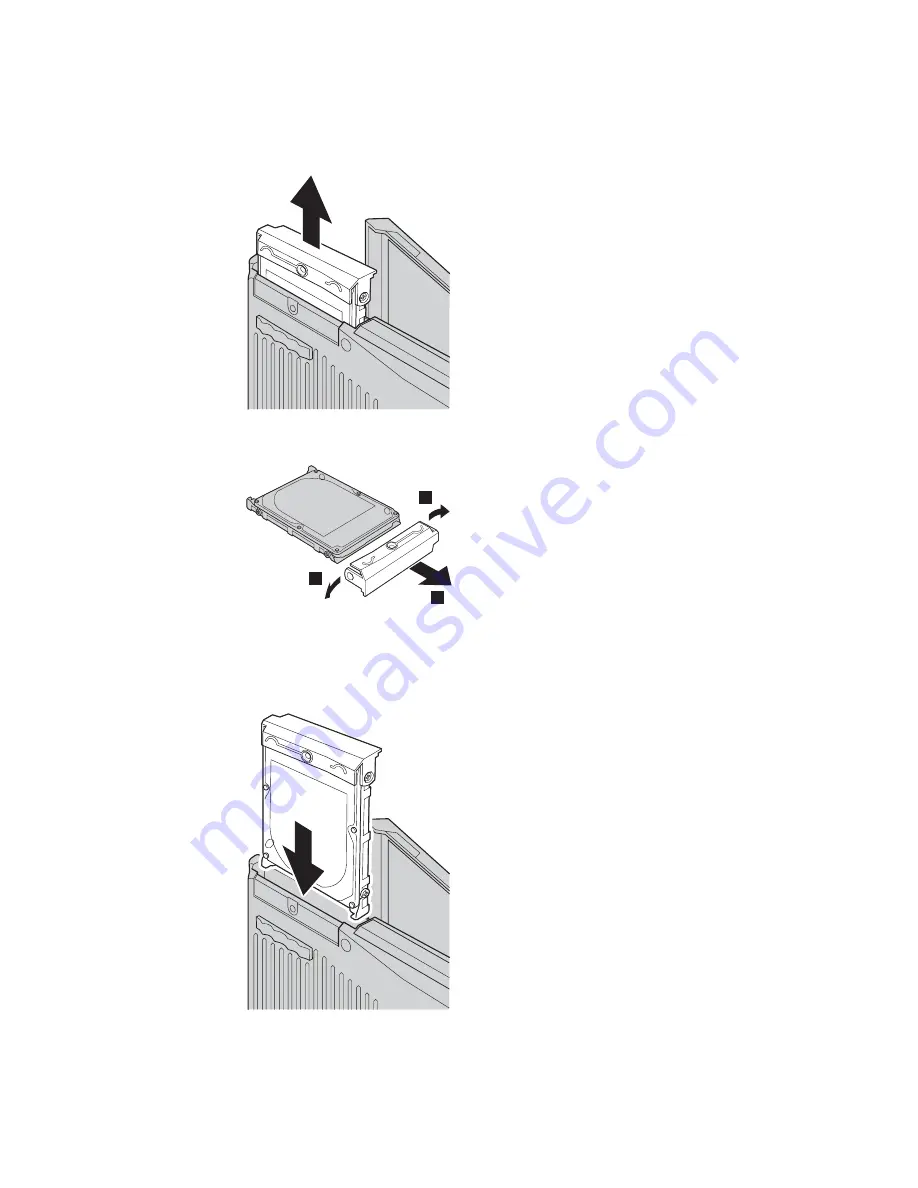
5.
Open the computer display; then stand the computer on its side and
remove the hard disk drive by pulling the cover away from the
computer.
6.
Detach the cover from the hard disk drive.
7.
Attach the cover to a new hard disk drive.
8.
Insert the hard disk drive and its cover into the hard disk drive bay; then
firmly install them.
9.
Close the computer display and place the computer with its bottom side
up. Reinstall the screw.
10.
Reinstall the battery.
Upgrading the hard disk drive
Chapter 2. Solving computer problems
33
Summary of Contents for THINKPAD R50 series
Page 1: ...ThinkPad R50 Series Service and Troubleshooting Guide...
Page 2: ......
Page 3: ...ThinkPad R50 Series Service and Troubleshooting Guide...
Page 6: ...iv ThinkPad R50 Series Service and Troubleshooting Guide...
Page 10: ...viii ThinkPad R50 Series Service and Troubleshooting Guide...
Page 20: ...Caring for your ThinkPad computer 10 ThinkPad R50 Series Service and Troubleshooting Guide...
Page 53: ...Copyright IBM Corp 2003 43...
Page 54: ...v v 44 ThinkPad R50 Series Service and Troubleshooting Guide...
Page 55: ...30 50 45...
Page 57: ...CDC Mini PCI LCD 15 modem v v v v v v v 26 AWG 47...
Page 59: ...PC PC laser 49...
Page 60: ...50 ThinkPad R50 Series Service and Troubleshooting Guide...
Page 64: ...54 ThinkPad R50 Series Service and Troubleshooting Guide...
Page 92: ...82 ThinkPad R50 Series Service and Troubleshooting Guide...
Page 93: ...Appendix D Notices 83...
Page 95: ...Appendix D Notices 85...
Page 101: ...Appendix D Notices 91...
Page 102: ...92 ThinkPad R50 Series Service and Troubleshooting Guide...
Page 103: ...Appendix D Notices 93...
Page 104: ...94 ThinkPad R50 Series Service and Troubleshooting Guide...
Page 106: ...96 ThinkPad R50 Series Service and Troubleshooting Guide...
Page 107: ......
Page 108: ...Part Number 13N6087 1P P N 13N6087...


