background image

Notes:

1.

If your ThinkPad computer does not support the Ethernet connector, you
cannot use the connector on the ThinkPad Dock II.

2.

You cannot use the Token Ring cable for this connector on the ThinkPad
Dock II.

3.

If your ThinkPad computer does not support 1000BASE-T Ethernet, you
cannot use 1000BASE-T Ethernet LAN.

(18)

The power jack is where you connect the power cord.
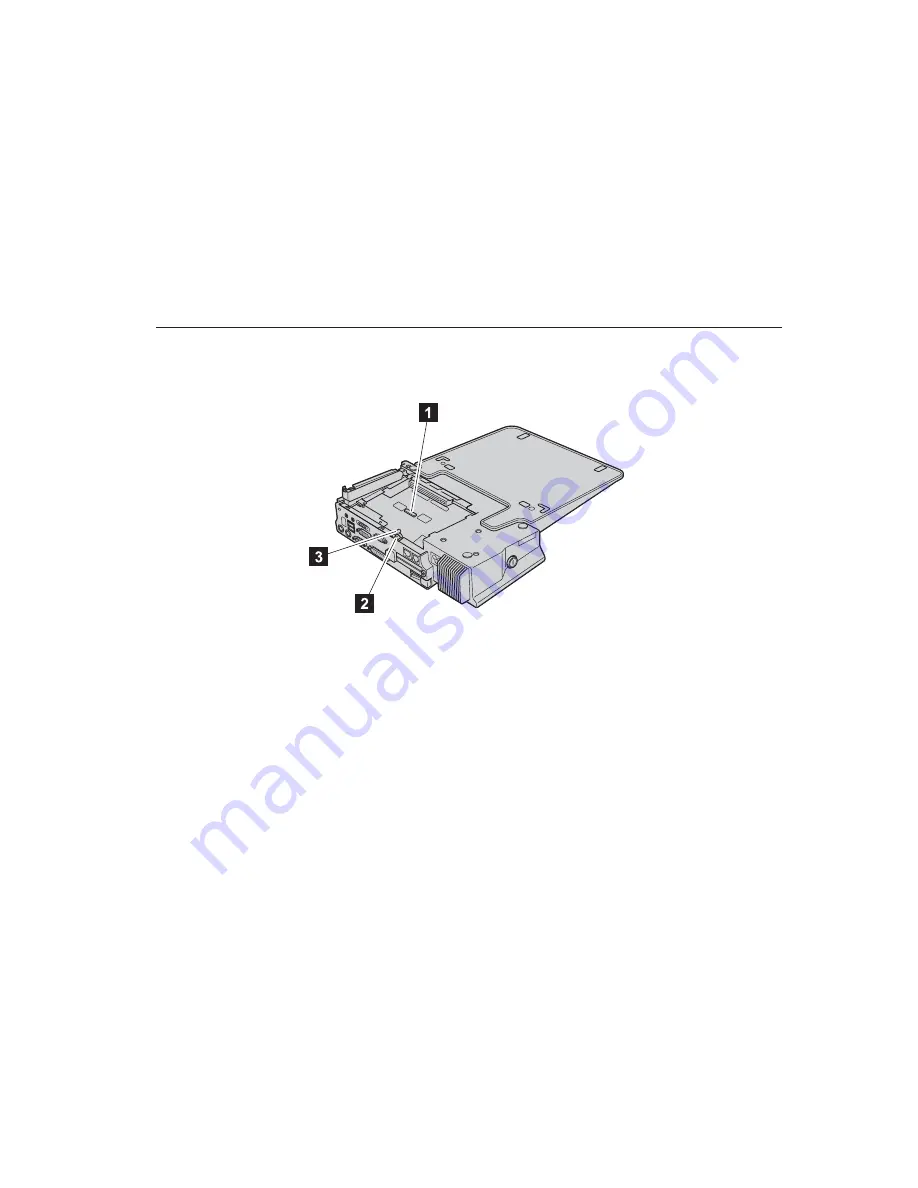
Inside view

ThinkPad Dock

(1)

The LAN Wake connector is where you connect the Wake on LAN

®

cable if

you install the PCI card with Wake on LAN function.

(2)

By setting the PC Card lock to the locked position, you can secure the PC

Card.

(3)

When you set the bay device lock to the locked position, the device release

lever is locked to secure the device in the Ultrabay 2000.

Note:

To lock the Ultrabay 2000 device, you can use either the bay device lock
or the security keyhole for the Ultrabay 2000 device.

Chapter 1. About the ThinkPad Dock and the ThinkPad Dock II

7

Summary of Contents for ThinkPad Dock

Page 1: ...ThinkPad Dock ThinkPad Dock II User s Guide...

Page 2: ......

Page 3: ...ThinkPad Dock ThinkPad Dock II User s Guide...

Page 4: ...s therefore this statement may not apply to you This publication could include technical inaccuracies or typographical errors Changes are periodically made to the information herein these changes will...

Page 5: ...9 Preparing for docking 9 Docking your computer in the ThinkPad Dock or the ThinkPad Dock II 11 Undocking 13 Emergency eject 15 Options for undocking 16 Inserting the PCI Card 17 Inserting the PC Card...

Page 6: ...iv ThinkPad Dock ThinkPad Dock II User s Guide...

Page 7: ...lone Always hold the whole assembly Front view ThinkPad Dock 1 The power switch turns the computer on and off 2 The drive in use indicator turns on when data is being read from or written to the hard...

Page 8: ...s the computer on and off 3 By pressing the pop up eject button you can tell the operating system to get ready for undocking You can do the same by selecting Eject PC in the start menu of your compute...

Page 9: ...xternal keyboard or an external numeric keypad 5 The mouse connector is for connecting a mouse 6 The Ultrabay 2000 only supports Ultrabay devices It does not support a second battery or an Ultrabay Pl...

Page 10: ...ight of the connector show the status of the network connection When your computer connects to a LAN and the session is available the left indicator shows green While data is being transmitted the rig...

Page 11: ...for connecting an external monitor 3 The digital visual interface DVI connector is for connecting a monitor that supports DVI Note The DVI connector provides a digital interface only If your ThinkPad...

Page 12: ...rive connector is for connecting an external diskette drive Note If your ThinkPad computer does not support the external diskette drive you cannot use the connector 13 The parallel connector is for co...

Page 13: ...cord Inside view ThinkPad Dock 1 The LAN Wake connector is where you connect the Wake on LAN cable if you install the PCI card with Wake on LAN function 2 By setting the PC Card lock to the locked po...

Page 14: ...all the PCI card with the Wake on LAN function 2 By setting the PC Card lock to the locked position you can secure the PC Card 3 When you set the bay device lock to the locked position the bay latch i...

Page 15: ...onfiguration by the procedure given in Creating the hardware profile for the dock configuration on page 10 with Windows 2000 v If the device driver is not installed install it as instructed in the Ins...

Page 16: ...at the left of the IDE ATA ATAPI controllers 8 Double click the second Primary IDE Channel 9 Click the Advanced Settings tab 10 Click the down arrow at the Transfer Mode in the Device 0 11 Select DMA...

Page 17: ...that the power cord is connected to the ThinkPad Dock 3 Make sure that the system lock key of the ThinkPad Dock is in place and in the unlocked vertical position 4 Put your computer on the platform of...

Page 18: ...is in standby mode or when it is operating 2 Make sure that the power cord is connected to the ThinkPad Dock II 3 Make sure that the system lock key of the ThinkPad Dock II is in place and in the lock...

Page 19: ...the computer display is on v The docking indicator on the ThinkPad Dock is on 4 If the computer is in the Docked Config status press the eject request button on the ThinkPad Dock then make sure that t...

Page 20: ...kPad Dock II is in place and in the unlocked vertical position 3 Check to see whether the computer is in the Docked Config status It is in that status if either of the following is true v Eject PC is...

Page 21: ...s this function When no ac power is supplied the eject button does not pop up automatically To make it pop up follow the procedure below Note Make sure that the system lock key is in place and in the...

Page 22: ...it from the docking station Note This function is supported in Windows XP or Windows 2000 The following are the options you can select v Hot undocking v Suspend when undocking v Hibernate when undocki...

Page 23: ...ThinkPad Dock or the ThinkPad Dock II v Remove all cables from the ThinkPad Dock or the ThinkPad Dock II v Remove all the peripheral devices from the ThinkPad Dock or the ThinkPad Dock II The ThinkPad...

Page 24: ...2 Note If you install the PCI card with Wake on LAN you can connect the Wake on LAN cable to the LAN Wake connector of the ThinkPad Dock and the connector of the card For details refer to the user s...

Page 25: ...r 2 3 Install the PCI card and connect it firmly 1 then reinstall the screw 2 Note If you install the PCI card with Wake on LAN you can connect the Wake on LAN cable to the LAN Wake connector of the T...

Page 26: ...how to insert or remove the card refer to the Installing a card section of your on line help system 2 If the PC Card lock is set in the locked position you cannot insert or remove the PC Card Unlock...

Page 27: ...ice in the bay The Ultrabay 2000 of the ThinkPad Dock or the ThinkPad Dock II supports an Ultrabay 2000 device except for a second battery Attention The Ultrabay 2000 supports warm swap of devices but...

Page 28: ...e lever 1 to the right and then remove the device 2 Note If you set the bay device lock to the locked position or attach the mechanical lock to the security keyhole next to the device release lever yo...

Page 29: ...Ultrabay 2000 slide the bay latch 1 to pop out the handle Pull the handle until it stops 2 and then remove the device 3 Note If you set the bay device lock to the locked position the handle will not p...

Page 30: ...ttaching a mechanical lock to the security keyhole has the following effects v The product itself is secured v The rear cover cannot be opened so the PCI card is secured v If you set the bay device lo...

Page 31: ...2000 device to the ThinkPad Dock you can lock the release lever There are two ways to lock it v You can use the bay device lock which is inside the bottom cover of the docking station v If the bay de...

Page 32: ...ce lock do as follows ThinkPad Dock 1 Turn the docking station upside down Loosen the screw 1 and remove the bottom cover 2 2 Set the bay device lock to the locked position 26 ThinkPad Dock ThinkPad D...

Page 33: ...right side up and attach a mechanical lock to the security keyhole refer to Attaching a mechanical lock on page 24 ThinkPad Dock II 1 Turn the docking station upside down Loosen the screws 1 and remov...

Page 34: ...n 3 Reinstall the bottom cover 1 and tighten the screws 2 4 Turn the docking station right side up and attach a mechanical lock to the security keyhole refer to Attaching a mechanical lock on page 24...

Page 35: ...locked position and attach the mechanical lock to the security keyhole as follows ThinkPad Dock 1 Turn the ThinkPad Dock upside down Loosen the screw 1 and remove the bottom cover 2 2 Set the PC Card...

Page 36: ...d Dock right side up and attach the mechanical lock to the security keyhole see Attaching a mechanical lock on page 24 ThinkPad Dock II 1 Turn the ThinkPad Dock II upside down Loosen the screws 1 and...

Page 37: ...nstall the bottom cover 1 and tighten the screws 2 4 Turn the ThinkPad Dock II right side up and attach the mechanical lock to the security keyhole see Attaching a mechanical lock on page 24 Chapter 2...

Page 38: ...32 ThinkPad Dock ThinkPad Dock II User s Guide...

Page 39: ...or other countries or both IBM ThinkPad Ultrabay Wake on LAN Microsoft Windows and Windows NT are trademarks of Microsoft Corporation in the United States other countries or both Other company product...

Page 40: ...34 ThinkPad Dock ThinkPad Dock II User s Guide...

Page 41: ......

Page 42: ...Part Number 92P1839 Printed in U S A 1P P N 92P1839...

Reviews: