


v
Install
only
fully
buffered
double-data-rate
dual-channel
(FB-DDR2),
PC2-5300,
registered
SDRAM
with
ECC
DIMMs.
For
a
current
list
of
supported
DIMMs
for
the
blade
server,
see
http://www.ibm.com/servers/eserver/serverproven/compat/
us/.
v
Installing
or
removing
DIMMs
changes
the
configuration
information
of
the
blade
server.
After
installing
or
removing
a
DIMM,
you
must
change
and
save
the
new
configuration
information
by
using
the
Configuration/Setup
Utility
program.
When
you
restart
the
blade
server,
a
message
indicates
that
the
memory
configuration
has
changed.
Start
the
Configuration/Setup
Utility
program
and
select
Save
Settings
(see
“Configuration/Setup
Utility
menu
choices”
on
page
40
for
more
information)
to
save
changes.
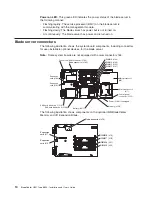
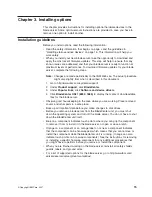
DIMM
Retaining clip
To
install
a
DIMM,
complete
the
following
steps:
1.
Read
the
safety
information
that
begins
on
page
v
and
“Installation
guidelines”
on
page
15.
2.
Read
the
documentation
that
comes
with
the
DIMMs.
3.
If
the
blade
server
is
installed
in
a
BladeCenter
unit,
remove
it
(see
“Removing
the
blade
server
from
the
BladeCenter
unit”
on
page
17
for
instructions).
4.
Carefully
lay
the
blade
server
on
a
flat,
static-protective
surface.
5.
Open
the
blade
server
cover
(see
“Opening
the
blade
server
cover”
on
page
18
for
instructions).
6.
If
a
Memory
and
I/O
Expansion
Blade
is
installed
and
you
are
installing
DIMMs
on
the
system
board,
remove
the
expansion
blade
(see
“Removing
an
expansion
unit”
on
page
19).
7.
If
the
blade
server
is
equipped
with
a
DIMM
air
baffle,
lift
it
off
of
the
system
board
and
store
it
in
a
safe
place.
8.
Locate
the
DIMM
connectors
(see
the
illustrations
in
“Blade
server
connectors”
on
page
14).
Determine
the
connectors
into
which
you
will
install
the
DIMMs.
9.
Touch
the
static-protective
package
that
contains
the
DIMM
to
any
unpainted
metal
surface
on
the
BladeCenter
unit
or
any
unpainted
metal
surface
on
any
other
grounded
rack
component
in
the
rack
in
which
you
are
installing
the
DIMM
for
at
least
2
seconds;
then,
remove
the
DIMM
from
its
package.
24
BladeCenter
HS21
Type
8853:
Installation
and
User’s
Guide
Summary of Contents for HS21 - BladeCenter - 8853
Page 3: ...BladeCenter HS21 Type 8853 Installation and User s Guide...
Page 60: ...48 BladeCenter HS21 Type 8853 Installation and User s Guide...
Page 78: ...66 BladeCenter HS21 Type 8853 Installation and User s Guide...
Page 79: ......
Page 80: ...Part Number 44W1496 Printed in USA 1P P N 44W1496...