background image

IBM High IOPS Adapter - Hardware User Guide 2.2.3 

 | 


__________________

__

__

15

1.  

2.  

3.  

4.  

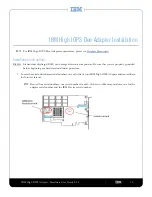
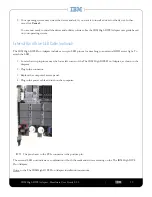
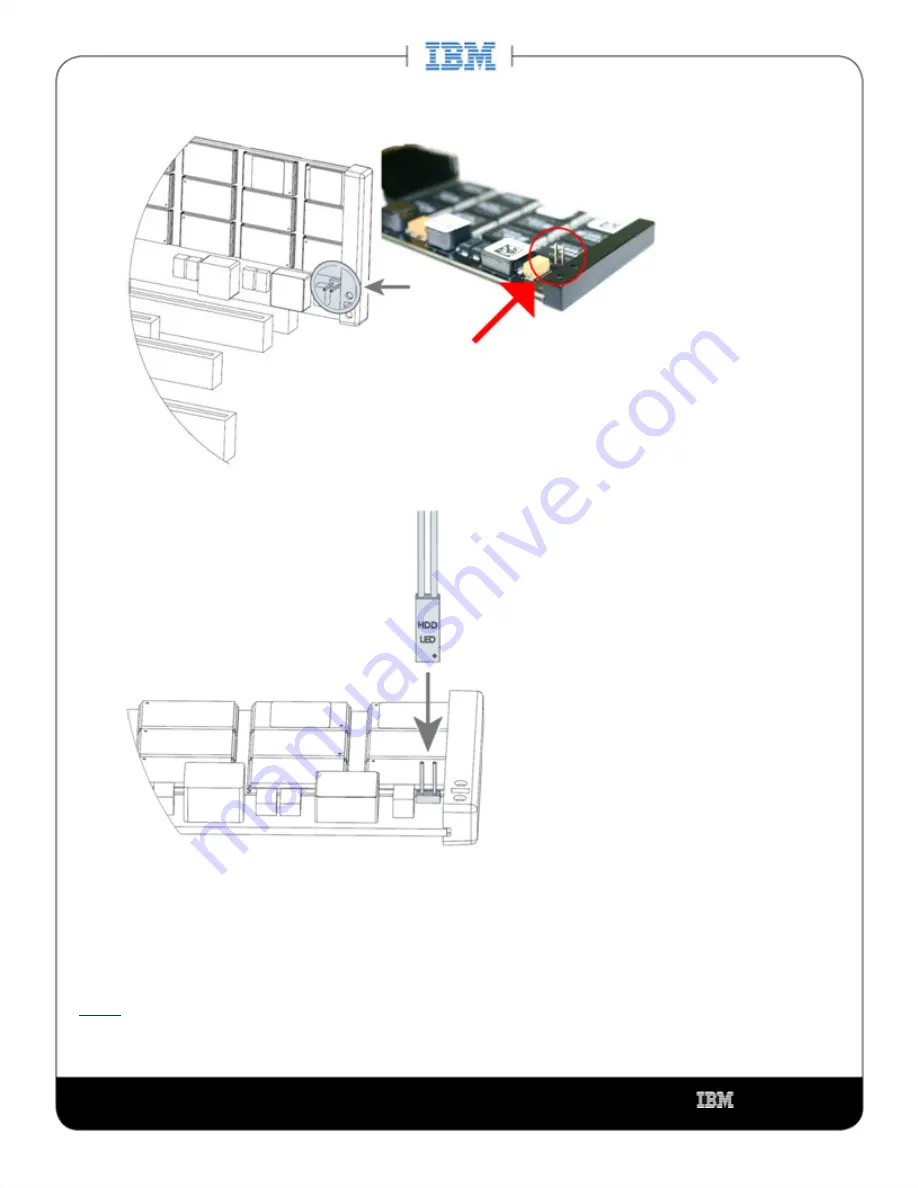
Locate the two-pin pinout at the right of the IBM High IOPS Adapter: 

Plug in the connector: 

NOTE


The pin closest to the PCIe connector is the negative pin.

Replace the computer's access panel.

Plug in the power cable and turn on the computer.

The external LED now displays both read and write operations performed on the IBM High IOPS Adapter.

Resume

 the installation of your IBM High IOPS Adapter

Summary of Contents for High IOPS Adapter

Page 1: ...IBM High IOPS Adapter Hardware User Guide for Driver Release 2 2 3 5 4 2011 ...

Page 2: ... 3 3 Safety Information 4 Introduction 5 IBM High IOPS Adapters 5 System Requirements 6 Hardware Requirements 7 In the Box 9 IBM High IOPS Adapter Installation 10 Half Height Bracket Installation 12 External Hard Drive LED optional 14 IBM High IOPS Duo Adapter Installation 16 External Hard Drive LED Cable optional 19 IBM Support 20 ...

Page 3: ...__ 3 IBM High IOPS Hardware User Guide for Driver Version 2 2 3 Copyright Notice Copyright International Business Machines 2011 All rights reserved Copyright 2006 2011 Fusion io Inc All rights reserved Fusion io is a trademark of Fusion io Inc Part Number D0003073 000_1C ...

Page 4: ...nly to connect or disconnect signal cables Never turn on any equipment when there is evidence of fire water or structural damage Disconnect the attached power cords telecommunications systems networks and modems before you open the device covers unless instructed otherwise in the installation and configuration procedures Connect and disconnect cables as described in the following table when instal...

Page 5: ...e by orders of magnitude The IBM High IOPS Adapter allows every computer to exceed the I O performance of an enterprise SAN The IBM High IOPS Adapter is a data accelerator designed specifically to improve the bandwidth for I O bound applications The IBM High IOPS Adapter is a no compromise solution for the toughest computational challenges faced by data centers today putting it in a league of its ...

Page 6: ...28TB 2 640GB 10PB 20PB 2 1 Single Level Cell SLC Multi Level Cell MLC 2 Assumes uniform distribution of writes across both memory modules Performance Attributes Feature Code NAND Type 1 Read Bandwidth Write Bandwidth IOPS 2 Access Latency 0096 SLC 770 MB s 750 MB s 123 000 26 µs 0097 SLC 1 5 GB s 1 5 GB s 238 000 26 µs 1649 MLC 735 MB s 510 MB s 67 000 29 µs 5985 MLC 1 5 GB s 1 0 GB s 138 000 29 µ...

Page 7: ...t to any driver version before 2 2 Supported Linux Distributions Red Hat Enterprise Linux RHEL 5 6 SUSE Linux Enterprise Server SLES 10 11 Supported Windows Operating Systems Microsoft Windows 2003 Server 64 Bit with SP2 or higher Microsoft Windows 2008 Server 64 Bit R1 with SP2 or higher Microsoft Windows 2008 Server 64 Bit R2 NOTE IBM High IOPS Adapters cannot be used as hibernation devices Hard...

Page 8: ... the average block size table below you can estimate the amount of system memory needed You can reduce worst case memory use by formatting your IBM High IOPS Adapter with a 4K sector size and thereby force the average written block size to be 4K or greater Note however that for many systems even those formatted with 512 byte sectors actual memory utilization typically tracks with I O operations on...

Page 9: ...nes must be active for full performance In the Box Your IBM High IOPS Adapter comes with these items IBM High IOPS Adapter USB Key Quick Start Instructions IBM High IOPS Adapter half height bracket used on low profile systems the IBM High IOPS Duo Adapter does not use a half height bracket Important Notices document On the USB Key are the following items IBM High IOPS Adapter User Guide for Linux ...

Page 10: ...ents Be sure that you are properly grounded before beginning any hardware installation procedure If you are installing the IBM High IOPS Adapter in a low profile system you need to use the half height bracket Please refer to the section for details Half Height Bracket Installation Locate the serial number on your IBM High IOPS Adapter and record it for future reference Turn off the computer and di...

Page 11: ...ve the option to install the external HDD LED connection If you choose to do this proceed to the section of this guide Otherwise continue with these steps to complete External Hard Drive LED optional the hardware installation Grasp the IBM High IOPS Adapter by the top edge and seat it gently but firmly in the available PCIe slot ...

Page 12: ...if you want it to install a hardware driver for the device In that case click Cancel You are now ready to install the driver and utilities software See the IBM High IOPS Adapter user guide based on your operating system Half Height Bracket Installation For half height installation such as in low profile systems you need to replace the full height retaining bracket with the included half height bra...

Page 13: ...e in removing the retaining screws Do not twist or pull on the bracket until both screws are out as this can cause damage to the components To prevent damage to the IBM High IOPS Adapter use only a Philips 1 tip screwdriver Remove the two screws holding the full height bracket to the IBM High IOPS Adapter in the order shown Remove the bracket carefully from the device ...

Page 14: ... the device opposite of heat sink Attach the half height bracket using a Philips 1 tip screwdriver to tighten the two screws Attention Do not over tighten This can cause damage to the device Return to Step 2 of the Hardware Installation section to complete the install External Hard Drive LED optional The IBM High IOPS Adapter includes a two pin LED pinout for attaching to an external HDD access li...

Page 15: ...h IOPS Adapter Plug in the connector NOTE The pin closest to the PCIe connector is the negative pin Replace the computer s access panel Plug in the power cable and turn on the computer The external LED now displays both read and write operations performed on the IBM High IOPS Adapter Resume the installation of your IBM High IOPS Adapter ...

Page 16: ...on Electrostatic discharge ESD can damage electronic components Be sure that you are properly grounded before beginning any hardware installation procedure Locate the serial and informational numbers on each side of your IBM High IOPS Adapter and record them for future reference NOTE Record four serial numbers one serial number for each of the two ioMemory modules one for the adapter serial number...

Page 17: ... identifying PCIe slots Gen1 slot with a minimum physical width of x8 and a minimum signaling width of x8 or a Gen2 slot with minimum physical width of x8 and minimum signaling width of x4 Plug in optional LED connector if desired NOTE If you choose to use the optional connector make that optional connection External Hard Drive LED before proceeding It will be difficult to make that connection onc...

Page 18: ...M High IOPS Adapter by the top edge and seat it gently but firmly in the available PCIe slot Secure the IBM High IOPS Adapter s retaining bracket using a screw or lever depending on how your hardware is configured Replace the computer s access panel Plug in the power cable and turn on the computer ...
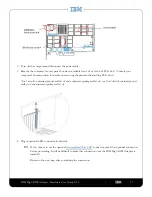
Page 19: ...IBM High IOPS Duo Adapter includes a two pin LED pinout for attaching to an external HDD access light To attach the LED Locate the two pin pinout near the lower left corner of the The IBM High IOPS Duo Adapter as shown in the diagram Plug in the connector Replace the computer s access panel Plug in the power cable and turn on the computer NOTE The pin closest to the PCIe connector is the positive ...

Page 20: ...dapter Hardware User Guide 2 2 3 __________________ __ __ 20 IBM Support IBM High IOPS Adapter Customer Support is available on the web at the following address http www ibm com systems support IBM part number 60Y1443 ...

Reviews: