background image

English

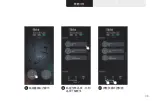
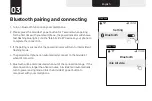
1.  Turn on bluetooth function on your smartphone.

2. Please press the Airvida E1 power button for 7 seconds when pairing  

  for the first time with your smartphone, the power indicator will show a  

  fast flashing blue light. Find the "ible Airvida E1" device on your phone to  

  complete the connection.

3. If the pairing is successful, the power indicator will turn to intermittent  

  flashing mode.

4. The paired smartphone can automatically connect to the Airvida E1   
  when it's turned on.

5. Bluetooth will be disconnected when out of the connection range.  If the 

  disconnection is longer than five minutes,  Airvida E1 will automatically 

  turn to power saving mode. Click the Airvida E1 power button to 
  reconnect with your smartphone.

Bluetooth pairing and connecting

03

Step one

Step two

Setting

Bluetooth

Bluetooth

ible Airvida

Summary of Contents for Airvida E1

Page 1: ...Airvida E1 空氣清淨藍牙降噪耳機 Airvida E1 wearable air purifier with noise cancelling earphones User Guide 使用者手冊 ...

Page 2: ...01 認識 Airvida E1 負離子出風口 負離子出風口 按鍵 麥克風收音孔 R 側耳機 L 側耳機 電源鍵 音量鍵 充電指示燈 電源指示燈 ANC 開關鍵 磁吸充電孔 L端內側 L端外側 A ...

Page 3: ...02 繁體中文 打開包裝 Airvida E1 直立底座 耳塞 L 耳塞 S 清潔針 USB 充電線 01 使用者手冊 保固卡 ...

Page 4: ...E1 負離子功能可能有所異常 請盡速聯絡 ible 客服 1 關機狀態下長按電源鍵 3 秒 電源指示燈顯示藍燈 Airvida E1 即開 機並啟動負離子空氣清淨功能 2 將 Airvida E1 配戴於脖子上 負離子出風口朝上 重要 負離子碳刷頭切勿被任何東西所遮掩 3 Airvida E1 亦可搭配底座 直立放置於桌面或是床頭櫃上使用 負離 子出風口朝向面部方向 距離不超過 30cm 以達到最佳效果 4 當 Airvida E1 低電量時 電源指示燈顯示橘燈 5 開機狀態下長按電源鍵 3 秒 Airvida E1 關閉 02 開始使用空氣清淨機 ...

Page 5: ...E1 電源指示燈顯示藍燈快速閃爍 點選手機 ible Airvida E1 裝 置後即可連線 3 藍牙連線成功後 電源指示燈顯示藍色燈間歇閃爍 4 配對過的手機 在 Airvida E1 開機後會自動連線 5 當手機與 Airvida E1 超出藍牙連接範圍時 藍牙連接會中斷 此時 Airvida E1 會回到藍牙待連接狀態 若五分鐘後沒有連接到任何裝置 Airvida E1 會 進入省電模式 如果需要重新與手機藍牙連線 短按電源鍵一下即可開始 藍牙搜尋並連接 開始藍牙配對連線 藍牙功能 開 設定 ible Airvida E1 藍牙 步驟 1 步驟 2 03 ...

Page 6: ...來電 音樂會暫停並撥放 來電提示鈴聲 短按一下電源鍵即可使用 Airvida E1 接聽並通話 5 通話中短按電源鍵兩下 可從 Airvida E1 切換成用手機通話 6 通話中短按一次電源鍵可以中斷通話 7 結束通話後會恢復音樂撥放 電源鍵 ANC 開關鍵 音量減小 音量增大 音樂播放狀態中按一下可以暫停播放音樂 音樂暫停狀態中按一下可以開始播放音樂 短按一次可以降音量 長按一次可以跳至前一首曲目的開頭 短按一次可以增加音量 長按一次可以跳至下一首曲目的開頭 短按一次可以開啟 關閉降噪功能 A 04 開始聆聽音樂以及通話 ...

Page 7: ...onnect 應用程式並開始使用 1 安裝 ible Airvida Connect 應用程式到您的手機 2 通過藍牙功能連接手機與 Airvida E1 3 打開應用程式主畫面 可以確認 Airvida E1 的連接狀態 4 若未連接成功 主畫面會顯示 連接 的提示 請點開提示以完成連接 5 若成功連接 即可使用應用程式提供的各種功能 6 可以點選主畫面 預覽 功能了解 Airvida E1 操作方式 7 主畫面上面的功能提示圖說明 ANC 是否開啟 負離子強度圖示 Airvida E1 剩餘電量 定位 05 ...

Page 8: ...a E1 應用程式主畫面左下角會顯示您目前所在位置的空氣品質指數 點選圖示即可開啟空氣品質資訊以及負離子控制器 2 點選空氣資訊頁中空氣品質及花粉品質選項 可以進一步檢視 PM2 5 PM10 以及多項花粉的空 氣汙染指數 3 透過負離子控制器可以依您需求選擇 Airvida E1 負離子釋放強度 同時應用程式會依您目前所在地 的空氣品質建議您適合開啟的強度 關於 ible Airvida Connect 應用程式空氣品質以及負離子控制功能 ...

Page 9: ...08 繁體中文 01 03 點選畫面左方圖示 點選空氣品質 花粉 品質了解更多 調整負離子控制器 02 ...

Page 10: ...09 1 先以手機選擇您想要聆聽的音樂並撥放 2 可以在音訊模式頁面中選擇您想要使用的聲音效果 3 可以在降噪模式選擇是否開啟降噪功能 選擇 Airvida E1 音訊模式 01 02 點選畫面右方圖示 可選擇降噪模式以及 六種音訊模式 ...

Page 11: ...10 繁體中文 1 在查詢頁輸入您想要查詢的空氣品質地區名稱關鍵字 2 即可顯示您所查詢地區的空氣品質資訊 查詢其他地區的空氣品質 01 02 點選左下角圖示 輸入地區名稱關鍵字 ...

Page 12: ...11 1 可依需求選擇您想要顯示的語言 2 打開推播通知 當您所在地區的空氣品質不佳時 應用 程式會提醒您調整負離子強度 以達到最好的保護效 果 設定每日推播的時間 應用程式會在您設定的時間 推播一則訊息 告知空氣品質的狀況 3 可依需求選擇電話來電時 Airvida E1 是否震動提示 4 請協助做保固登錄 以有最完善的售後服務 關於設定頁 01 02 點選右下方圖示 選擇語言 ...

Page 13: ...12 繁體中文 03 04 05 設定推撥通知 選擇 Airvida E1 是否 開啟來電震動 保固登錄 ...

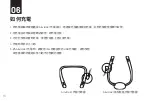
Page 14: ...接 Airvida E1 充電接口 再連接充電器後開始充電 此時充電燈號會顯示紅燈 2 待充電指示燈由紅燈轉為綠燈 即充電完成 3 亦可於使用底座時充電 放置於底座上直立後充電 4 充電時間大約 3 小時 5 為 Airvida E1 充電時 請使用 ible 原廠提供的 USB 充電線 請勿使用 其他廠牌的充電線以免引起不可預期的傷害 Airvida E1 充電示意圖 Airvida E1 搭配底座充電示意圖 06 如何充電 ...

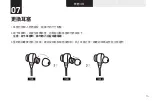
Page 15: ...14 繁體中文 更換耳塞 1 耳塞可依個人舒適感受 選擇不同尺寸配戴 2 取下耳機時 請按住耳機裝置 扭動並拉動耳塞即可將其取下 注意 取下耳塞時 請勿用力拉扯耳塞尾端 3 重新穩固確實地裝上耳塞 確認沒有鬆脫或角度傾斜 裝上耳塞之後 請確認耳機是否能正常運作 步驟 1 步驟 2 步驟 3 07 ...

Page 16: ...耳塞尾端 3 若耳機外側髒汙 請以乾軟布擦拭 如果極度髒污 請以乾布沾取適量稀釋的 中性清潔劑後清潔 並再以乾淨的布徹底擦乾 確保耳機完全乾燥後再使用 重要 請勿使用苯或酒精等溶劑進行清潔 以免損壞表面 4 清潔耳機防塵網 請先取下耳塞 用軟布沾少量水去做清潔以去除塵土 耳垢 或任何可能累積的物質 請小心不要意外將塵土或碎屑推入塞網內 重要 請不要過度摩擦網片 否則網片可能或脫落或撕裂 5 如果在 USB 充電口附近發現髒污或灰塵 請以乾軟布擦拭即可 請勿沾水或任 何清潔劑 重要 如果在 USB 充電埠附近發現有汗水 水分或濕氣 應立即予以拭除 並 置於室溫中予以乾燥 否則可能影響充電功能 提示 中性清潔劑稀釋的調配 方法 可於水中加入一 至兩滴沙拉脫即可做清 潔使用 08 清潔 ...

Page 17: ...能 2 Airvida 產品的設計為每 0 6 秒產生一次負離子 因此即使在戶外 或是在風量較為強烈的地方時 Airvida 產品仍能正常使用 3 在清潔前 請確保機器處於關機狀態 無論任何時刻 在使用 Airvida 產品前 都須確保機器是乾燥狀態 4 當要長時間存放時 請關閉 Airvida 產品電源並充電一小時 如果存放時間超過六個月 每六個月都應 該充電一小時一次 依存放的時間長短不同 Airvida 產品重新開啟時 有可能會處於低電量的狀態 裝置長期存放之後 要再度使用前 請先充電至少一小時 09 ...

Page 18: ... 儲存時應避免陽光直曬 5 遠離瓦斯爐與電爐 並避免在可能發生爆炸或充滿水氣的空間使用 6 請避免產品發生任何強烈的撞擊 因為強烈的衝擊下 產品外殼或內部零件可能會有損壞的危險 7 如果在使用過程中 主機有發熱的情況發生 請立即關機停止使用 並聯絡客服人員處理 8 避免將 Airvida 產品被設計成在一般環境都能有良好的表現 避免將 Airvida 產品暴露在高於 40 C 或 是低於 0 C 的環境 高溫的環境可能會永久損害電池的蓄電量 在嚴寒的環境中使用 Airvida 產品 電池的續航力可能會暫時縮短 一但電池溫度回到正常作業範圍 0 C 40 C 電池效能會回復正常 ...

Page 19: ...18 繁體中文 ...

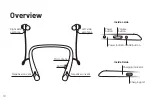
Page 20: ...w Negative ion vent Button Microphone Right side earphone Power button Charging indicator Power indicator ANC button Charging port Inside L side Inside R side A Left side earphone Negative ion vent Volume button ...

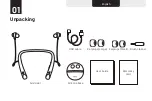
Page 21: ...English Unpacking Airvida E1 Silicone base Earplugs Large Earplugs Small Brush cleaner USB cable 01 User Guide Warranty card ...

Page 22: ...wer indicator will turn blue and automatically start to purify the air 2 With negative ion vents facing upwards gently place the Airvida E1 behind your neck Important Negative ion vent carbon fiber brush should not be covered by anything 3 Airvida E1 can be put on the silicone base when using on a desk or nightstand Adjust the negative ion vent toward your face within 30 cm to reach the best perfo...

Page 23: ...e pairing is successful the power indicator will turn to intermittent flashing mode 4 The paired smartphone can automatically connect to the Airvida E1 when it s turned on 5 Bluetooth will be disconnected when out of the connection range If the disconnection is longer than five minutes Airvida E1 will automatically turn to power saving mode Click the Airvida E1 power button to reconnect with your sm...

Page 24: ...to your smartphone by clicking the power button twice 6 Click the power button again to hang up the phone call 7 After ending the call the music will automatically resume playing Start listening to music and phone calls Volume down Volume up ANC button Click to pause the music Click to play the music Short press to decrease the volume Long press to skip to the beginning of the previous track Short...

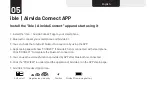
Page 25: ... connection by using the APP 4 App s main page will show CONNECT if Airvida E1 is not connected with smartphone Click CONNECT to complete the bluetooth connection 5 You can use the various functions provided by APP after bluetooth is connected 6 Click the PREVIEW to understand the operation of Airvida E1 on the APP s main page 7 Airvida E1 State description icon ANC on off Negative ions intensity ...

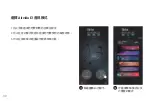
Page 26: ...tion and negative ion controller page 2 Click air quality information items to learn more about PM2 5 PM10 and pollen air pollution 3 You can select the negative ion intensity by the controller as your need APP will recommend the suitable intensity based on your current local air quality About ible Airvida Connect APP air quality information and negative ion controller ...

Page 27: ...English 01 03 Click the left icon Click the items to learn more Select negative ion intensity 02 ...

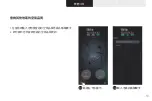
Page 28: ...y with your smartphone 2 You can choose one audio mode you like in the Equalizer page 3 You can choose the noise cancelling mode you want Choose the audio mode 01 02 Click the right icon Audio mode and noise cancelling mode ...

Page 29: ...English 1 Enter keywords of the region you want to query 2 The air quality index of the region you query will show Regional information 01 02 Click the icon on the left corner Enter keywords ...

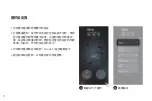
Page 30: ...air quality in your position Set the notification time APP will send a message at the time you set to inform the air quality status 3 You can choose whether the Airvida E1 vibrates or not when receiving a phone call 4 Please complete the warranty registration for customer support services General settings 01 02 Click the icon on the right corner Choose the language ...

Page 31: ...English 03 04 05 Push notification settings Airvida E1 vibration switch Device warranty registration ...

Page 32: ...ndicator turns from Red to Green Airvida E1 is fully recharged 3 You can also charge the Airvida E1 on the silicone base 4 Charging time is approximately 3 hours 5 Please use original ible charging cable to charge Airvida E1 Do not use charging cables from other brands to avoid complications Airvida E1 charging diagram Airvida E1 charging on silicone base diagram 06 ...

Page 33: ...your preferences 2 Please press and hold the earphone device twist and pull the earplug to remove it Important when removing the earplugs do not forcefully pull on the earplugs 3 Please make sure the earplugs replacement is complete and the earphones are working properly Step one Step two Step three 07 ...

Page 34: ... after cleaning Important Do not pull the the earplugs forcefully when removing earplugs 3 To clean the surface of the earphone wipe it with a dry soft cloth If it is extremely dirty wipe it with a cloth along with some diluted neutral detergent Dry them after cleaning Important Do not use solvents such as benzene or alcohol for cleaning to avoid damage to the surface 4 To clean the earphone s dus...

Page 35: ...ng 5 To clean dirt or dust near the USB charging port please wipe it with a dry soft cloth Do not use water or any other cleaning agents Important Any sweat moisture or moisture near the USB charging port should be wiped off immediately and dried at room temperature otherwise it may affect the charging function ...

Page 36: ...Before cleaning please make sure that the machine is turned off Before using any Airvida products please make sure that the machine is dry 4 When storing for a long period of time please turn off Airvida and charge for one hour Airvida should be charged for one hour every six months Depending on the differences of storing periods when Airvida turns on it may remain in a low battery condition When ...

Page 37: ...or humid areas 6 Prevent heavy impact Heavy impact will cause potential damages in both the outer casting and inner components 7 If you feel the main body is overheating please turn off the device immdeialtely and contact customer service 8 Airvida is designed to work well in a wide range of temperatures However Airvida should not be constantly exposed in above 40 C or below 0 C environments Highe...

Page 38: ...s no guarantee that interference will not occur in a particular installation If this equipment does cause harmful interference to radio or television reception which can be determined by turning the equipment off and on the user is encouraged to try to correct the interference by one or more of the following measures Reorient or relocate the receiving antenna Increase the separation between the eq...

Page 39: ...ny other antenna or transmitter RF exposure warning This equipment must be installed and operated in accordance with provided instructions and the antenna s used for this transmitter must be installed to provide a separation distance of at least 20 cm from all persons and must not be co located or operating in conjunction with any other antenna or transmitter End users and installers must be provi...

Page 40: ...contact regional distributor 取得審驗證明之低功率射頻器材 非經核准 公司 商號或使用者均 不得擅自變更頻率 加大功率或變更原設計之特性及功能 低功率射 頻器材之使用不得影響飛航安全及干擾合法通信 經發現有干擾現象 時 應立即停用 並改善至無干擾時方得繼續使用 前述合法通信 指依電信管理法規定作業之無線電通信 低功率射頻器材須忍受合法 通信或工業 科學及醫療用電波輻射性電機設備之干擾 2021 ible Technology Inc All rights reserved B12 ...

Reviews: