background image

10

Check that

the control unit is connected as per instructions on page 9.
Power supply 230-240 V +/-15%, 50/60 Hz.

Check that

the input signal is 0-10 V.

Check that

the rotation monitor and blow-clean function are connected.

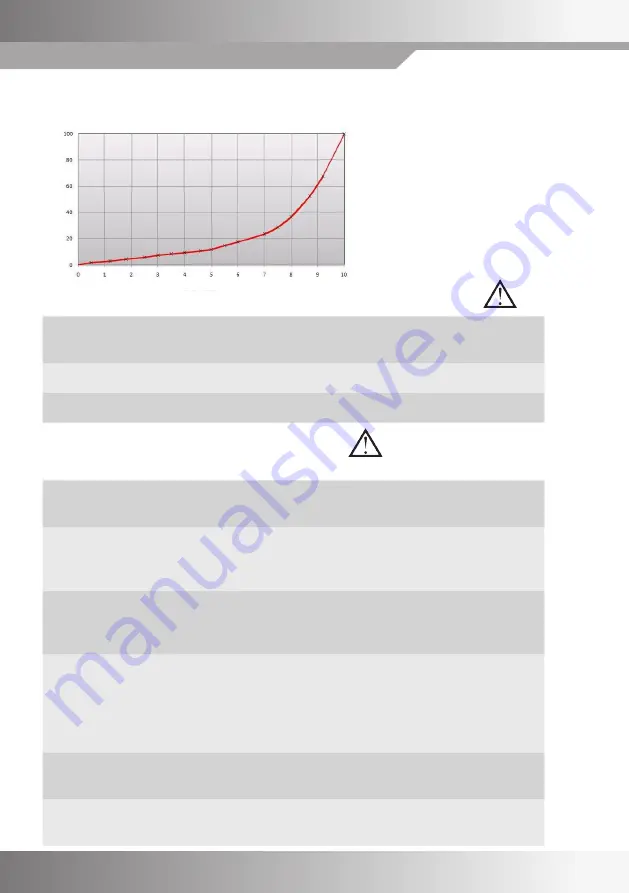
INPUT SIGNAL/ROTATION SPEED

The input signal is directly 
proportional to the efficacy of the 
rotor, which implies that input signal 
and rotation speed are as per the 
adjacent diagram.

CHECKS BEFORE POWERING UP THE CONTROL UNIT

Check that

the motor rotates in the right direction in relation to the rotor's direction 
of rotation. In the event of a fault, switch two phases to the motor.

Adjustment of max. 
speed

Set the High Speed DIP switch to the ON position. 
Adjust "Max rpm" so that the rotor rotates at 10-12 rpm 
(or as per rotor manufacturer's directions).

Checking minimum 
speed

Set the Low Speed DIP switch to ON. 
Check that the rotor starts. 
The minimum speed is preset. 

Checking the blow-clean 
function

Switch off the voltage.
Make sure the blow-clean DIP switch is set to ON and the input signal is 
disconnected. 
After switching on the voltage the rotor rotates for 20 seconds at 12 rpm 
on the motor. 

Checking the rotation 
monitor

The yellow Rotation LED will flash when the magnet passes the magnetic 
sensor, regardless of DIP switch position. 

Finish by

having the control unit drive the rotor at maximum and minimum 
rotation speeds and checking that the operating rotor speed is correct. 

COMMISSIONING THE EQUIPMENT

Should be accomplished in sequence

11

Input signal - rotation speed

Rotation speed (%)

Input signal 0-10 V

Summary of Contents for F21100303

Page 1: ...IBCcontrol Made in Sweden MANUAL CONTROL UNIT FOR ROTATING HEAT EXCHANGER VariMax100 UL CSA Article no F21100303 ...

Page 2: ......

Page 3: ...ical data control unit 6 Technical data motor 6 Functions 6 DIP switch 7 Operational indications 7 Alarms 7 Settings via potentiometer 8 Push button 8 Connection diagram 9 Connections 9 Input signal Rotation speed 10 Checks before powering up the control unit 10 Commissioning the equipment 10 EMC installation 11 EMC gland 11 Own notes 12 13 ...

Page 4: ...al and recycling When replacing components or when the control unit in its entirety needs replacing please follow the advice below The aim shall always be to achieve the maximum possible recycling of raw materials with the minimum possible environmental impact Never dispose of electrical components with ordinary waste always use the designated collection points Disposal should be effected as envir...

Page 5: ...ch off main power before removing the cover Never touch electrical components or contacts while main current is switched on Risk of electrocution resulting in serious injury or death Connected terminals contain residual voltage even after the main current has been switched off The following symbols and references will be used in this description These instructions are important they apply to perso...

Page 6: ...N 61800 3 2004 emission category C1 and immunity category C2 All control units comply with the Low Voltage Directive 2006 95 EC standard EN 61800 5 1 All control units are designed for installation in environments subject to pollution degree 2 UL CSA ETL 4009131 All control units are also approved in accordance with UL 508C and CSA C22 2 No 14 Associated VariMax motor100 is approved in accordance ...

Page 7: ...Max100 UL CSA has a preset threshold value of 0 1 V hysteresis 0 13 0 07 V If the input signal falls below this value the rotor will stop The VariMax100 UL CSA has a rotation monitor magnet mounted on the rotor with associated magnet transmitter and a built in blow cleaning function The functions can be disconnected via DIP switches The VariMax100 UL CSA starts automatically after voltage drop out...

Page 8: ...al fuse 4 AT Exact value cannot be obtained with a digital measuring instrument The fuse protects both motor and electronics TECHNICAL DATA CONTROL UNIT Max moment 10 Nm Min rotation speed 1 rpm Max speed rpm 400 rpm Motor temperature mantle max 110 O C Shaft diameter 19 mm Shaft length 35 mm Ambient temperature 30 45 O C Protection form IP54 Weight incl motor bracket 8 4 kg Measurements incl shaf...

Page 9: ...he rotation sensor DIP switch setting Flashes even if the input signal is lower than the threshold value ALARMS In the event of an alarm the control unit restarts after 30 seconds The respective red light diode comes on for the same duration 30 seconds After restart the light diode goes out this happens twice The third time the alarm relay closes and the alarm moves on In order for the alarm relay...

Page 10: ...e level 85 30 O C Short circuit Probable cause Alarms and trips in the event of short circuit phase phase or phase earth Short circuit between phases in cable or motor Short circuit between phase earth in cable or motor Interruption to one phase in cable or motor Measure motor resistance it should be identical on all coils Internal fault Alarms and trips if an internal fault in the control system ...

Page 11: ... to terminal 10 The magnet is installed with south side S towards the transmitter Max gap 15 mm 12 V output 3 11 Output for 12 V DC Terminal connection 3 is minus terminal connection 11 is plus Max 50 mA Reset 11 12 Remote reset in the event of alarm The control unit is reset automatically in the event of voltage drop out Thermal contact T T This must be connected to protect the motor against over...

Page 12: ...N position Adjust Max rpm so that the rotor rotates at 10 12 rpm or as per rotor manufacturer s directions Checking minimum speed Set the Low Speed DIP switch to ON Check that the rotor starts The minimum speed is preset Checking the blow clean function Switch off the voltage Make sure the blow clean DIP switch is set to ON and the input signal is disconnected After switching on the voltage the ro...

Page 13: ... HAR UL CSA 7G0 75 Shielded Input signal LiYCY 2x0 34 0 5 UL recognized Shielded EMC glands must be used for shielded cables The above cables or equivalent must be used to comply with the EMC Directive NOTE When connecting the shielding to the EMC gland it is important to connect as shown above 11 ...

Page 14: ...OWN NOTES 12 ...

Page 15: ...OWN NOTES 13 ...

Page 16: ...IBC control AB Brännerigatan 5 A SE 263 37 Höganäs Sweden Tel 46 0 42 33 00 10 Fax 46 0 42 33 03 75 www ibccontrol se info ibccontrol se IBCcontrol F21100903GB VERSION 1 2017 01 05 ...

Reviews: