background image

iB-WR7011A 

150M 1-Port Wi-Fi ADSL2+ Router User Guide 


23 


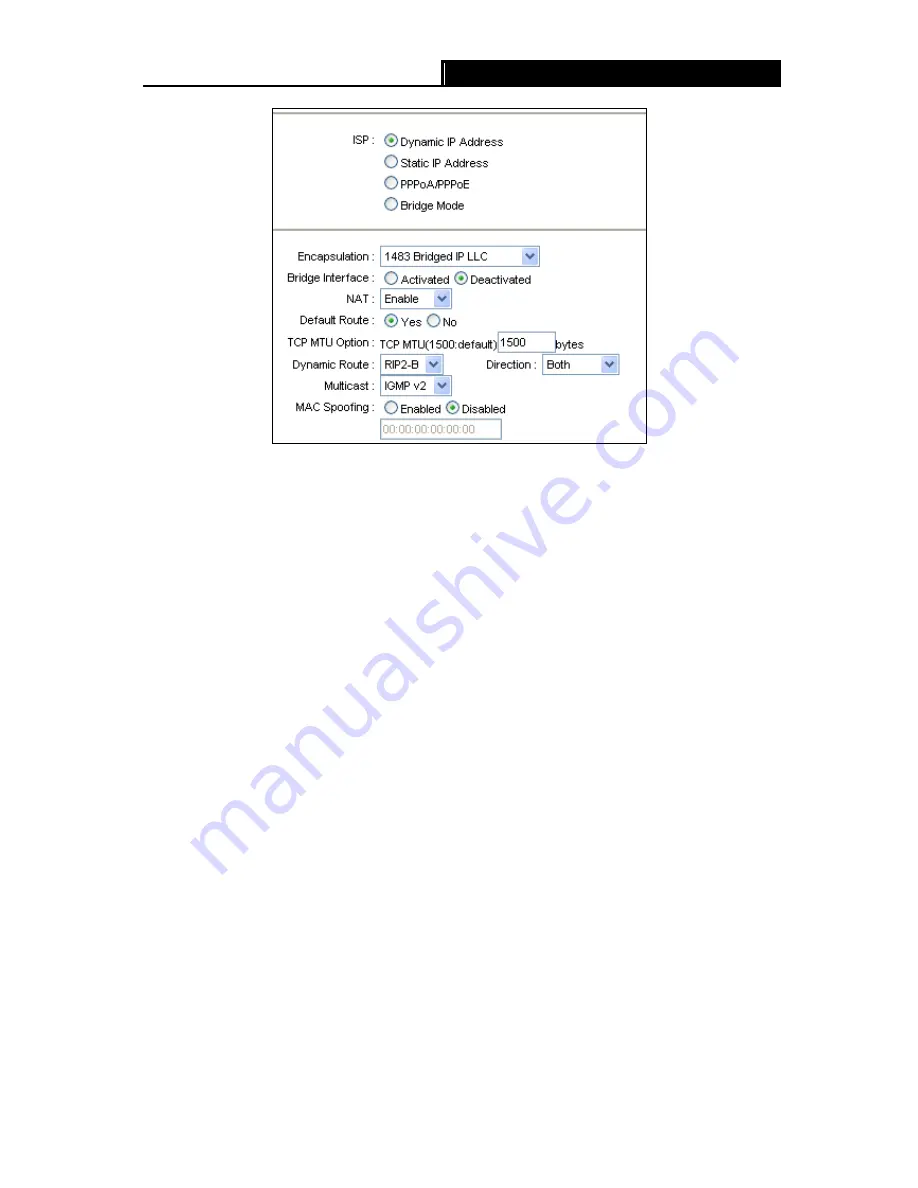
Figure 4-7 


Encapsulation: 

Select the encapsulation mode for the Dynamic IP Address, you can leave it 

default. 


NAT:

 Select this option to Enable/Disable the NAT (Network Address Translation) function for 

this VC. The NAT function can be activated or deactivated per PVC basis. 


Default  Route:

  If  enable  this  function,  the  current  PVC  will  be  considered  as  the  default 

gateway to internet from this device. 


TCP MTU Option:

 Enter the TCP MTU as your desire. 


Dynamic Route:

 Select this option to specify the RIP (Routing Information protocol) version 

for WAN interface, including 

RIP1

RIP2-B

 and 

RIP2-M

. RIP2-B and RIP2-M are both sent in 

RIP2  format,  the  difference  is  that  RIP2-M  using  Multicast,  while  RIP2-B  using  Broadcast 

format.   


Direction: 

Select this option to specify the RIP direction. 

None

 is for disabling the RIP 

function. 

Both

  means  the  ADSL  Router  will  periodically  send  routing  information  and 

accept routing information, and then incorporate them into routing table. 

IN only 

means 

the ADLS router will only accept but will not send RIP packet. 

OUT only

 means the ADLS 

router will only send but will not accept RIP packet. 


Multicast: 

Select  IGMP  version,  or  disable  the  function.  IGMP  (Internet  Group  Multicast 

Protocol) is a session-layer protocol used to establish membership in a multicast group. The 

ADSL ATU-R supports both IGMP version 1 (

IGMP v1

) and 

IGMP v2

. Select “Disabled” to 

disable it. 


Summary of Contents for iB-WR7011A

Page 1: ...150M 1 Port Wi Fi ADSL2 Router Model No iB WR7011A User Guide Ver 1 0 0...

Page 2: ...orrect the interference by one or more of the following measures Reorient or relocate the receiving antenna Increase the separation between the equipment and receiver Connect the equipment into an out...

Page 3: ...ment 5 2 4 Connecting the Router 6 Chapter 3 Quick Installation Guide 8 3 1 Configure PC 8 3 2 Login 11 Chapter 4 Software Configuration 15 4 1 Status 15 4 1 1 Device Info 15 4 1 2 System Log 17 4 1 3...

Page 4: ...4 5 3 SNMP 59 4 5 4 UPnP 59 4 5 5 DDNS 60 4 5 6 CWMP 61 4 6 Maintenance 62 4 6 1 Administration 62 4 6 2 Time Zone 62 4 6 3 Firmware 64 4 6 4 SysRestart 66 4 6 5 Diagnostics 67 4 7 Help 68 Appendix A...

Page 5: ...in your package 150M 1 Port Wi Fi ADSL2 Router Power Adapter Quick Installation Guide RJ45 cable RJ11 cables ADSL splitter One Resource CD which includes this User Guide Note Make sure that the packa...

Page 6: ...address The advanced security enhancements IP MAC Application and URL Filtering can help to secure your network Quick Start of the Web based Utility is supplied and friendly help messages are provided...

Page 7: ...WPS Wi Fi Button allows users to turn off the wireless function as not in use and for Wi Fi protected Setup establishing WPA2 encryption security Supports Multiple PVC Permanent Virtual Circuit Tripl...

Page 8: ...p Off LINE port is linked down ACT On Red Colour Port Init Flash Green Colour Data is being transferred over the Internet Off There is no data transmission over the internet LAN Ethernet On There is a...

Page 9: ...ault settings Method two Restore the default setting from Maintenance SysRestart of the Router s Web based Utility Ethernet Through the port you can connect the Router to your PC or the other Ethernet...

Page 10: ...he Internet and make calls at the same time The external splitter has three ports LINE Connect to the wall jack PHONE Connect to the phone sets MODEM Connect to the ADSL LINE port of iB WR7011A Plug o...

Page 11: ...iB WR7011A 150M 1 Port Wi Fi ADSL2 Router User Guide 7 Figure 2 3...

Page 12: ...or connect your adapter to a Hub Switch which has connected to the Router you need to configure your PC s IP address Follow the steps below to configure it Step 1 Click the Start menu on your desktop...

Page 13: ...iB WR7011A 150M 1 Port Wi Fi ADSL2 Router User Guide 9 Figure 3 2 Step 3 Select General tab highlight Internet Protocol TCP IP and then click the Properties button Figure 3 3...

Page 14: ...and Obtain DNS server address automatically in the screen above Now you can run the Ping command in the command prompt to verify the network connection Please click the Start menu on your desktop sel...

Page 15: ...2 Is the TCP IP configuration for your PC correct If the Router s IP address is 192 168 1 1 your PC s IP address must be within the range of 192 168 1 2 192 168 1 254 3 2 Login Once your host PC is pr...

Page 16: ...then click RUN WIZARD and you will see the next screen Click the NEXT button Figure 3 8 Step 2 Configure the time for the Router and then click the NEXT button Figure 3 9 Step 3 Select the connection...

Page 17: ...Router User Guide 13 Figure 3 10 Step 4 Configure the following options provided by your ISP Username Password VPI VCI and Connection Type Then click NEXT Figure 3 11 Step 5 Configure the rules for t...

Page 18: ...s Point is activated the wireless function will be available even without the external antenna because of an additional printed antenna To adopt the wireless security protection measures please refer...

Page 19: ...ll be available after you click one of the main menus On the center of the Web based Utility there are the detailed configurations or status information To apply any settings you have altered on the p...

Page 20: ...150M 1 Port Wi Fi ADSL2 Router User Guide 16 Figure 4 2 Note Click the other submenus System Log or Statistics in Figure 4 2 and you will be able to view the system log and traffic statistics about t...

Page 21: ...gs of the Router Figure 4 3 The Router can keep logs of all traffic You can query the logs to find what happened to the Router Click the CLEAR LOG button to clear the logs Click the SAVE LOG button to...

Page 22: ...es The total bytes transmitted over the Ethernet port Transmit Collision The collision occurred over the Ethernet port when data is being transmitted Transmit Error Frames The error frames over the Et...

Page 23: ...ived Select WLAN and you will see the statistics table as below Statistics Table Transmit Statistics Tx Frames Count The frames transmitted over the WLAN when wireless data is being transmitted Tx Err...

Page 24: ...Network Setup Choose Network Setup you can see the next submenus WAN LAN and Wireless Figure 4 5 Click any of them and you will be able to configure the corresponding function 4 3 1 WAN Choose Network...

Page 25: ...iB WR7011A 150M 1 Port Wi Fi ADSL2 Router User Guide 21 Figure 4 6...

Page 26: ...32 to 65535 1 to 31 is reserved for well known protocols Please input the value provided by your ISP PVCs Summary Click the button and you can view the summary information about the PVCs QoS Select th...

Page 27: ...RIP1 RIP2 B and RIP2 M RIP2 B and RIP2 M are both sent in RIP2 format the difference is that RIP2 M using Multicast while RIP2 B using Broadcast format Direction Select this option to specify the RIP...

Page 28: ...must be in the appropriate IP form which is four IP octets separated by a dot x x x x such as 192 168 1 100 The Router will not accept the IP address if it is not in this format 3 PPPoA PPPoE Select t...

Page 29: ...A connection you need to specify the type of Multiplexing either LLC or VC Mux Bridge Interface Activate the option and the Router can also work in Bridge mode Connection For PPPoE PPPoA connection yo...

Page 30: ...ng and enter a MAC address to configure the WAN port It makes your inside network appear as a device with this MAC address to the outside world 4 Bridge Mode If you select this type of connection the...

Page 31: ...Subnet Mask the default value is 255 255 255 0 Dynamic Route Select this option to specify the RIP Routing Information protocol version for LAN interface including RIP1 RIP2 B and RIP2 M RIP2 B and RI...

Page 32: ...device must be set as a DHCP client to obtain the IP address automatically By default the DHCP Server is enabled The DHCP address pool contains the range of the IP address that will automatically be a...

Page 33: ...Server Only is selected in DNS Relay it is necessary for you to enter the primary and optional secondary DNS server IP addresses After type in the address click SAVE button to save it and invoke it DH...

Page 34: ...Wi Fi ADSL2 Router User Guide 30 4 3 3 Wireless Choose Network Setup Wireless menu and you will see the Wireless screen shown in Figure 4 14 Please configure the parameters for wireless according to...

Page 35: ...receiving an RTS the wireless station responds with a Clear to Send CTS frame to acknowledge the right to begin transmission In most cases keep its default value of 2347 Fragmentation Threshold This...

Page 36: ...default setting If you don t want to broadcast the Router s SSID select No Use WPS Use WPS Wi Fi Protected Setup function you can add a new wireless device to an existing network quickly To Use WPS k...

Page 37: ...n the IEEE 802 11g standard Figure 4 16 2 WEP 128Bits To configure WPA 64Bits settings select the WPA 64Bits option from the drop down list The menu will change to offer the appropriate settings 128 b...

Page 38: ...s It must have 8 63 ASCII characters or 64 Hexadecimal digits 4 WPA2 PSK3 To configure WPA2 PSK settings select the WPA2 PSK option from the drop down list The menu will change to offer the appropriat...

Page 39: ...and Router using either Push Button Configuration PBC method or PIN method please select the one you want WPS progress Show the current WPS progress 1 PBC If the wireless adapter supports Wi Fi Protec...

Page 40: ...you can add it to the network by PIN with the following two methods Click PIN code you will see the screen as shown below Figure 4 22 Method One Enter the PIN into my Router Step 1 For the configurat...

Page 41: ...Figure 4 23 Method Two Enter the PIN from my Router Step 1 Get the Current PIN code of the Router from AP self PIN code in Figure 4 23 each Router has its unique PIN code Here takes the PIN code 11930...

Page 42: ...a wireless network The SSID must be identical for all devices in the wireless network It is case sensitive and must not exceed 32 characters use any of the characters on the keyboard Make sure this se...

Page 43: ...tive If you wish to filter users by MAC Address select Activated and Deactived for don t Action To filter wireless users by MAC Address select Allow Association or Deny Association the follow Wireless...

Page 44: ...ponding function 4 4 1 Firewall Choose Advanced Setup Firewall menu and you will see the next screen shown in Figure 4 25 Figure 4 25 Firewall Select this option can automatically detect and block Den...

Page 45: ...same segment as your Router over Internet WAN the gateway must be the IP address of one of the remote nodes Metric Metric represents the cost of transmission for routing purposes IP Routing uses hop...

Page 46: ...to explain Note For VCs with single IP they share the same DMZ and Virtual servers for VCs with multiple IPs each VC can set DMZ and Virtual servers Furthermore for VCs with multiple IPs they can defi...

Page 47: ...ocol used for this application Start End port number Enter the specific Start and End Port number you want to forward If it is one port only you can enter the End port number the same as Start port nu...

Page 48: ...in the next screen The IP Address Mapping is for those VCs that configured with multiple IPs The IP Address Mapping rule is per VC based only for Multiple IPs VCs Figure 4 31 Rule Index Select the Vi...

Page 49: ...entries as shown in Figure 4 31 Select the index of assigned entry and click the DELETE button to delete the entry Click the BACK button to return to the previous screen Click the CANCEL button to can...

Page 50: ...QoS If the traffic complies with the rule then the Router will take the corresponding action to deal with it Rule Index Select the index for the rule you want to configure Active Activate the rule The...

Page 51: ...vice that the Router takes to deal with the traffic 802 1p Select the priority range for the rule When you select DSCP you can assign the priority via DHCP the header of IP group It maps the IP group...

Page 52: ...s configured with an access list specifying membership in a set of VLANs ATM VLAN Using LAN Emulation LANE protocol to map Ethernet packets into ATM cells and deliver them to their destination by conv...

Page 53: ...mum VLAN ID This indicates the VLAN group ATM VCs Select the ATM VCs as members of VLAN and if you leave the Tagged blank the tag in frames will be deleted when transmitted from the VC Ethernet Select...

Page 54: ...connection problem Please check the proper settings with your Internet service provider Figure 4 36 ADSL Mode Select the ADSL operation mode which your ADSL connection uses ADSL Type Select the ADSL...

Page 55: ...addresses which are permitted to access to the Router remotely With the default IP 0 0 0 0 any client would be allowed to remotely access the ADSL Router Application Select the application for the AC...

Page 56: ...low Figure 4 39 Filter Type Selection Select the filter type for the configuration below IP MAC Filter Set Index Select the Set index for the IP Filter entry This index can match with six IP MAC Filte...

Page 57: ...dress for the rule You can enter 0 0 0 0 it means that all IP addresses are controlled by the rule The set of Subnet Mask and Port Number are same as Source IP Address Subnet Mask Enter the Subnet Mas...

Page 58: ...e Direction Both for the first rule Note If you want to make the rule take effect please select Yes to active the rule Step 3 Enter the Source IP Address Destination IP Address Subnet Mask and Port Nu...

Page 59: ...gure 4 39 Select the IP MAC Filter Set Index and IP MAC Filter Rule Index to view or modify the entry Select the IP MAC Filter Set Index and IP MAC Filter Rule Index to locate the specific rule and th...

Page 60: ...5F to access the Internet you can configure as follows Presume the rules are both aimed at the interface PVC0 and their indexes are 1 1 and 1 2 Step 1 Select the IP MAC Filter as the Filter Type Sele...

Page 61: ...t the IP MAC Filter Set Index and IP MAC Filter Rule Index to locate the specific rule and then click the DELETE button to delete the entry 4 5 2 3 Application Filter Select Application Filter as the...

Page 62: ...make the rule to take effect URL Index Select the index for the URL Filter entry URL Enter the URL for this URL Filter URL Filter Listing This displays the information about the URL Filter rules Loca...

Page 63: ...SNMP screen The Simple Network Management Protocol SNMP is used for exchanging information between network devices Figure 4 43 Get Community Set the password for the incoming Get and Get next requests...

Page 64: ...nd service descriptions 4 5 5 DDNS Choose Access Management DDNS you can configure the DDNS function in the screen shown in Figure 4 45 The router offers a Dynamic Domain Name System DDNS feature The...

Page 65: ...noses the devices and configures the devices automatically via ACS Auto Configuration Server Figure 4 46 CWMP Select activate the CWMP function URL Enter the website of ACS which is provided by your I...

Page 66: ...dmin has read write access privilege 2 When you change the password you should enter the new password twice and then click SAVE to make the new password take effect 4 6 2 Time Zone Choose Maintenance...

Page 67: ...ter built in some NTP Servers when the Router connects to the Internet the Router will get the system time automatically from the NTP Server You can also configure the NTP Server address manually and...

Page 68: ...current time Figure 4 51 4 6 3 Firmware Choose Maintenance Firmware you can upgrade the firmware of the Router in the screen shown in Figure 4 52 Make sure the firmware or romfile you want to use is o...

Page 69: ...s firmware you may lose its current configurations so please back up the router s current settings before you upgrade its firmware 2 Do not turn off the router or press the Reset button while the fir...

Page 70: ...to locate the update file for the device or enter the exact path in New Romfile Location field Step 2 Click the UPGRADE button to complete 4 6 4 SysRestart Choose Maintenance SysRestart you can selec...

Page 71: ...Router User Guide 67 4 6 5 Diagnostics Choose Maintenance Diagnostics you can view the test results for the connectivity of the physical layer and protocol layer for both LAN and WAN sides in the scre...

Page 72: ...Port Wi Fi ADSL2 Router User Guide 68 4 7 Help Choose Help you can view the help information for configuration of any function Figure 4 57 Note Click the tab and you will be able to get the correspon...

Page 73: ...TX UTP category 5 Max line length 6 5Km Data Rates Downstream Up to 24Mbps Upstream Up to 3 5Mbps With Annex M enabled WiFi WPS WPS and WiFi ON OFF button Reset button Factory default Safety Emission...

Page 74: ...90dBm 8 PER Physical and Environment Working Temperature 0 40 Working Humidity 10 90 RH non condensing Storage Temperature 40 70 Storage Humidity 5 90 RH non condensing Appendix C Contact Information...

Reviews: