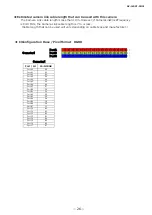
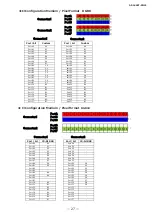
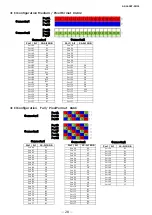
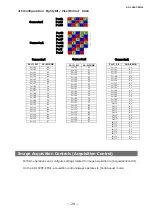
background image

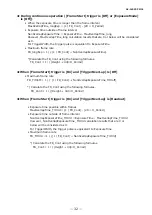
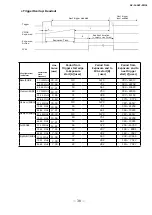
■ During continuous operation ([Frame Start] trigger is [Off] or [ExposureMode]

is [Off])

• When the exposure time is longer than the frame interval

MaxOverlapTime_longExp = (1 / FR_Cont) - (20 × H_Period)

• Exposure time outside of frame interval

NonOverlapExposureTime = ExposureTime - MaxOverlapTime_long

However, MaxOverlapTime_long calculation results that are 0 or below will be considered

as 0.

For TriggerWidth, the trigger pulse is equivalent to ExposureTime.

• Maximum frame rate

FR_longExp = 1 / {(1 / FR_Cont) + NonOverlapExposureTime}

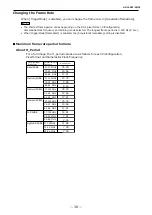
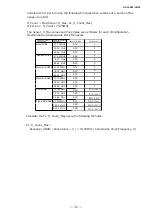
*)Calculate the FR_Cont using the following formulas.

   FR_Cont = 1 / ((Height + 44)×H_Period)


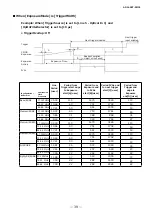
 When [Frame Start] trigger is [On] and [TriggerOverLap] is [Off]

• Maximum frame rate

FR_TrOloff = 1 / { (1 / FR_Cont) + NonOverlapExposureTime_TrOloff}

*) Calculate the FR_Cont using the following formulas.

    FR_Cont = 1 / ((Height + 44)×H_Period) 


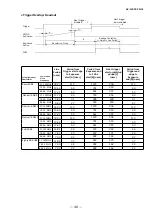
 When [Frame Start] trigger is [On] and [TriggerOverLap] is [Readout]

AP-

16

00T-

PMCL

• Exposure time possible within frames

MaxOverlapTime_TrOlrd = (1 / FR_Cont) - (20 × H_Period)

• Exposure time outside of frame interval

NonOverlapExposureTime_TrOlrd = ExposureTime -  MaxOverlapTime_TrOlrd

However, NonOverlapExposureTime_TrOlrd calculation results that are 0 or

below will be considered as 0.

For TriggerWidth, the trigger pulse is equivalent to ExposureTime.

• Maximum frame rate

FR_TrOlrd = 1 / {(1 / FR_Cont) + NonOverlapExposureTime_TrOlrd}

*) Calculate the FR_Cont using the following formulas.

 FR_Cont = 1 / ((Height + 44)×H_Period)

— 

32

 —

Summary of Contents for AP-1600T-PMCL

Page 1: ...hank you for purchasing this product Be sure to read this manual before use This manual includes important safety precautions and instructions on how to operate the unit Be sure to read this manual to ensure proper operation The contents of this manual are subject to change without notice for the purpose of improvement 2018 JAI ...

Page 2: ... On and TriggerOverLap is Readout 32 ExposureMode 33 Actual Exposure Times 33 Trigger Control 33 Shortest Repetition Period for Triggers 34 Gain Control 41 Adjusting the Master Gain and Performing Fine Adjustment with R and B Master Mode 41 Adjusting the Gain Individually for RGB Individual Mode 42 Automatic Gain Level Control 42 Lookup Table LUT 43 To use the LUT function 43 LUT values 43 Gamma F...

Page 3: ...t has been tested and found to comply with the limits for a Class B digital device pursuant to Part 15 of the FCC Rules These limits are designed to provide reasonable protection against harmful interference in a residential installation This equipment generates uses and can radiate radio frequency energy and if not installed and used in accordance with the instructions may cause harmful interfere...

Page 4: ...d Hazardous Substances in this camera mark shows that the environment friendly use period of contained Hazardous Substances is 15 years 嶷勣廣吭並 嗤蕎 嗤墾麗嵎賜圷殆兆各式根楚燕 功象嶄鯖繁酎慌才忽佚連恢匍何〆窮徨佚連恢瞳麟半陣崙砿尖一隈〇 云恢瞳ゞ 嗤蕎 嗤 墾麗嵎賜圷殆兆各式根楚燕 泌和 桟隠聞喘豚 窮徨佚連恢瞳嶄根嗤議嗤蕎嗤墾麗嵎賜圷殆壓屎械聞喘議訳周和音氏窟伏翌 亶賜融延 窮徨佚連恢瞳喘薩聞喘乎窮徨佚連恢瞳音氏斤桟廠夛撹冢嶷麟半 賜斤児繁附 夏恢夛撹冢嶷鱒墾議豚 方忖仝15々葎豚 15定 部件名称 有毒有害物质或元素 铅 Pb 汞 Hg 镉 Cd 六价铬 Cr VI 多溴联苯 PPB 多溴二苯醚 PBDE 棱镜 光学滤镜 连接插头 电路板 AP ...

Page 5: ...our hands or cloth blow with your mouth or use other methods to remove dust Phenomena specific to CMOS image sensors The following phenomena are known to occur on cameras equipped with CMOS image sensors These do not indicate malfunctions Aliasing When shooting straight lines stripes and similar patterns vertical aliasing zigzag distortion may appear on the monitor Blooming When strong light enter...

Page 6: ...gamma correction circuits The ROI and binning functions allow for even faster readout speeds The gain and exposure time can be configured individually for each CMOS sensor A color space conversion function is also supported Features overview Compliance with CameraLink and GenICam standards 1 2 9 inch 3CMOS progressive RGB color camera Lens mount C mount flange back 17 526 mm Effective pixels 1456 ...

Page 7: ...t X_OUT2 5 18 Out X_Clk CL Clock 6 19 Out X_OUT3 Data out 7 20 In SerTC RxD LVDS Serial Control 8 21 Out SerTFG TxD 9 22 In CC1 Trigger JAI standard trigger 10 23 In CC2 Reserved 11 24 N C 12 25 N C 13 14 Shield Power Return Mount a C mount lens microscope adapter etc here Before mounting a lens be sure to refer to Step 2 Connecting Devices and confirm the precautions for attaching a lens and the ...

Page 8: ...24 Out Z_Clk CL Clock 12 25 Out Z_OUT3 Data out 13 14 Shield Power Return AP 1600T PMCL 8 3 Power trigger LED Indicates the power and trigger input status LED status and camera status LED Light Status Power trigger LED Lit amber Camera initializing Lit green Operational and no triggers being input Blinking green Operational and triggers being input The blinking interval is not related to the actua...

Page 9: ...ne 5 6 In Opto IN 1 7 Out Opto OUT 1 Line 2 8 Out Opto OUT 1 9 Out TTL OUT 1 Line 1 10 11 Power IN DC IN DC 12 V to 24 V 10 12 GND Note When DC power is supplied to either Pin 1 Pin 2 or Pin 11 Pin 12 the camera operates Recommended external input circuit diagram reference example TLP2366 1 3 6 5 4 1SS400 180CS BF545C S D G IN USER POWER1 3 3V to 24V CAMERA side User side 3 3V Pin5 Opto In 1 2 Pin...

Page 10: ...iagram reference example Standard circuit diagram example Pin8 Opto OUT1 Pin7 Opto OUT1 User Side JAI Camera Side Characteristics of the recommended circuits for Opto OUT OUTPUT LINE RESPONSE TIME Output Line Voltage Camera Output Signal RT TDR TDF FT 90 10 Output LEVEL User Vcc 0 8 to 1 1 User power VCC 3 3 V to 24 V Time Delay Rise TDR us 0 5 to 0 7 Tisc Time RT us 1 2 to 3 0 Time Delay Fall TDF...

Page 11: ...ly When using the camera for the first time install the software for configuring and controlling the camera JAI SDK on the computer When you install JAI SDK JAI Camera Control Tool will also be installed 1 Download the JAI Getting Started Guide and JAI SDK from the JAI website URL http www jai com en support download jai software 2 Refer to the JAI Getting Started Guide and install JAI SDK on the ...

Page 12: ...gger or 7 AC adapter not supplied 1 Lens C mount lenses with lens mount protrusions of 4 mm or less can be attached 4 mm or less Lens mount protrusion Lens Use a lens designed for three sensor cameras Using a lens for single sensor cameras may hinder full performance of the camera The diagonal of the camera s CMOS image sensor is 6 27 mm the size of standard 1 2 9 inch lenses To prevent vignetting...

Page 13: ...edition DDR3 8 GB or higher Graphics card PCI Express 3 0 or higher Network card We recommend using a network card that uses an Intel chip 6 DC IN trigger IN connection cable 7 AC adapter power supply if necessary Connect the AC adapter and the round connector of the connection cable to the DC IN trigger IN connector on the camera 3 Camera Link cable Connect the Camera Link cable to the Mini Camer...

Page 14: ...rify whether power is being supplied to the camera by checking the rear LED Lights green When properly turned on For details on how to read the LEDs see LED status and camera status in the Parts Identification section Step 4 Verifying the Connection between the Camera and PC Verify whether the camera is properly recognized via Control Tool Connecting the Camera to Control Tool 1 Start JAI Control ...

Page 15: ...ing settings Confirmation of frame grabber board In order to support GenCP it is necessary to set the COM port on the frame grabber board For details please refer to the instruction manual of each board maker Confirmation of JAI SDK Start JAI Control Tool and click Settings in the upper right AP 1600T PMCL 15 AP 1600T PMCL AP 1600T PMCL AP 1600T PMCL ...

Page 16: ... The items of JAI_GenCP_Camera_Link and Camera Link Transport Layer are set to the following settings Confirm that it is AP 1600T PMCL 16 ...

Page 17: ...to configure 3 Check that the settings of the selected camera are displayed Check that the settings information of the selected camera appears in the right area If a camera is not detected right click within the window and select Search for Cameras ...

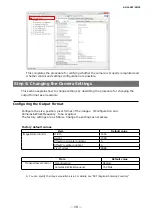
Page 18: ...t value ImageFormatControl Width 1456 Height 1088 OffsetX horizontal position 0 OffsetY vertical position 0 Pixel Format RGB8 You can specify the image acquisition area For details see ROI Regional Scanning Function Item Default value TransportLayerControl ClConfigurtion Medium CameraLinkClockFrequency 74 3MHz Configure the size position pixel format of the images ClConfiguration and CameraLinkClo...

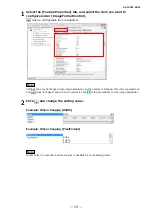
Page 19: ... when image acquisition on the camera is stopped If an item is grayed out and does not appear even when you select it click Stop Acquisition to stop image acquisition 2 Click and change the setting value Example When changing Width Example When changing PixelFormat Note Direct entry of numerical and text values is possible for some setting items AP 1600T PMCL AP 1600T PMCL RGB8 RGB10 RGB12 ...

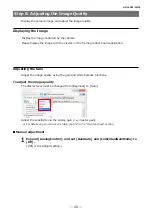
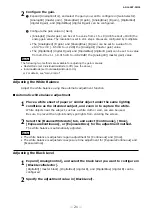
Page 20: ...ard application Adjusting the Gain Adjust the image quality using the gain and white balance functions To adjust the image quality The display level must be changed from Beginner to Guru Adjust the sensitivity via the analog gain i e master gain For details on gain control see Gain Control in the Main Functions section Manual adjustment 1 Expand AnalogControl and set GainAuto and IndividualGainMod...

Page 21: ...dualMode set IndividualGainMode to On For details see Gain Control Adjusting the White Balance Adjust the white balance using the automatic adjustment function Automatic white balance adjustment 1 Place a white sheet of paper or similar object under the same lighting conditions as the intended subject and zoom in to capture the white White objects near the subject such as a white cloth or wall can...

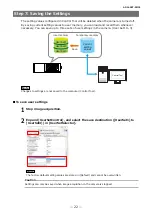
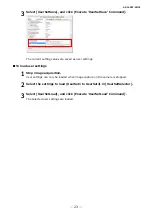
Page 22: ...User Set1 to 3 User memory Temporary memory Current setting values Control Tool Save User Set1 User Set2 User Set3 Note Changes to settings are not saved to the computer Control Tool To save user settings 1 Stop image acquisition 2 Expand UserSetControl and select the save destination UserSet1 to UserSet3 in UserSetSelector Note The factory default setting values are stored in Default and cannot b...

Page 23: ...ved as user settings To load user settings 1 Stop image acquisition User settings can only be loaded when image capture on the camera is stopped 2 Select the settings to load UserSet1 to UserSet3 in UserSetSelector 3 Select UserSetLoad and click Execute UserSetLoad Command The selected user settings are loaded ...

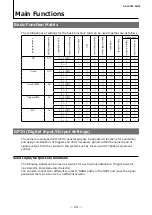
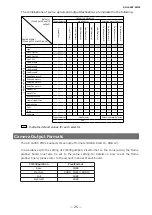
Page 24: ...n 1 1 Off 1 2 2 1 2 2 RCT On 1 1 Off 1 2 2 1 2 2 GPIO Digital Input Output Settings The camera is equipped with GPIO general purpose input output functions for generating and using combinations of triggers and other necessary signals within the camera and of signals output from the camera to the system such as those used for lighting equipment control Valid Input Output Combinations The following ...

Page 25: ...PulseGenerator2 PulseGenerator3 Nand0Out Nand1Out ExposureActive FrameTriggerWait FrameActive FVAL LVAL x x Software TriggerSelector LineSelector PulseGeneratorSelector Line7 CC1 Selector Cross point switch output Source signal Cross point switch input Output destination Signals to use as output Use ClConfiguration PixelFormat Base RGB8 Medium RGB8 RGB10 RGB12 Full RGB8 EightyBit RGB8 The AP 1600T...

Page 26: ... R6 Port A7 R7 Port B0 G0 Port B1 G1 Port B2 G2 Port B3 G3 Port B4 G4 Port B5 G5 Port B6 G6 Port B7 G7 Port C0 B0 Port C1 B1 Port C2 B2 Port C3 B3 Port C4 B4 Port C5 B5 Port C6 B6 Port C7 B7 Connetor1 Estimated camera link cable length that can be used with this camera The Camera Link cable length is less than 10 m However if CameraLinkClockFrequency is 84 9 MHz the Camera Link cable length is 7 m...

Page 27: ...F3 B3 Port C4 B4 Port F4 B4 Port C5 B5 Port F5 B5 Port C6 B6 Port F6 B6 Port C7 B7 Port F7 B7 ClConfiguration Medium PixelFormat RGB10 16 13 14 15 16 13 14 15 16 12 13 14 15 7 8 9 10 11 12 7 8 9 10 11 12 7 8 9 10 11 Connector1 Connector2 1 1 PortA PortB PortC PortD 4 3 5 1 2 PortF PortE 6 6 4 4 5 5 2 2 3 3 6 Port bit 30 bit RGB Port bit 30 bit RGB Port A0 R0 Port D0 Port A1 R1 Port D1 Port A2 R2 P...

Page 28: ...11 14 PortB 1 4 6 9 12 14 PortC 1 4 7 9 12 15 PortD 2 4 7 10 12 15 PortE 2 5 7 10 13 15 PortF 2 5 8 10 13 16 PortG 3 5 8 11 13 16 PortH 3 6 8 11 14 16 Connector2 Connector1 Port bit 24 bit RGB Port bit 24 bit RGB Port A0 R0 Port D0 R0 Port A1 R1 Port D1 R1 Port A2 R2 Port D2 R2 Port A3 R3 Port D3 R3 Port A4 R4 Port D4 R4 Port A5 R5 Port D5 R5 Port A6 R6 Port D6 R6 Port A7 R7 Port D7 R7 Port B0 G0 ...

Page 29: ... 24 bit RGB Port bit 24 bit RGB Port A0 R0 Port D0 R0 Port A1 R1 Port D1 R1 Port A2 R2 Port D2 R2 Port A3 R3 Port D3 R3 Port A4 R4 Port D4 R4 Port A5 R5 Port D5 R5 Port A6 R6 Port D6 R6 Port A7 R7 Port D7 R7 Port B0 G0 Port E0 G0 Port B1 G1 Port E1 G1 Port B2 G2 Port E2 G2 Port B3 G3 Port E3 G3 Port B4 G4 Port E4 G4 Port B5 G5 Port E5 G5 Port B6 G6 Port E6 G6 Port B7 G7 Port E7 G7 Port C0 B0 Port ...

Page 30: ... Maximum frame rate period formula About H_Period For a full image the H_period values are as follows for each ClConfiguration PixelFormat and CameraLink Clock Frequency Base RGB8 39 33 19 66 17 21 Medium RGB8 19 72 9 86 8 63 Medium RGB10 39 33 19 66 17 21 Medium RGB12 39 33 19 66 17 21 Full RGB8 14 81 7 41 7 00 EightyBit RGB8 11 88 7 00 7 00 37 125MHz 74 25 MHz 84 86 MHz 37 125MHz 74 25 MHz 84 86...

Page 31: ...612 612 612 Medium RGB12 612 612 612 Full RGB8 612 520 520 EightyBit RGB8 612 520 520 37 125MHz 74 25 MHz 84 86 MHz 37 125MHz 74 25 MHz 84 86 MHz 37 125MHz 74 25 MHz 84 86 MHz 37 125MHz 74 25 MHz 84 86 MHz 37 125MHz 74 25 MHz 84 86 MHz 37 125MHz 74 25 MHz 84 86 MHz ClConfiguration PixelFormat CameraLink Clock Frequency Sensor_H_Max Calculate the CL_H_Count_Max using the following formulas CL_H_Cou...

Page 32: ...Frame Start trigger is On and TriggerOverLap is Off Maximum frame rate FR_TrOloff 1 1 FR_Cont NonOverlapExposureTime_TrOloff Calculate the FR_Cont using the following formulas FR_Cont 1 Height 44 H_Period When Frame Start trigger is On and TriggerOverLap is Readout AP 1600T PMCL Exposure time possible within frames MaxOverlapTime_TrOlrd 1 FR_Cont 20 H_Period Exposure time outside of frame interval...

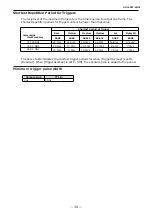
Page 33: ...osure times that can be configured are as follows ExposureMode Shortest exposure time Timed 15 26 μs 8 bit TriggerWidth 15 26 μs 8 bit Trigger Control The camera allows the following controls to be performed via external trigger signals TriggerSelector Description FrameStart Start exposure in response to the external trigger signal input Select this to perform exposure control using external trigg...

Page 34: ...indicates the shortest trigger periods for when TriggerOverLap is set to Readout When TriggerOverLap is set to Off the exposure time is added to the period CameraLink ClockFrequency RGB8 RGB8 37 125MHz 74 25 MHz 84 86 MHz Base Medium RGB10 Medium RGB12 RGB8 Medium Ful RGB8 EightyBit Minimum trigger pulse width Camera Link TTL In 3 μs 50 ns 19 5ms 9 8ms 19 5ms 8 4ms 19 5ms 7 9ms 7 9ms 7 9ms 44 5ms ...

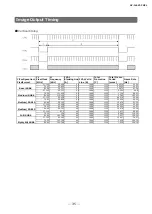
Page 35: ...16 89 61 84 86 115 925 44 1088 1132 9 765 102 33 37 125 25 428 44 1088 1132 44 518 22 46 74 25 50 856 44 1088 1132 22 259 44 93 84 86 58 121 44 1088 1132 19 476 51 34 37 125 25 428 44 1088 1132 44 518 22 46 74 25 50 856 44 1088 1132 22 259 44 93 84 86 58 121 44 1088 1132 19 476 51 34 37 125 67 5 44 1088 1132 16 77 59 63 74 25 135 44 1088 1132 8 385 119 26 84 86 142 788 44 1088 1132 7 927 126 14 37...

Page 36: ...9 72 50 717 74 25 4 728 732 9 86 101 434 84 86 4 728 732 8 63 115 925 37 125 4 1456 1460 39 33 25 428 74 25 4 1456 1460 19 66 50 856 84 86 4 1456 1460 17 21 58 121 37 125 4 1456 1460 39 33 25 428 74 25 4 1456 1460 19 66 50 856 84 86 4 1456 1460 17 21 58 121 37 125 4 546 550 14 81 67 5 74 25 4 546 550 7 41 135 84 86 49 546 595 7 142 788 37 125 4 437 441 11 8 84 184 74 25 83 437 520 7 142 788 84 86 ...

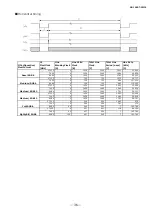
Page 37: ...86 31 388 868 8 63 27 343 764 Medium RGB10 39 33 119 1479 3426 19 66 60 751 1702 17 21 53 661 1493 Medium RGB12 39 33 119 1479 3426 19 66 60 751 1702 17 21 53 661 1493 Full RGB8 14 81 46 572 1343 7 41 23 297 660 7 00 22 282 1142 EightyBit RGB8 11 88 37 463 1094 7 00 22 282 1690 7 00 22 282 2426 CameraLink Clock Frequency 37 125MHz 74 25 MHz 84 86 MHz 37 125MHz 74 25 MHz 84 86 MHz 37 125MHz 74 25 M...

Page 38: ...7927 EightyBit RGB8 463 238 13446 282 140 7927 282 140 7927 CameraLink Clock Frequency 37 125MHz 74 25 MHz 84 86 MHz 37 125MHz 74 25 MHz 84 86 MHz 37 125MHz 74 25 MHz 84 86 MHz 37 125MHz 74 25 MHz 84 86 MHz 37 125MHz 74 25 MHz 84 86 MHz 37 125MHz 74 25 MHz 84 86 MHz Period from Trigger start edge to Exposure start A usec Period from Exposure end to FVAL start B usec Period from Exposure end to nex...

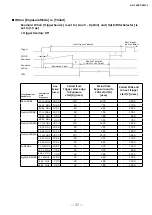
Page 39: ...c Period from Trigger end edge to Exposure end D usec Base RGB8 1479 3426 751 1702 661 1493 Medium RGB8 753 1761 388 868 343 764 Medium RGB10 1479 3426 751 1702 661 1493 Medium RGB12 1479 3426 751 1702 661 1493 Full RGB8 572 1343 297 660 282 1142 EightyBit RGB8 463 1094 282 1690 282 2426 CameraLink Clock Frequency 37 125MHz 74 25 MHz 84 86 MHz 37 125MHz 74 25 MHz 84 86 MHz 37 125MHz 74 25 MHz 84 8...

Page 40: ...se RGB8 1479 906 751 453 661 397 Medium RGB8 753 454 388 228 343 200 Medium RGB10 1479 906 751 453 661 397 Medium RGB12 1479 906 751 453 661 397 Full RGB8 572 342 297 171 282 162 EightyBit RGB8 463 275 282 162 282 162 CameraLink Clock Frequency 37 125MHz 74 25 MHz 84 86 MHz 37 125MHz 74 25 MHz 84 86 MHz 37 125MHz 74 25 MHz 84 86 MHz 37 125MHz 74 25 MHz 84 86 MHz 37 125MHz 74 25 MHz 84 86 MHz 37 12...

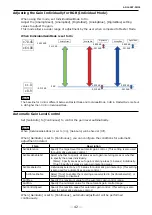
Page 41: ...o Off Adjust the AnalogAll master gain setting first and then adjust the AnalogRed DigitalRed AnalogBlue and DigitalBlue setting values to perform fine adjustment When IndividualGainMode is set to Off 0 dB 18 dB 6 5 dB 12 dB 0 915 dB 0 828 dB 6 5 dB 12 dB 0 828 dB 6 5 dB 12 dB 0 915 dB 0 828 dB 6 5 dB 12 dB 0 915 dB 0 828 dB 6 215 dB 30 828 dB AnalogAll AnalogRed DigitalRed AnalogBlue DigitalBlue ...

Page 42: ...t to Continuous you can configure the conditions for automatic adjustment in detail Item Description ALCReference Specify the target level for automatic gain control This setting is also used for automatic exposure control ALCAreaEnableAll Select whether to specify all areas as auto gain metering areas or whether to specify the areas individually False Specify areas as auto gain metering areas 16 ...

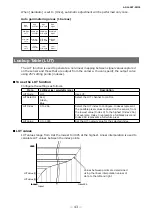
Page 43: ...n Configure the settings as follows Item Setting value selectable range Description LUTMode LUT Use LUT LUTSelector Red Green Blue Select the LUT channel to control LUTIndex 0 to 256 Select the LUT index to configure Indexes represent the possible pixel values captured on the sensor from the lowest value Index 0 to the highest Index 256 For example Index 0 represents a full black pixel and Index 2...

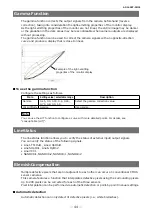
Page 44: ...0 55 0 6 0 65 0 75 0 8 0 9 1 0 Select the gamma correction value JAI LUTMode Gamma Use gamma Note You can use the LUT function to configure a curve with more detailed points For details see Lookup Table LUT LineStatus The line status function allows you to verify the status of external input output signals You can verify the status of the following signals Line1 TTLOut1 Line2 OptOut1 Line5 OptIn1 ...

Page 45: ...sary as 1 If 0 is specified the first line or first pixel will be interpolated Note BlemishCompensationDataClear specify sensor BlemishCompensationIndex you can return a specific pixel correction setting to the default value storage not required 3 Execute BlemishStore Blemish compensation data will be stored 4 Set BlemishEnable to True and execute interpolation If it is set to False Blemish compen...

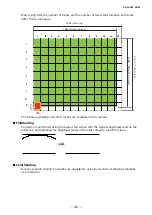
Page 46: ...n is performed using the area of the screen with the highest brightness level as the reference and adjusting the brightness levels of the other areas to match this level ColorShading R channel and B channel properties are adjusted to using the G channel shading properties as a reference 1536 Total size 1456 Effective pixels 1 2 2 4 3 5 1 2 3 4 5 6 7 128 1152 Total size 1088 Effective pixels 6 7 9 ...

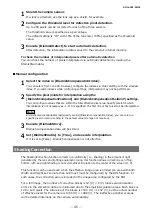
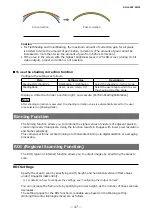
Page 47: ...ing correction is executed the shading correction value is automatically saved to the user area selected in ShadingMode Binning Function The binning function allows you to combine the signal values of clusters of adjacent pixels to create improved virtual pixels Using the function results in images with lower pixel resolution and higher sensitivity This camera performs vertical binning and horizon...

Page 48: ...16 pxels step BinningVertical Off 0 to 1086 2 lines step BinningHorizontal On 0 to 720 8 pxels step BinningVertical On 0 to 542 2 lines step Example 1 Without binning BinningHorizontal 1 BinningVertical 1 OffsetX OffsetY Height Width 1088 Height Max 1456 Width Max Scanning range Example 2 With binning BinningHorizontal 2 BinningVertical 2 OffsetX OffsetY Height Width 544 Height Max 778 Width Max Scann...

Page 49: ...tal 2 and SensorMultiROI mode can not be used at the same time Binning mode and SensorMultiROI mode can be used at the same time if BinningVertical 1 or BinningHorizontal 1 Sequencer mode and SensorMultiROI mode can not be used at the same time The setting is JAICustomControlSensorMultiROI Specify width height horizontal vertical offset value for each index Please refer to the example in the figur...

Page 50: ...iggerSequencer SequencerSetNext 1 to128 1 Set the next index to be displayed for the selected SequencerIndex SequencerWidth SequencerBinningHorizontal 1 96 to 1456 SequencerBinningHorizontal 2 48 to 728 1456 Set the width of the selected SequencerIndex SequencerHeight SequencerBinningVertical 1 2 to 1088 SequencerBinningVertical 2 2 to 544 1088 Set the Height of the selected SequencerIndex Sequenc...

Page 51: ...e sequence When gamma is selected the gamma setting defined in AnalogControl is applied to all exposures in the sequence When LUT is selected the LUT characteristics defined in AnalogControl are applied to indexes for which SequencerLUT enable is set to ON SequencerReset During TriggerSequencer mode operation this switches the index number to be executed to Sample TriggerSequencer mode operation U...

Page 52: ...s unless the CommandSequencerIndex value is changed SequencerFrameNumber and SequencerSetNext cannot be used in CommandSequencer mode Index1 ROI1 Exposure 1 Gain1 M Red Blue Black Level1 Binning1 H V LUT Enable1 Frame Count1 Next Index1 Index2 ROI2 Exposure 2 Gain2 M Red Blue Black Level2 Binning2 H V LUT Enable2 Frame Count2 Next Index2 Index128 ROI128 Exposure 128 Gain128 M Red Blue Black Level1...

Page 53: ...This camera allows you to convert the standard color space RGB that is used to produce colors into other color spaces including XYZ and HSI Five color spaces are available RGB sRGB RGB AdobeRGB RGB UserCustom XYZ and HSI Specify the desied color space by configuring ColorTransofrmationMode and ColorTransformationRGBMode as follows ColorTransformation ColorTransformationMode ColorTransformationRGBM...

Page 54: ...Enable Color is set to True Set a value from 0 to 1 0 1 steps for ColorEnhancerValue ColorEnhancerSelector to set the enhancement to one of ten levels 0 no enhancement 1 approx x2 the color level of the original data Six colors can be specified in ColorEnhancerSelector Red Cyan Green Magenta Blue and Yellow CounterAndTimerControl Function This camera supports only the counter function The counter ...

Page 55: ...ion to the HOST Event detection Event detection Counter0 FrameStartTrigger Counter1 ExposureStart Counter2 SensorReadOut To use the counter function Configure the settings as follows Four counters are available Specify a counter Counter0 to Counter3 and configure the settings Item Setting value selectable range Description Counter 0 to 2 Counter 0 to 2 Select the counter CounterEventSource Counter...

Page 56: ... DigitalBlue BlackLevel LUT Shading Binning H V Enhancement ColorMatrix All video processes are enabled Camera output Base RGB8 Medium RGB8 RGB10 Full RGB8 EightyBit RGB8 Medium RGB12 Functions available in VideoProcessBypassMode The following functions can be used in video process bypass mode Gain AnalogAll Gain AnalogRed Gain AnalogGreen Gain AnalogBlue AutoGainControl AutoShutterControl AutoWhi...

Page 57: ...aud19200 Baud38400 Baud57600 Baud115200 Baud230400 Baud460800 Baud921600 Baud9600 Displays the baud rate of the serial port 示します DeviceReset Reset the device b ImageFormatControl Configure image format settings SensorWidth 1456 1456 Display the maximum image width SensorHeight 1088 1088 Display the maximum image height SensorDigitizationBits 12 Bits 12 Bits Display the number of bits at which the ...

Page 58: ...isitionFrameRate Hz 0 125 to 126 1 Full Set the frame rate as a frequency unit Hz The maximum value varies depending on the PixelFormat and ROI settings TriggerSelector FrameStart FrameStart Select the trigger operation TriggerMode Off On Off Select the trigger mode TriggerSoftware Execute a software trigger TriggerSource Low High Software PulseGenerator0 3 User Output 0 3 Line 5 OptIn1 Line 6 Opt...

Page 59: ...g selected in GainSelector GainAuto Off Continuous Once Off Enable disable gain auto adjustment Once automatically changes to Off when the signal level converges once BalanceWhiteAuto Off Continuous Once ExposureContinuous ExposureOnce Preset3200K Preset5000K Preset6500K Preset7500K Off Enable disable auto white balance WB adjustment via gain adjustment Continuous Once WB adjustment via exposure t...

Page 60: ...e polarity inversion for the selected input signal or output signal LineStatus True False False Display the status of the input signal or output signal True High False Low LineSource Low High FrameTriggerWait FrameActive ExposureActive FVAL LVAL PulseGenerator0 3 UserOutput0 3 Line5OptIn1 Line6OptIn2 Line7 CC1 NAND0Out NAND1Out Low Select the line source signal for the item selected in LineSelecto...

Page 61: ...ve Display the counter status CounterIdle Idle CounterActive Counting CounterOverflow Count value exceeded the maximum value i UserSetControl Configure user settings UserSetSelector Default UserSet1 to 3 Default Select the user settings UserSetLoad Load user settings UserSetSave Save the current setting values as user settings j SequencerControl Configure sequencer settings SequencerMode On Off Of...

Page 62: ...d SequencerIndex SequencerGain AnalogAll 1 0 to 8 0 1 0 Set the GainAnalogAll value SequencerGain AnalogRed 0 47 to 4 0 1 0 to 64 0 1 0 SequencerGain AnalogGreen 1 0 fixed 1 0 to 64 0 1 0 SequencerGain AnalogBlue 0 47 to 4 0 1 0 to 64 0 1 0 SequencerExposure TimeCommon µs Set the exposure time for the selected SequencerIndex SequencerExposure TimeRed µs SequencerExposure TimeGreen µs SequencerExpo...

Page 63: ...t Medium CameraLinkClockFrequendy 37 1MHz 74 3MHz 84 9MHzk 74 3MHz l JAICustomControl PulseGenerators Configure pulse generator settings ClockPreScaler 1 to 4096 165 Set the division value for the prescaler 12 bit using PixelClock as the base clock PulseGeneratorClock MHz 0 018127 to 74 25 0 45 Set the clock used for the pulse generator This value is calculated using the ClockPreScaler value as a ...

Page 64: ...reaches this value the output will be 0 PulseGeneratorEnd Point ms 1 PulseGeneratorClock MHz to 1048575 PulseGeneratorClock MHz 33 3333 Set the start point of the Low interval in milliseconds When the counter reaches this value the output will be 0 The setting range varies depending on the ClockPreScaler value PulseGeneratorPulse width ms 33 3333 Display the High interval width of the pulse in mil...

Page 65: ...ea states configured in ALCAreaSelector Off Operate ALC according to the individual enabled disabled photometry area states configured in ALCAreaSelector AutoShutterControl ExposureMin 100 to 13426 100 Set the minimum value for the ExposureAuto ASC control range AutoShutterControl ExposueMax 101 to 13427 Set the maximum value for the ExposureAuto ASC control range AutoGainControlGainRaw Min 100 to...

Page 66: ...False True Enable disable blemish correction BlemishDetect Execute blemish detection BlemishStore Save the location information of detected blemishes BlemishSelector Red Green Blue Specify the sensor for which to configure Blemish BlemishDetect Threshold 0 to 100 10 Set the blemish detection threshold BlemishCompensation Index 1 to 200 Select the index for the target blemish coordinates BlemishDat...

Page 67: ...ancer VideoSendMode NormalMode TriggerSequencerMode CommandSequencer Mode MultiRoiMode NormalMode Set the VideoSendMode q JAICustomControl SensorMultiROI Configure settings for sensor Multi ROI SensorMultiRoiMode On Off Off Enable disable sensor Multi Roi This function can be enabled only when SequecerMode is Off and MultiRoiMode is Off SensorMultiRoiIndex Index1 Index2 Index 1 Select the index fo...

Page 68: ...on to correct the display As the light emitting properties of the monitor are not linear the entire image may be darker or the gradation in the dark areas may be less noticeable when camera outputs are displayed without processing Using the gamma function performs correction to produce a display that is close to linear For details see Gamma Function Settings and operations Problem Cause and soluti...

Page 69: ...lector Exposure FrameStart ExposureMode Off Timed TriggerWidth PWC Trigger overlap Off Readout Trigger input signals Low High Software PulseGenerator0 3 UserOutput0 3 Line5 OptIn1 Line6 OptIn2 Line7 CC1 NAND0Out NAND1Out Opto filter Off default 100 µs 500 µs 1ms 5ms 10ms Exposure Mode Timed 15 26μs 8 bit 15 26µs 10 bit min to 8 s max Performance verified for up to 1 second Trigger Width 15 26µs 8 ...

Page 70: ...9 1 0 9 steps available LUT OFF γ 1 0 ON 257 points can be set Vibration resistance 3 G 20 Hz to 200 Hz X Y Z direction Impact resistance 50 G Power supply 12 pin connector Input range DC 12 V to 24 V 10 via input terminal Consumption Lens mount C mount Lens mount protrusion length of 4 mm or less is supported Flange back 17 526 tolerance 0 mm to 0 05 m Optical filter IR cut filter Verified perfor...

Page 71: ...600T_Rch Pixel count Resolution screen size ROI Binning Pixel size µm Image size mm Frame rate 1 6 MP 1456 1088 Full pixel 3 45 3 45 5 02 x 3 75 6 27 1 3 MP 1280 1024 ROI 4 42 x 3 53 5 66 0 5 MP 800 600 ROI 0 3 MP 640 480 ROI 0 3 MP 640 480 ROI 2x2 Binning 3 45 3 45 3 45 3 45 3 45 3 45 6 9 6 9 2 76 x 2 07 3 45 2 21 x 1 66 2 76 4 42 x 3 31 5 52 126 1 fps 24 bit 133 7 fps 24bit 221 7 fps 24bit 272 5...

Page 72: ... 72 AP 1600T PMCL Dimensions Dimensional tolerance 0 3 mm Unit mm DC IN TRIG 3 68 26 26 4 M3 Depth3 POWER TRIG 44 44 C Mount 74 6 3 0 5 3 68 4 M3 Depth3 DIGITAL I O 1 DIGITAL I O 2 ...

Page 73: ...818 10 3 162 11 3 548 12 3 981 Near maximum value of Gain AnalogRed AnalogBlue 4 13 4 467 14 5 012 15 5 623 16 6 31 17 7 079 18 7 943 Near maximum value of Gain AnalogAll 5 19 8 913 20 10 21 11 22 22 12 589 23 14 125 24 15 849 25 17 783 26 19 953 27 22 387 28 25 119 29 28 184 30 31 623 31 35 481 32 39 811 33 44 668 34 50 119 35 56 234 36 63 096 Near maximum value of Gain AnalogIndividualRed Green ...

Page 74: ...and Windows are trademarks or registered trademarks of Microsoft Corporation in the United States and other countries Intel and Intel Core are trademarks of Intel Corporation in the United States and other countries Other system and product names described in this document are trademarks or registered trademarks of their respective owners The and symbols are not used in this document ...

Page 75: ... Output Settings 24 Dimensions 72 E Edge Enhancer 54 ExposureMode 33 FeatureProperties 57 Frame Rate 29 Frame Rate Reference 71 G Gamma Function 44 GPIO 24 I Installing the Software 11 P 7 L LED 8 Lens 12 Lens mount 12 LineStatus 44 Lookup Table 43 LUT 43 M Maximum Frame Rate 29 O Optional accessories not supplied 10 Output format 25 Parts Identification POWER TRIG LED 8 R Regional Scanning Functi...

Page 76: ...Revision history Revision Date Changes 1 0 Apr 2018 First version 1 1 Nov 2018 Add KC 1 2 Mar 2019 Fix Contents and Index ...

Reviews: