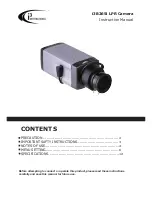
i3 International i3B265i Instruction Manual Download Page 2

2

PRECAUTIONS

The lightening flash with an 

Warrowh-ead symbol within an 

equilateral triangle is intended to 

alert the user to the presence of 

uninsula-ted "dangerous voltage" 

within the product's enclosure 

that may be of sufficient 

magnitude to constitute  a risk of 

electric shock to persons.

The exclamation point within an 

equilateral triangle is intende-d 

to alert the user to the presen-

ce of important operating 

and maintenance (servicing) 

instructions in the literature 

accompanying the appliance

NOTE: This equipment has been 

tested and found to comply 

with the limits for a Class A 

digital device, pursuant to Part 

15 of the FCC Rules. These 

limits are designed to provide 

reasonable protection against 

harmful interference when the 

equipment is operated in a 

commercial environment. This 

equipment generates, uses, 

and can radiate radio frequency 

energy and, if not installed and 

used in accordance with the 

instruction manual, may cause 

harmful interference to radio 

communications.

The operation of this equipment 

in a residential area is likely 

to cause harmful interference 

in which case the user will 

be required to correct the 

interference at his own 

expense.

FCC Caution: To assure 

continu-ed compliance use only 

shielded interface cables when 

connecting to computer or 

peripheral devices. Any changes 

or modifications not expressly 

approved by the party 

responsible for compliance 

could void the user’s authority 
to oper-ate this equipment.

The serial number of this 

product may be found on the 

top of the unit. You should 

note the serial number of this 

unit in the space provided and 

retain this book as a permanent 

record of your purchase to aid 

identification in the event of 
theft.

Model No.                         

R I S K


O F


E L E C T R I C


S H O C K

D O


N O T


O P E N

CAUTION

CAUTION

Summary of Contents for i3B265i

Page 1: ...perate this product please read these instructions carefully and save this manual for future use CONTENTS PRECAUTION IMPORTANT SAFTY INSTRUCTIONS NOTES OF USE MENU SETTING SPECIFICATIONS 2 3 4 6 12 i3B265i LPR Camera Instruction Manual ...

Page 2: ...t This equipment generates uses and can radiate radio frequency energy and if not installed and used in accordance with the instruction manual may cause harmful interference to radio communications The operation of this equipment in a residential area is likely to cause harmful interference in which case the user will be required to correct the interference at his own expense FCC Caution To assure...

Page 3: ...er This video product should not be placed in a built in installation IMPORTANT SAFETY INSTRUCTIONS Powersupply cords should be routed so that they are not likely to be walk ed on or pinched by items placed upon or against them Pay particu lar attention to cords at plugs scre ws and the point where they exit from such as a bookcase or rack unless proper ventilation is provided or the manufacturer ...

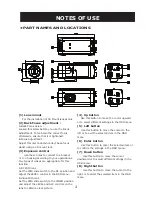
Page 4: ... position and adjust the LEVEL control in the OSD menu B Video IRIS lens Set the IRIS slide switch to the VIDEO position and adjust the LEVEL and ALC controls on the lens to obtain a clear picture 4 Up button Use this button to move the cursor upward or to select different settings in the OSD menu 5 Left button Use this button to move the cursor to the left or to exit the selected item in the OSD ...

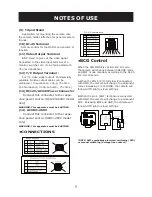
Page 5: ...DC12V AC24V model only WARNING This apparatus must be EARTHED 14 AC90V 260V Connect this connector to the respe ctive power source AC90 260V model only WARNING This apparatus must be EARTHED NOTES OF USE CONNECTIONS RJ 45 connector BCG Control When the D N MODE is set into B C G mode the camera will change between COLOUR mode and B W mode manually according to the RJ 45 B C G commands A When the P...

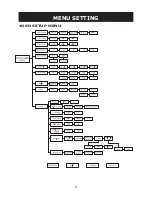
Page 6: ...6 MENU SETTING OSD SETUP MENU LPR ...

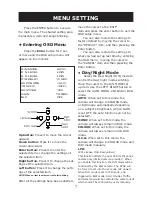
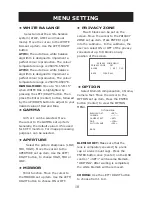
Page 7: ... and then pressing the Enter button Day Night Mode Select the Day Night D N mode to control the day night mode switching Move the cursor to the D N MODE set up item Use the LEFT RIGHT button to select the AUTO MONO COLOUR or BCG mode AUTO When set to this mode the camera will change to COLOUR mode or B W mode automatically depending on a subject s brightness When GAIN is set OFF the auto function ...

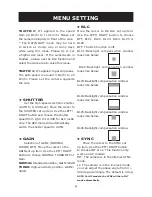
Page 8: ... EXPOSURE AES Auto electronic shutter mode ALC MENU LENS TYPE DC LEVEL ALC MENU LENS TYPE VIDEO AES MENU LEVEL Select N D LEVEL to set up the switchover point of brightness from COLOUR mode to B W mode under different lux levels Move the cursor to the N D LEVEL set up item Use the LEFT RIGHT button to select HIGH LOW or MID This function is only effective when the N D mode is set to AUTO LOW The s...

Page 9: ...em Use the LEFT RIGHT button to choose NORMAL TURBO OFF or Gain NORMAL Standard position GAIN 24dB TURBO High sensitivity position GAIN 30dB Move the cursor to the SYNC set up item Use the LEFT RIGHT button to choose INT or LL This function only works on AC models INT The camera is in the internal SYNC mode LL The camera is in the line lock mode you can adjust the phase angle from 0 300 deg accord...

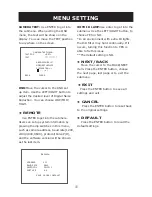
Page 10: ...white balance system ATW2 ATW1 and manual mode Move the cursor to the WHITE BAL set up item Use the LEFT RIGHT button ATW1 The auto trace white balance algorithm is designed to implement a perfect colour reproduction The colour temperature range is 2600 K 6500 K ATW2 The auto trace white balance algorithm is designed to implement a perfect colour reproduction The colour temperature range is 2500 K...

Page 11: ... You can choose LOW MID HIGH MENU SETTING Remote ADDRESS 001 BAUD RATE 4800 PROTOCOL PELCO P SOFT VER X X SAVE CANCEL DEFAULT Use ENTER to get into the submenu Users can set up system information by pressing the dip switches in this menu such as camera address baud rate 1200 2400 4800 9600 protocol Pelco P D and the software version will be shown as the last item Press the ENTER button to reset ba...

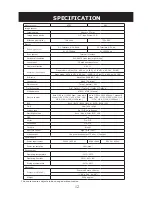
Page 12: ...in control Turbo Normal Off Traffic Function Off Traffic 1 Traffic 2 Traffic 3 Traffic 4 White balance ATW1 ATW2 Manual Electric shutter Auto 1 60 to 1 100 000sec manual 9 steps 1 60 1 100 1 250 1 500 1 1K 1 2K 1 4K 1 10K 1 100Ksec Auto 1 50 to 1 100 000sec manual 9 steps 1 50 1 120 1 250 1 500 1 1K 1 2K 1 4K 1 10K 1 100Ksec BLC BLC1 BLC2 BLC3 BLC4 BLC5 BLC6 Off DNR Low Mid High Privacy zone On Of...

Reviews: