


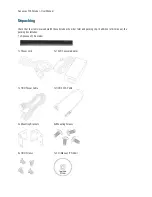


Installation
7
If any parts are missing or damaged, contact the dealer you purchased the encoder from.
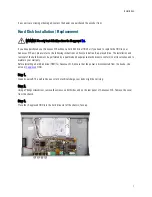
Hard Disk Installation / Replacement
WARNING! Use only hard disk drives from the i3-approved
list
.
If you have purchased your Annexxus 516 without a hard disk drive (HDD) or if you need to replace the HDD in your
Annexxus 516 unit, please refer to the following instructions on how to install an i3-approved drive. The installation and
removal of the hard disk must be performed by a qualified and experienced technicians to conform to all local codes and to
maintain your warranty.
Before installing a hard disk drive (HDD) for Annexxus 516, ensure that the power is disconnected from the device. Use
only an
i3-approved
HDD.
Step 1.
Ground yourself. This will remove any static electrical charge your body might be carrying.
Step 2.
Using a Phillips screwdriver, remove the screws on both sides and on the rear panel of Annexxus 516. Remove the cover
from the chassis.
Step 3.
Place the i3-approved HDD into the hard drive slot of the chassis, face up.