USER MANUAL
Page -4-
Am57 Analog Dome Camera
SETUP>BACKLIGHT>WDR section. On-board dip switch must be in the WDR mode.
•
DEFOG
: Digital DEFOG function uses built-in video processing algorithm to improve
video appearance in foggy conditions. Set DEFOG function to ON or OFF. When enabled,
DEFOG function allows setting area’s POSITION / SIZE and GRADATION.
• POS/SIZE. By default, DEFOG area covers the entire screen. To re-size/re-position:
1. Press the Joystick button OR click the Iris Open icon twice to first adjust the SIZE
of the selected area.
2. Press and hold the Joystick OR PTZ controls UP/LEFT to reduce the height/width
of the area.
3. Press the Joystick button OR click the Iris Open icon to save changes and select
AGAIN to return to the POSITION screen.
4. Move the Joystick OR use PTZ controls to reposition re-sized area on the screen.
5. Press the Joystick button OR click the Iris Open icon twice to save changes and
select RET to exit POS/SIZE DEFOG sub-menu.
• GRADATION. Set the GRADATION value to OFF, LOW, MIDDLE, or HIGH.
• DEFAULT. Select DEFAULT to reset DEFOG settings back to factory defaults.
MENU > SETUP > BACKLIGHT
BACKLIGHT setup can be set to OFF, WDR, BLC, or HLC.
•
WDR (Wide Dynamic Range):
Note: To enable WDR mode, camera’s CVBS/WDR
dipswitch must be in the WDR position.
• GAIN: Set the GAIN value to LOW, MIDDLE or HIGH.
• WDR BRIGHTNESS: Set the WDR BRIGHT value from 0 to 60.
• WDR OFFSET: Set the WDR OFFSET value from 0 to 60.
•
BLC (Backlight Compensation) /
HLC (Highlight Compensation)
• GAIN: Set the GAIN value to LOW, MIDDLE or HIGH.
• AREA: To change BLC area’s position and size, follow
instructions under DEFOG POS/SIZE section above.
• DEFAULT: Select DEFAULT to reset BLC settings back to
factory defaults.
MENU > VIDEO OUT
Video Out options allow setting the camera to NTSC (default) or PAL video format.
MENU > LANGUAGE
The OSD language is set to English by default, but can be adjusted to one of the other
supported languages. Supported OSD languages: English (default), Chinese 2, Japanese,
Chinese 1, Korean, German, French, Italian, Spanish, Polish, Russian, Portuguese, Dutch,
Turkish, Hebrew, and Arabic.
MENU > SETUP > SMART
FOCUS
Use ths Smart Focus feature to fine-
tune the camera’s varifocal lens zoom
and focus settings after installation.
Use the PTZ control buttons to adjust
the Zoom (Up/Down) and Focus (Left/
Right). When done, use the
Iris Open
icon to return to the main Setup menu.
MENU > SETUP > SCENE
Under SCENE, select INDOOR, OUTDOOR, INDOOR1 and LOW-LIGHT as the working
environment. This scene selection adjusts the brightness of the video image to the pre-
configured levels.
MENU > SETUP > EXPOSURE
EXPOSURE setup contains settings for SHUTTER, AGC, SENS-UP, BRIGHTNESS, D-WDR, and
DEFOG functions.
•
SHUTTER:
Set camera shutter speed to AUTO, 1/30, 1/60, FLK
(Flickerless mode), 1/240, 1/480, 1/1000, 1/2000, 1/5000,
1/10000, 1/50000.
•
AGC
: Set the Automatic Gain Control value from 0 to 15.
•
SENS-UP
: (
Note: SENS-UP is disabled if AGC value is 0 or
when SHUTTER is set to anything other than AUTO or 1/30).
SENS-UP function allows setting a slower shutter speed to let
extra light into the camera for higher sensitivity in low-light
conditions. SENS-UP can be set to OFF or AUTO. When in AUTO mode, SENS-UP can be
set to: x2, x4, x6, x8, x10, x15, x20, x25, or x30.
•
BRIGHTNESS
: Set the video image brightness value from 1 to 100, where 100
represents the highest brightness setting.
•
D-WDR
: Digital Wide Dynamic Range prevents direct bright light from washing out the
image. D-WDR can be set to ON or OFF.
Important:
True WDR can be configured under
EXPOSURE
1. SHUTTER
AUTO
2. AGC
--|--15
3. SENS-UP
OFF
4. BRIGHTNESS --|--60
5. D-WDR
ON
6. DEFOG
OFF
7. RETURN
RET
WDR
1. GAIN
HIGH
2. WDR BRIGHT --|--30
3. WDR OFFSET ---|-40
4. RETURN
RET
BLC / HLC
1. GAIN
HIGH
2. AREA
3. DEFAULT
4. RETURN
RET
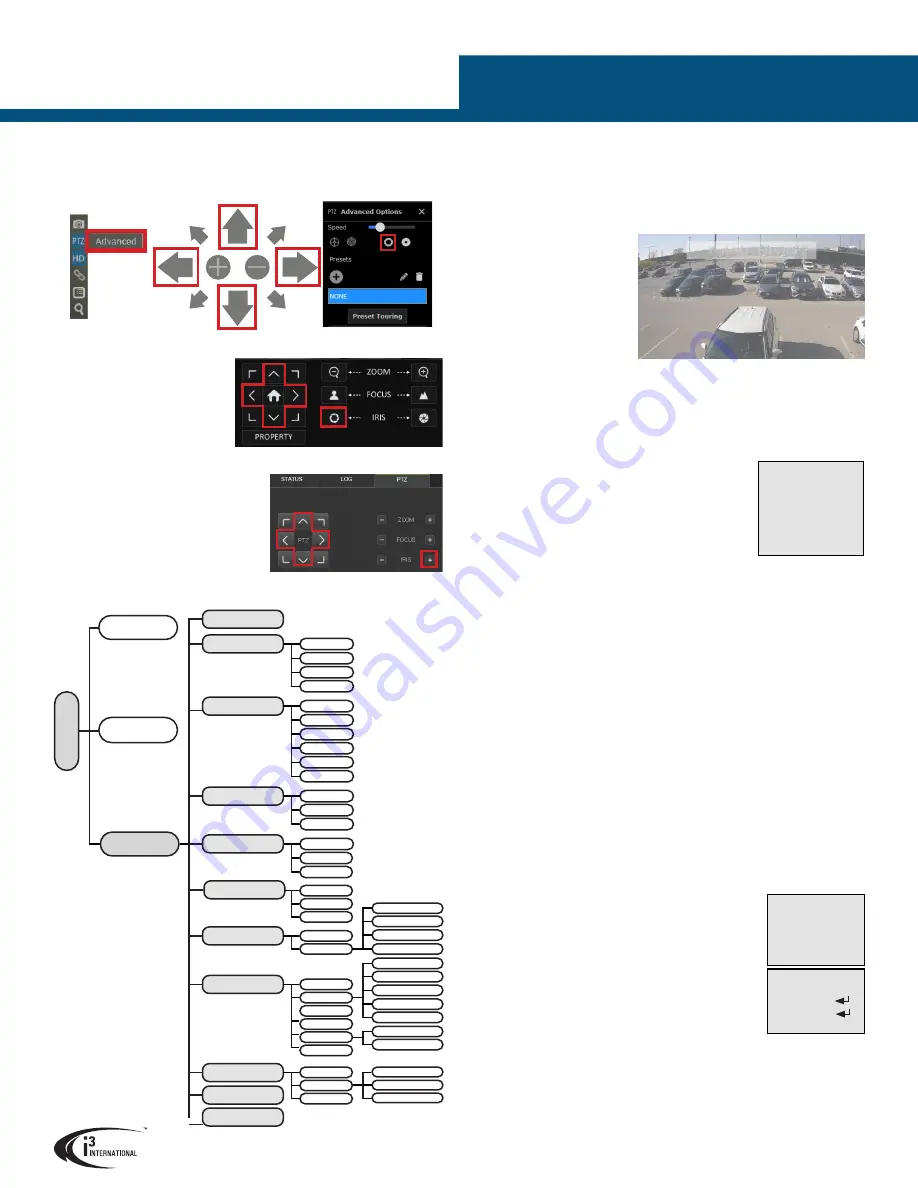
CALLING UP OSD via VIDEO PILOT CLIENT (v7 and up).
1.
Repeat Steps 1-5 of the
ADJUST ZOOM/FOCUS via VIDEO PILOT CLIENT (incl.
SRX-PRO SERVER v7 and up) section.
2.
Use the
Iris Open
in the PTZ Advanced Options side panel and the on-screen
UP/DOWN/LEFT/RIGHT
buttons to bring up and navigate in the OSD menus.
CALLING UP OSD via VEO16p (LOCAL)
1.
Repeat Steps 1-5 of the
ADJUST
ZOOM/FOCUS via VEO16p
(LOCAL) section.
2.
Use the
Iris Open
icon and the
UP/DOWN/LEFT/RIGHT
buttons
on the PTZ panel to bring up and
navigate in the OSD menus.
CALLING UP OSD via VEO16p (REMOTE)
1.
Repeat Steps 1-7 of the
ADJUST ZOOM/
FOCUS via VEO16p (REMOTE) section.
2.
Use the
Iris Open
icon and the
UP/
DOWN/LEFT/RIGHT
buttons on the PTZ
panel to bring up and navigate in the OSD
menus.
VIDEO OUT
SETUP
LANGUAGE
AUTO
BLC
ATW
SHUTTER
HLC
AWC-SET
AGC
MANUAL
SENS-UP
SCENE
DAY&NIGHT
BACKLIGHT
WHITE BALANCE
EXPOSURE
2DNR
3DNR
NR
CAM TITLE
D-EFFECT
PRIVACY
DEFECT
SPECIAL
SHARPNESS
MONITOR
LSC
ADJUST
RESET
BRIGHTNESS
COLOR
B/W
EXIT
D-WDR
DEFOG
WDR
SMART FOCUS
VOLTAGE DET.
INDOOR
OUTDOOR
INDOOR1
LOW-LIGHT
MOTION
CAMERA OSD MENU
MENU
F O C U S
▌
¡
F O C U S
¡
Ë
S M A R T F O C U S
Z O O M
Z O O M
¡
▌
Ë
¡
SMART NR
LEVEL
START.AGC
END.AGC
FREEZE
MIRROR
D-ZOOM
SMART D-ZOOM
NEG.IMAGE
LIVE DPC
STATIC DPC
GAMMA / BLK
BLUE GAIN
RED GAIN


