background image

On-Screen Menu (continued)


Rear Panel Features


LED Tally


Use this setting to enable or disable the LED Tally. When enabled, the yellow, red and green LEDs above each display 
will respond to tally commands, according to the Tally Source setting (

see page 21

).


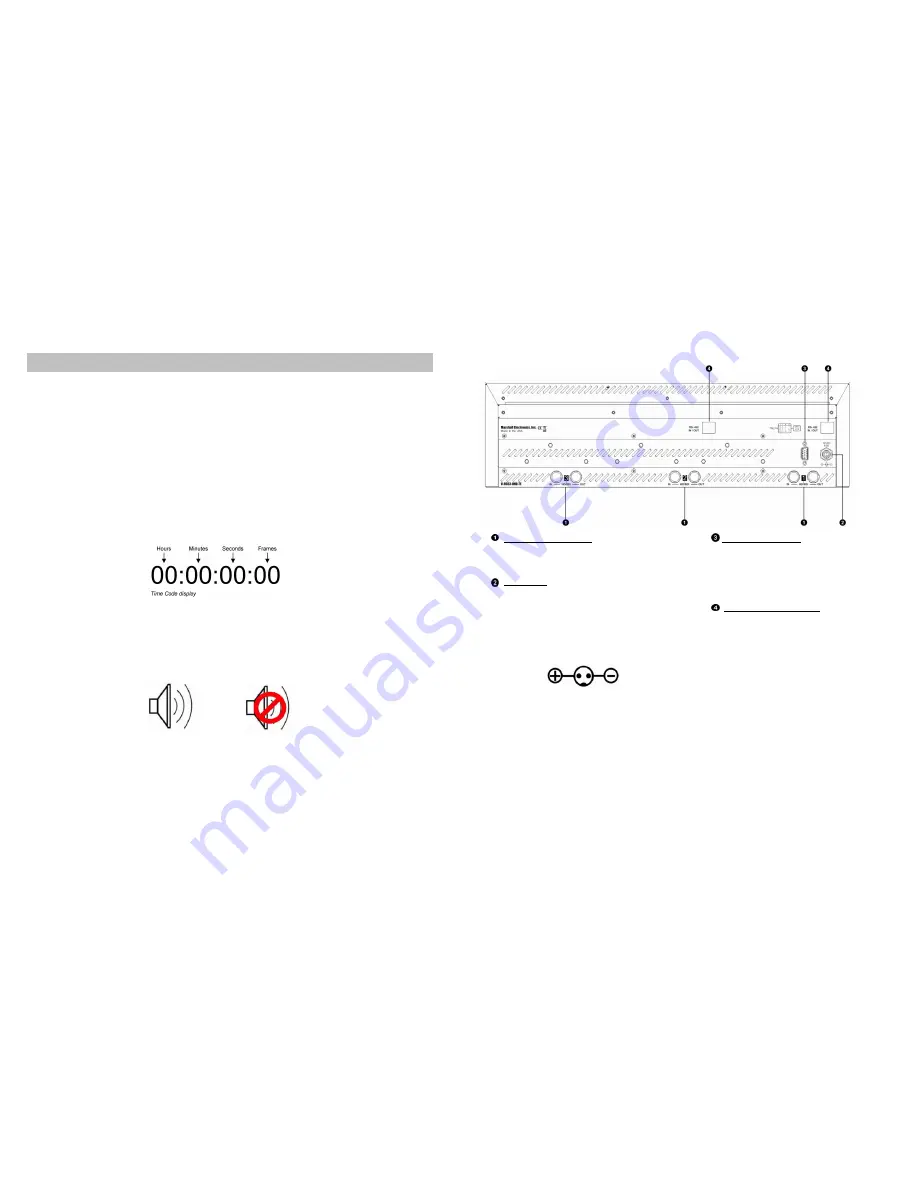
   Time Code


Use this setting to enable time code display on the screen. Time code is de-embedded from the vertical ancillary data 
(VANC) within the SDI signal. Two types of time code can be selected to display on the screen: 

LTC (linear time 

code) 

or 

VITC (vertical interval time code)

.


The position of the time code display varies based on the aspect ratio setting and presence of IMD text 

(see Aspect 

Ratio diagrams on page 14).


   Audio Monitor


Use the Audio Monitor menu option to enable or disable the audio presence indicator icon. When enabled, this icon 
indicates whether embedded audio is present in the SDI video input. A red circle and cross will flash on the icon if no 
embedded audio is present.


  HD-SDI Input and Output


Each screen has one HD-SDI input and one active 
loop-through output. 

Note: No more than 4 screens 

should be connected in one loop.


  Power Input


Connect the 12VDC input to the 2-Pin twist lock 
power input connector. Power can be supplied from 
the included power supply, or from a variety of DC 
sources supplying at least 6.0 Amps at 12 Volts.


IMPORTANT: If using a power source other than the 
included power supply, be sure that the polarity of 
the DC input is correct:


   Tally Interface (HD-15)


Both LED tally and OSD tally can be activated via 
the HD-15 connector by connecting the 
corresponding pin to ground. A variety of external 
devices can be used to perform the contact closure. 
No additional power should be supplied to the HD-
15 port. 

See pin-out details on page 22.


    RS-422/485 Serial Interface


The RS-422/485 ports are used to remotely control 
the IMD or all V-R171-IMD-HDSDI features, using 
a variety of industry standard protocols. 

(Note: 

Connector/pin-out may need to be adapted 
depending on protocol and controlling device 
used. See pin-out details on page 22.) 

Only one 

connection to either port is needed to control the 
monitor. The second port can be used to loop 
multiple monitors in the same bus.


18


7


Embedded Audio Present


No Embedded Audio


OSD CONFIGURATION SUBMENU (continued) 

Summary of Contents for V-R171-IMD-HDSDI

Page 1: ...V R171 IMD HDSDI High Definition Triple LCD Monitor with In Monitor Display Operating Instructions i Tech Company LLC TOLL FREE 888 483 2418 EMAIL info i techcompany com WEB www iTechLCD com...

Page 2: ...ner for a period of one year from the purchase date This warranty is extended to the first consumer only and proof of purchase is necessary to honor the warranty If there is no proof of purchase provi...

Page 3: ...horized Recycle Facility Product Overview 4 Features 4 Installation and Initial Setup 5 Unpacking 5 Installation 5 Connections and Power On and Initial Setup 5 Top and Front Panel Features 6 Power But...

Page 4: ...reen Menu continued IMD CONFIGURATION SUBMENU continued Tally Source The V R171 IMD HDSDI tally OSD and LED can be controlled in a variety of different ways Use the Tally Source setting to choose how...

Page 5: ...ixed at 38400 bauds IMD Fixed Align Use this setting to choose the horizontal alignment of the IMD text IMD text can be justified on the left center or right of the screen This setting is overridden w...

Page 6: ...ccessing and navigating the main menu using only a single control Image Adjustment Knobs Use the image adjustment knobs to adjust color saturation brightness and contrast of the image The status of ea...

Page 7: ...rough output Note No more than 4 screens should be connected in one loop Power Input Connect the 12VDC input to the 2 Pin twist lock power input connector Power can be supplied from the included power...

Page 8: ...Ratio 4 3 Scaled 4 3 16 9 16 9 Centered Video Config Curtain Color Blue Red Green White Black Gray Levels RGB 000 255 8 unit steps Function 1 Marker Center Marker Marker Background IMD Time Code OSD T...

Page 9: ...e top left of the screen When disabled status is only displayed for 2 seconds when the monitor is powered on when an input is applied or when the input video standard changes The status display reads...

Page 10: ...or temperature comparison and calibration User Definable Function Buttons Use the Function 1 and Function 2 menu items to define each function button on the front panel of the monitor The following op...

Page 11: ...this setting to choose how selected markers are displayed on the screen Off The marker is superimposed on the complete image 50 Gray Screen area beyond the marker is shown at 50 intensity Black Scree...

Page 12: ...bars with the following procedure 1 Allow the monitor to warm up for at least 5 10 minutes 2 Display SMPTE split field color bars on the monitor using an external source 3 Enable Monochrome mode 4 Lo...

Reviews: