background image


i-Stor - RAID                                                                                                  User Guide 

Chapter 3 - System Set Up  /  Page 5 


Be careful not to 

damage any cables 

or components, and 

make sure the 

cables are 

connected firmly. 


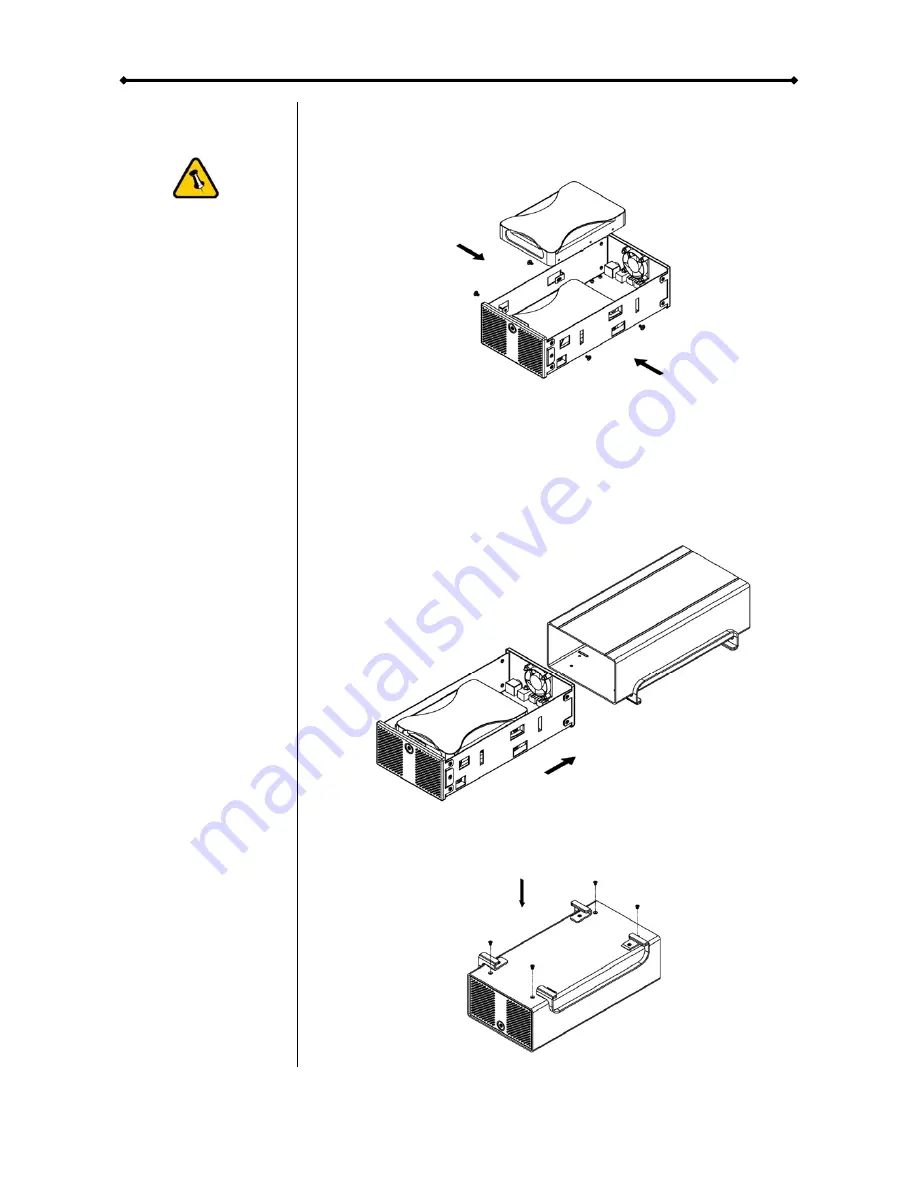
4. Install the second hard drive and mount it with two screws 

on each side. 


5. Connect the SATA and power cables to your hard drives. Be 

careful not to damage any components and confirm that the 

cables are connected firmly. 


6. Slide the inner enclosure back into the outer chassis. 


7. Fasten the four screws to finish the assembly. 


Summary of Contents for iS605

Page 1: ...Dual Bay Storage Enclosure for 3 5 Serial ATA Hard Drives User Manual English Deutsch 中文 v1 0 August 23 2007 FW400 FW800 USB2 0 Combo External RAID 0 1 Subsystem iS605 ...

Page 2: ...CKAGE CONTENTS 3 ABOUT DATA BACKUP 3 CHAPTER 2 HARD DRIVE ASSEMBLY 4 I STOR RAID 4 CHAPTER 3 SYSTEM SET UP 6 CONNECTION TO YOUR COMPUTER 6 HARD DISK MODE 6 RAID SETUP 6 NON RAID 6 JBOD OR RAID 0 SPANNING 6 RAID 0 STRIPING 6 RAID 1 MIRRORING 7 INSTALLATION ON A PC 8 REMOVE PROCEDURE 8 INSTALLATION ON A MACINTOSH 9 REMOVE PROCEDURE 9 PARTITIONING FORMATTING 10 PC RUNNING WINDOWS 10 MAC OS 11 CHAPTER...

Page 3: ...rong and rugged offering more than enough capacity to store all your digital media files Not only that the i Stor RAID can also back up and secure all of your data thanks to RAID protection Product Dimensions 24 5cm x 13 3cm x 7 6cm 9 65in x 5 23in x 3in Available Interfaces FireWire 400 800 USB 2 0 MS DOS Microsoft Windows 2000 XP Vista are trademarks of Microsoft Corporation Apple Macintosh and ...

Page 4: ... ON OFF switch and release it To turn it off press the ON OFF switch hold it for 3 seconds and then release it again Rear View 1 Switch for RAID setting 2 Fan for ventilation 3 FireWire 400 port 4 FireWire 800 ports 5 USB 2 0 port 6 Power receptacle RAID Setting Non RAID RAID 0 Striping 1 Up 2 Up 1 Down 2 Up RAID 1 Mirroring RAID 0 Spanning 1 Down 2 Down 1 Up 2 Down Note Changing the RAID setup wi...

Page 5: ...equipped Mac Mac OS 10 1 5 or above 1394b equipped Mac Mac OS 10 2 or above Package Contents i Stor RAID or RAID II External Power Adapter Input 100 240V Output 12V 3A 5V 4 2A Power Cord Interface Cables Manual About Data Backup To protect your files and help prevent the loss of your data we strongly recommend that you keep two copies of your data one copy on your i Stor and a second copy either o...

Page 6: ...ity and RPM Chapter 2 Hard Drive Assembly Your unit may come with a pre installed hard drive Before opening such an enclosure please read the warranty from your vendor carefully as this could void your warranty i Stor RAID 1 Remove the four screws at the bottom of the case 2 Push the inner enclosure out and remove the outer chassis 3 Install the first hard drive and mount it with two screws on eac...

Page 7: ...nnected firmly 4 Install the second hard drive and mount it with two screws on each side 5 Connect the SATA and power cables to your hard drives Be careful not to damage any components and confirm that the cables are connected firmly 6 Slide the inner enclosure back into the outer chassis 7 Fasten the four screws to finish the assembly ...

Page 8: ...vice is next restarted When not in use turn off the power For the hard drives to go into stand by with the Operating System we recommend using SATA II hard drives set up as RAID 0 or RAID 1 RAID Setup Non RAID The drives will show up as two independent drives Use this if you have only installed one drive or two different drives not the same capacity and brand JBOD or RAID 0 Spanning The two drives...

Page 9: ...ndication at the front to show the status of the hard drives As long as both HDD1 and HDD2 are working OK the LED is green When a drive fails the corresponding LED will turn red To replace the faulty drive do the following 1 Turn off the i Stor and remove both the power supply and the interface cable 2 Open the enclosure and replace the faulty hard drive HDD1 CN1 HDD2 CN2 3 Finish the assembly and...

Page 10: ...lled and setup already you do not need to change anything unless you prefer a different setup Turn on your Computer and start Windows Connect the i Stor and turn it on Let Windows search and install the driver automatically Open My Computer to see your external hard drive For factory new drives and more info about formatting see Partitioning Formatting Remove Procedure For the safe removal of your...

Page 11: ...up the RAID using the switches at the back of the enclosure See pages 2 3 and 9 10 for more details about the RAID setup If the drives have been pre installed and setup already you do not need to change anything unless you prefer a different setup Turn on your computer and start Mac OS Connect the i Stor and turn it on No driver installation required The external drive will mount and show up on yo...

Page 12: ... required the first time you install a factory new hard drive if you change the format or want to erase all data on your drive PC running Windows Disk Management Program Right click on My Computer and choose Manage Select Disk Management Choose the drive you want to format and right click on it for further commands Choose New Partition Follow the Partition Wizard to setup the drive For Win2000 Win...

Page 13: ... external drive and format it according to your requirement For Mac OS X we recommend formatting the drive using the native Mac file system HFS also known as Mac OS Extended If you want to use your drive on a PC running Microsoft Windows as well as on your Mac we recommend you to use the FAT32 file system On your Mac select MS DOS when formatting it Note The file size for a single file on FAT32 is...

Page 14: ...online support area FAQ Q What file system should I choose to format my drive A This will depend on how you want to use the drive but in general here is what we recommend Windows 2000 XP Vista Æ NTFS Mac OS X Æ HFS Mac OS Extended To use it on both PC and Mac Æ FAT32 About this Manual This manual covers both the i Stor RAID and i Stor RAID II Firmware images and descriptions might slightly vary be...

Reviews: