background image

20

Customizing the Sound
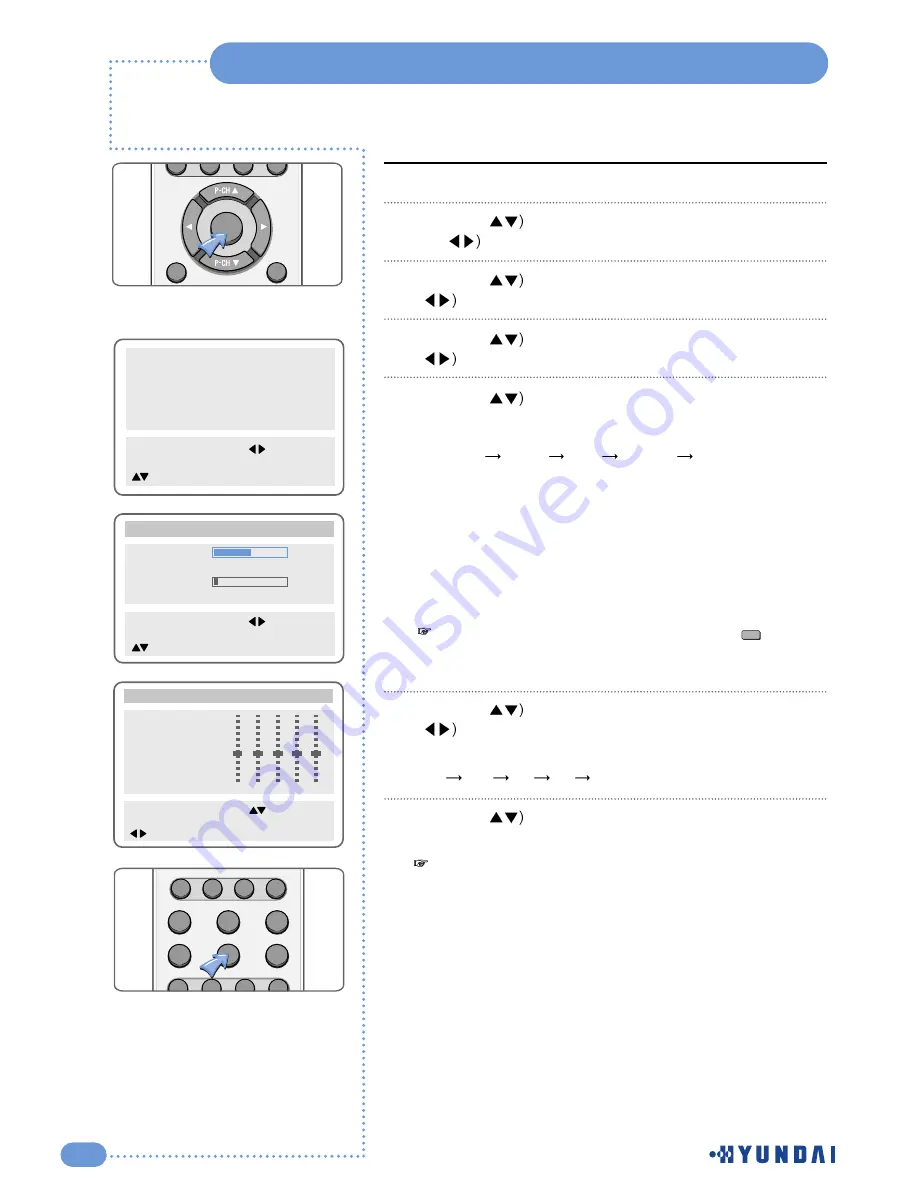
Press the 

MENU

button. 

Press the (

button to select the 

Sound

group and press 

the (

or 

OK

button.

Press the (

button to select 

Balance

and press the

(

button to adjust the sound balance.

Press the (

button to select 

Equalizer

and press the    

(

button.

Press the (

button to select the sound mode according to 

the type of image being watched.
Sound mode will be change in the following order.

Standard

Music

Film

Speech

Custom

Standard :

This is good for any picture.

Music      :

Select when you listen to music, videos or concerts.

Film        :

Select when you watch the a movie.

Speech   :

Select when you listen to speeches or news.

Custom :

Select when you want to adjust the setting
manually.

Press the (

button to select 

Custom

and press the      

(

button to select the frequency that you want to adjust. 

The frequency range will be selected as following order.

100 

300 

1K 

3K 

10K

Press the (

button to adjust.

1

2

3

6

7

If  you  adjust  the  frequency  (

100

Hz

,


300

Hz

,


1

KHz

,


3

KHz

,

10

KHz)  in  Standard

,

  Music

,

  Film

,

  Speech

,

  or  Custom  mode

,


the  mode  will  change  to  Custom  mode

.

4

5

Picture

Sound

Clock
Install
Language
Advanced

MENU : Previous                : Select
INPUT : Exit                  OK : Select
      : Position


Balance                                         R5

 Equalizer                               
 

Volume                                            8

 Input Source                              Main    

Sound

MENU : Previous                : Adjust
INPUT : Exit
      : Position


Mode


Standard


     Music


Film

     Speech
     Custom

>>

100

Equalizer

300 1K

3K 10K

MENU : Previous                : Select
INPUT : Exit
      : Position

You  can  get  the  same

.

  result  by  pressing  the  (              )  button      

on  the  remote  control

.

S.Mode

MENU

OK

FAVORITE

PC

STILL

ASPECT

SLEEP

S.MODE

P.MODE

MTS

DISPLAY

CLOCK ADD/ERASE

S.EFFECT

DTV

VIDEO

INPUT

All manuals and user guides at all-guides.com

Summary of Contents for HQL260WR

Page 1: ...FCC ID PJILT26AW000 REPORT NO HCT F04 0303 HYUNDAI C TECH ATTACHMENT E 2 USER S MANUAL All manuals and user guides at all guides com a l l g u i d e s c o m...

Page 2: ...he button to select Custom and press the button to select the frequency that you want to adjust The frequency range will be selected as following order 100 300 1K 3K 10K Press the button to adjust 1 2...

Page 3: ...n adjust the headphones volume by pressing the button You can listen to the main picture s sound when the PIP is off even if you select PIP mode sound 6 Picture Sound Clock Install Language Advanced M...

Page 4: ...ted from Mono sound Surround This features allows the TV s L R Speakers to provide a home Theater like surround effect The center and surround sounds ard mixed into the L R speakers 1 You can adjust t...

Page 5: ...to adjust the Hour and Minute Adjust the Hour using the 24 hour system Example 6 P M Press 1 and 8 You can erase and reset the and hour and minute by pressing the OK button 1 2 3 4 5 6 Picture Sound C...

Page 6: ...l and press the button Press the or number 0 9 button to select the channel You can erase and reset the channel by pressing the OK button Press the button to select Volume and press the button to adju...

Page 7: ...off once with the remote control Always With the lock function always on you can control the TV only with the remote control not with the buttons on the TV 1 2 3 4 This function prevents children fro...

Page 8: ...tomatically after the set time If you set 0 menu screen will not disappear automatically 5 Caption CC1 Local Lock Off Osd Timeout 60 No Operation Timeout 180 No Signal Timeout 20 Favorite Channel NR O...

Page 9: ...he button to select a Favorite channel Press the button to move the position and press the button to select Channel No AV etc You can select up to 5 Channel No AV etc You can direct select input sourc...

Page 10: ...button Press the button to select the Advanced group and press the or OK button Press the button to select NR Press the button to select On Whenever you press the button the selection will switch betw...

Page 11: ...nging the PIP Position Press the button on the remote control The PIP position will change among 5 positions whenever you press this button 1 2 You can change the main picture channel by pressing the...

Page 12: ...he PIP mode will change whenever you press this button Standard Sports Natural Mild Custom Swapping the Main Sub Picture Press the button on the remote controller The Main image and PIP image will swi...

Page 13: ...time The PIP image will change only from 4 3 to 16 9 1 16 9 4 3 Panorama Zoom Press the Still button on the remote control The picture does not move but the sound plays normally Press this button agai...

Page 14: ...in PC Mode See page 34 1 2 3 4 PC AM 11 25 Stereo RGB 15Pin D Sub Cable Rear of the TV Rear of the PC Connect the 15Pin D Sub Cable to the RGB INPUT port on the TV and output port on the Rear of the P...

Page 15: ...resolution to 1280x768 pixels Click the Advanced button and click the Monitor tab on the dialog box Set the vertical frequency to 60Hz and then click the OK button 1 2 3 4 5 Maximum resolution depend...

Page 16: ...ect the Phase Press the button to adjust the Phase Reload Geometry Values Press the button to select Factory Preset Press the button to set the Geometry the factory default settings 1 1 1 2 3 4 2 2 H...

Page 17: ...ing order Standard Sports Natural Mild Custom Adjusting Contrast Press the MENU button Press the button to select the Picture group and press the or OK button Press the button to select Contrast Press...

Page 18: ...1024 768 XGA 1024 768 Horizontal KHz 31 469 31 469 31 469 37 500 37 861 37 879 46 875 48 077 48 363 56 476 60 023 Vertical Hz 70 086 70 087 59 940 75 000 72 809 60 317 75 000 72 188 60 004 70 069 75...

Page 19: ...re the channel using a stereo broadcast by pressing the Display button Select Mono The sound quality of a stereo broadcast may be unstable in an area with a weak signal See page 22 Make sure the chann...

Page 20: ...age 36 Check if the signal cable 15Pin D sub is properly connected to the computer See page 32 Make sure the resolution and frequency of the computer video card are set properly to the range of the TV...

Page 21: ...AAA type Operating Instructions Power Cord DC Adapter Model name Size Display Size Pixel Pitch Pixel Number Type Brightness Contrast Ratio Viewing Angle LCD Color System Sound System Video System Y Pb...

Reviews: