12
13
Operation
Operation
General operations
Touch screen
Due to the touch screen, you can fulfill most
functions not only by pressing buttons but also
by touching the options you need.
Turning the unit on/off
Press POWER/MUTE button on the panel or
POWER button on the RC to switch the unit on.
Press and hold this button to turn off the power.
Reset the unit
Operating the unit for the first time or after
replacing the car battery, you must reset the
unit. Press reset button on the unit with a
pointed object (such as a ballpoint pen) to set
the unit to initial state.
Volume control
Press VOL+/VOL- buttons on the RC or
rotate VOL regulator on the unit to increase/
decrease the sound level.
Setting the sound characteristics
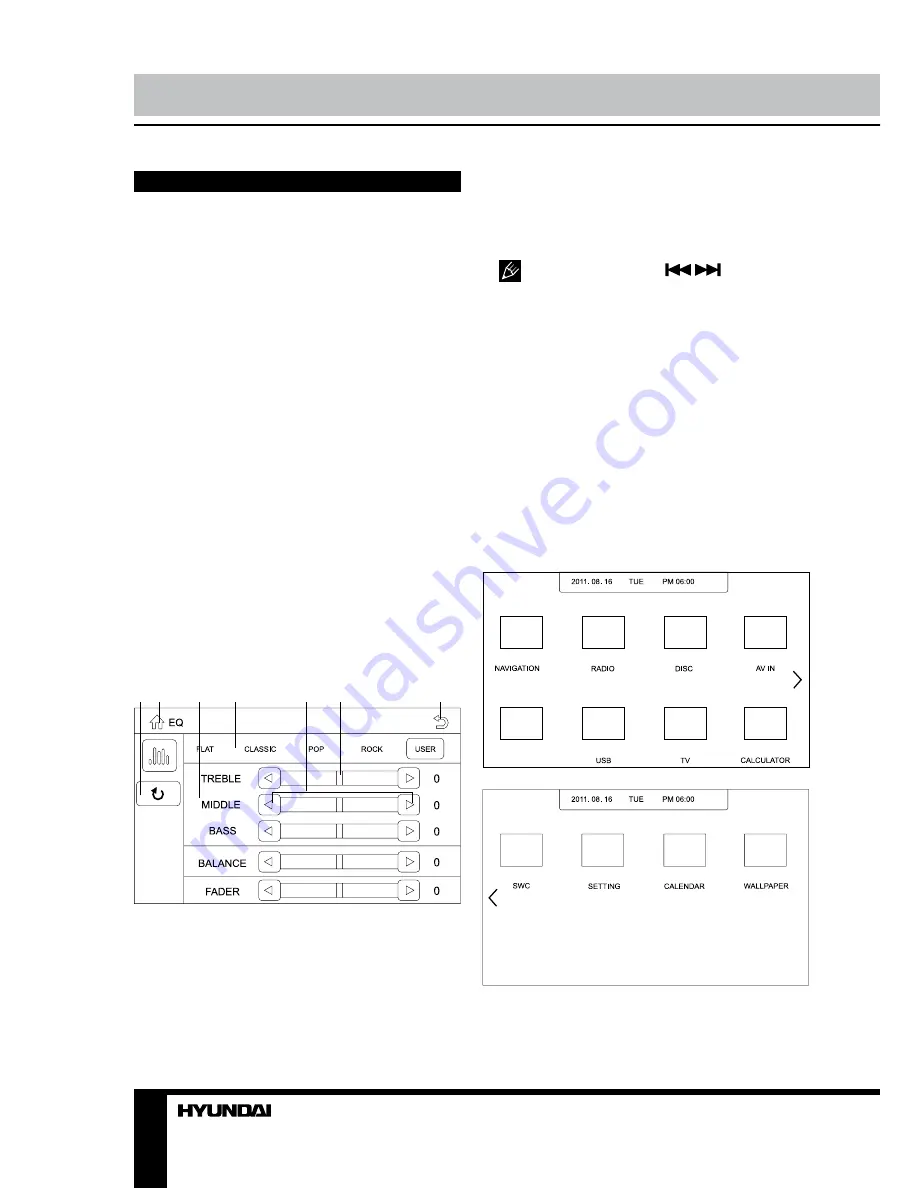
Press SEL button to open the following menu:
2
4
3
1
5
6
7
1. Touch this button to reset settings.
2. Touch to return to the main menu.
3. Setting list. Touch a setting to select its
adjustment.
4. Equalizer mode selection buttons. Touch to
select an equalizer mode.
5. Adjustment buttons. Touch them to adjust
corresponding setting.
6. Adjustment slidebar. Touch to adjust a
setting.
7. Touch to go to previous screen.
You can also press
/
buttons on
the RC to select menu pages; press UP/DOWN
cursor buttons to select a setting, press LEFT/
RIGHT buttons to adjust the setting.
Mute function
Press MUTE button on the RC or POWER/
MUTE button on the unit to turn off the sound.
Press the button again or adjust volume to
resume the sound output.
Mode selection
• Repeatedly press MODE button on the RC
or on the panel to select an operation mode.
• In any mode press MENU button to display
the Main menu consisting of two pages:
SDHC
- - -
In the menu, touch the item of the mode you
need to select the corresponding mode. Touch
Summary of Contents for H-CMD2062G
Page 26: ...26 46 46 47 47 47 47 47 47 47 47 47 48 48 48 48 48 48 48 48 48 49 49 49 49 50 51 DVD PBC ID3...
Page 27: ...27 1 1 20...
Page 28: ...28...
Page 29: ...29 35 5 6 2 4 3 5 6 1...
Page 30: ...30 1 2 3 5 4 5 4 6 6 4 6...
Page 31: ...31 Key1 Key2 15 A GPS ISO ISO 1 ISO 2 ISO 1 2...
Page 32: ...32 ISO A B 1 2 3 4 12 5 6 7 8...
Page 33: ...33 Key 1 2 illumination...
Page 34: ...34 1 SEL VOL 2 3 4 POWER MUTE 5 6 7 AV 8 USB 9 RESET 10 11 MODE 1 2 3 4 5 6 7 8 9 10 11...
Page 37: ...37 SDHC Disc USB SDHC USB GPS NAVIGATION MODE SETTING...
Page 45: ...45 4 5 6 7 8 9 10 11 12 13 14 15 16 1 2 3 4 5 6 7 8 9 1 2 PIP 3 4 5 6 7 8 9 DVD AVI...
Page 49: ...49 12...
Page 50: ...50 35 35 RESET...


