background image

6

Instruction manual

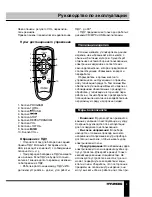
repe10/FOL+ or -10/FOL- button on 
the RC to select a folder.

•  Select a desired track by using 

/


buttons on the unit or 

 or 

 buttons 

on the RC.

•  Press PROGRAM (PROG) button again to 

confirm. The set will advance to next memory 
position, the display will show “P02”. Repeat 
two steps described above to enter additional 
memories into the program if necessary.

•  After the maximum of 99 tracks (or less) 

have been selected as described above, press 

USB button on the unit or on the RC to 

start playing the programmed tracks.

•  The “PROGRAM” symbol will remain on 

to indicate that you have saved a program-
memory (sequence).

•  To check the program you stored, after 

the programming is completed, in stop mode 
press PROGRAM (PROG) button, then press 
repeatedly 

 button on the unit or 


button on the RC to see all programmed track 
numbers.

•  The program memory will be cleared when 

you press STOP button twice, open the disc 
compartment door or turn off the disc player or 
power supply.

  Good quality sound is guaranteed only 

when playing licensed MP3 discs.

USB playback

•  This unit is equipped with a USB socket 

that can accept and play MP3 files stored on 
standard USB flash (compatible with USB 
versions 2.0) up to 16 Gb.

•  To use USB drives for MP3 playback, slide 

the function switch to CD/MP3 position. Insert 
the USB drive into the USB port and press and 
hold 

USB button on the unit or on the RC 

until the display shows “USB”.

•  All operations with files contained in USB 

are the same as operations with MP3 discs.

  Always switch off the unit or change 

mode to CD before removing a USB flash 
drive, to prevent damage to your USB device.

Note:

 Although this product is fully 

compatible with USB 2.0 standard formats, 

a small percentage of USB flash drives 
might not be readable, due to those device 
manufacturers non-compliance with the full 
(official) USB standards. FAT/FAT32 file 
systems are supported.

iPod/iPhone docking

•  Open the iPod jack compartment cover 

and connect your iPod or iPhone to the jack. 
Be careful, the jack can be easily damaged. 
Ensure the connection is good for a better 
contact.

•  Set the function switch to AUX position. 

The battery of the connected device will be 
automatically charged by the power of this unit.

•  When the device is connected, this unit 

will serve as amplifier and speaker for music 
played in the connected device. Rotate VOL 
regulator on this unit to adjust volume. All 
playback operations are performed by the 
controllers of the connected device.

•  If you connect an external device through 

the AUX input and iPod at the same time, the 
iPod/iPhone docking will not function.

“Dynamic Bass Boost” system

For increased bass at all volume levels, 

press BASS button for an emphasized bass 
sound. Press the button again to disable the 
function. When the function is activated, BASS 
indicator will light up in red.

Maintenance and care

•  Check your batteries regularly, old or 

discharged batteries should be replaced. If the 
unit is not going to be used for some time or is 
being run exclusively on the alternative power, 
remove the batteries to avoid leakage and 
damage.

•  Electronic products of this kind should 

Summary of Contents for H-1444

Page 1: ...л чит т нич ю н льт цию гл т чн Б з вы дны www sotmarket ru д бн я инф м ция т в тзывы бз ы и ы Инструкция для Hyundai H 1444 Перейти в карточку товара 8 800 775 98 98 ...

Page 2: ...CD MP3 USB СТЕРЕОМАГНИТОЛА С ПОДДЕРЖКОЙ IPOD IPHONE CD MP3 USB RADIO PLAYER WITH IPOD IPHONE DOCKING Руководство по эксплуатации Instruction manual H 1444 ...

Page 3: ...t cover 4 USB port 5 Standby indicator 6 POWER button 7 REP RAN button 8 17 Speakers 9 PROG button 10 BASS button 11 IR sensor 12 iPod jack compartment 13 LCD display 14 BASS indicator 15 FM stereo indicator 16 button 18 OPEN CLOSE button 19 USB button 20 STOP button 21 TUNING regulator 22 button Not indicated Back panel Power cord socket AUX input Phone output Bottom Battery compartment Left pane...

Page 4: ...nt recovery and recycling Please contact your local authorities for the correct method of disposal By doing so you will ensure that your disposed product undergoes the necessary treatment recovery and recycling and thus prevent potential negative effects on the environment and human health Important safeguards Attention The owner s manual contains important operating and maintenance instructions F...

Page 5: ...g MP3 player please use a standard stereo cable not included with 3 5 mm to 3 5 mm plugs to connect the headphone out or audio line out of the external device to the AUX input socket of this unit Slide the function switch to AUX position Turn on the external device Radio operation Set the function switch to RADIO position Select your desired broadcasting band by setting the band switch to the desi...

Page 6: ...button on the RC to go to the beginning of the current track press this button twice to skip back to previous track Press and hold this button to search for a particular point at high speed backward Release the button to resume normal playback If the disc contains more than 10 tracks you can skip to 10 tracks forward or back by pressing 10 FOL or 10 FOL buttons on the RC correspondingly If you use...

Page 7: ...B are the same as operations with MP3 discs Always switch off the unit or change mode to CD before removing a USB flash drive to prevent damage to your USB device Note Although this product is fully compatible with USB 2 0 standard formats a small percentage of USB flash drives might not be readable due to those device manufacturers non compliance with the full official USB standards FAT FAT32 fil...

Page 8: ...s connected with continual improvement of the device never be subjected to moisture or extreme temperatures Do not use the unit in places where it can be exposed to water moisture and dust If necessary clean the unit with a piece of cloth dampened with water only be sure the power cord is disconnected from the power supply When pick up the CD disc always hold the edge of the disc never touch the s...

Page 9: ...ереди 1 Телескопическая FM антенна 2 Ручка 3 Крышка отсека дисков 4 USB порт 5 Индикатор режим ожидания 6 Кнопка POWER 7 Кнопка REP RAN 8 17 Динамики 9 Кнопка PROG 10 Кнопка BASS 11 ИК датчик 12 Крышка отсека для iPod 13 ЖК дисплей 14 Индикатор BASS 15 Индикатор FM 16 Кнопка 18 Кнопка OPEN CLOSE 19 Кнопка USB 20 Кнопка STOP 21 Регулятор TUNING 22 Кнопка Не показано на рисунке Задняя панель разъем ...

Page 10: ...лектронных изделий в соответствии с законодательством которая предполагает соответствующее обращение возврат и переработку Обращайтесь в органы местного управления за инструкциями по правиль ной утилизации продукта Тем самым Вы обеспечите утилизацию Вашего изделия с соблюдением обязательных процедур по обработке утилизации и вторичной пере работке и таким образом предотвратите потенциальное негати...

Page 11: ... нажмите кнопку POWER чтобы установить его в режим ожидания Индикатор загорится красным цветом Подключение наушников Для частного прослушивания подклю чите наушники с диаметром штекера 3 5 мм к разъему для подключения наушников С помощью регулятора громкости VOL установите желаемый уровень громкости звука При подключенных наушниках звук через динамики не воспроизводится Разъем AUX Вы можете прослу...

Page 12: ...дисков Использование CD проигрывателя Установите переключатель режимов работы в положение CD MP3 Вставьте диск в отсек и нажав на двер цу закройте ее Через несколько секунд на дисплее отобразится общее количество композиций содержащихся на диске Воспроизведение временная остановка Для запуска воспроизведения нажмите кнопку USB устройстве или на ПДУ на дисплее отобразится номер первого трека и симв...

Page 13: ...изведение останов лено Для остановки нажмите кнопку STOP Нажмите кнопку PROGRAM на ПДУ или кнопку PROG на устройстве На дисплее ото бразится P01 и символ PROGRAM Теперь устройство находится в режиме программи рования При использовании MP3 диска содер жащего папки сначала выберите нужную папку кнопками 10 FOL или 10 FOL С помощью кнопок на устройстве или или на ПДУ выберите нуж ный трек на дисплее ...

Page 14: ...го устройства от питания стереомагнитолы После подключения внешнего устрой ства магнитола будет служить усилителем и динамиками для воспроизведения аудио файлов содержащихся в iPhone или iPod Вращайте регулятор VOL магнитолы для регулирования громкости звука Все опера ции с воспроизведением файлов осущест вляются с помощью средств управления подключенного устройства При подсоединении внешнего устр...

Page 15: ...1982101 01792 год производства 2011 месяц производства январь Технические характеристики Воспроизводимые форматы MP3 CDDA Поддержка носителей CD CD R CD RW USB Номинальное напряжение питания 220 В 50 Гц Питание от батарей 9 В 1 5 В х 6 батарей типа UM2 LR14 Номинальная потребляемая мощность 13 5 Вт Выходная мощность 2 х 1 Вт FM диапазон радиочастот 64 108 МГц AM диапазон радиочастот 520 1620 кГц В...

Page 16: ......

Page 17: ...л т з з любым д бным б м гл т чн я л жб дд ж и Д т в з з в в ии ф мл ни дит нл н з 2 мин ты м нии Д т в и л т вин и тзывы ции и ид и Hyundai H 1444 Описание Характеристики Отзывы ...

Reviews: