background image

34

Bluetooth Connectivity

English

Phone functions

After connecting the unit to a smartphone, 

you can use various call functions that are 

available on the connected smartphone 

from the unit.

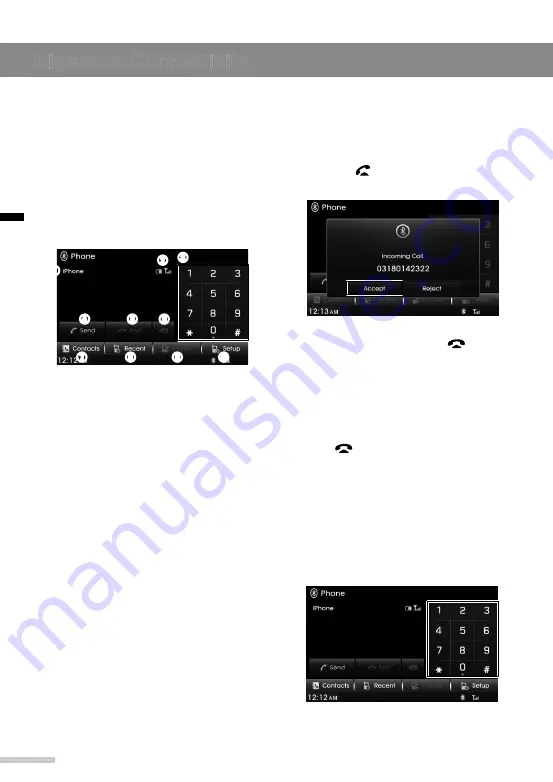
Phone screen

Press the 

PHONE

 button on the unit to 

open the phone screen.

➋ ➌

Phone name: View the name of the

currently connected smartphone.

Phone status: View the battery level and

the signal strength of the smartphone.

Keypad: Tap to enter a phone

number. Tap and hold "

0

" to enter the

international prefix.

Send

: Tap to make a call. When there is

no entered number, the call history list

opens.

End

: Tap to end the current call.

Delete: Tap to delete an entered digit or

character. Tap and hold to clear all digits

or characters.

Contacts

: Tap to open the

smartphone's contact list.

Recent

: Tap to display the call history.

Private

/

Handsfree

: During a call,

switch the call between the smartphone

and the unit.

Setup

: Tap to open the phone setup

screen.

Accepting a call

When a call is received at the unit, the

Incoming Call screen will appear.

Tap 

Accept

 on the screen or press

the 

Call

 [

] button on steering wheel 

to accept the call.

To reject the call, tap 

Reject

 on the 

screen or press the 

End

 [ ] button 

on steering wheel.

Talk with the other party through

the speaker and the unit's built-in 

microphone.

Tap 

End 

on the screen or press the

End

 [

] button on steering wheel to 

end the call.

Making a call

Using the keypad

From the phone screen, tap the

buttons on the keypad to enter a 

phone number.

Tap 

Send

 on the screen to make a

call.

Summary of Contents for BAPE-L3000N

Page 1: ...User Manual BAPE L3000N USB Bluetooth iPod Player with AM FM Radio FM AM PHONE SETUP POWER PUSH VOL AUDIO PUSH TUNE FM AM PHONE SETUP POWER PUSH VOL AUDIO PUSH TUNE...

Page 2: ......

Page 3: ...h iPod Player with AM FM Radio BAPE L3000N User Manual Please read this manual carefully before operating your set and retain it for future reference Designs and specifications are subject to change w...

Page 4: ...rference to radio communications However there is no guarantee that interference will not occur in a particular installation If this equipment does cause harmful interference to radio or television re...

Page 5: ...USB video player screen 18 Selecting a file from a list 19 USB image player 19 USB image player screen 19 Selecting a file from a list 20 Bluetooth audio player 21 Pairing and connecting with a Bluet...

Page 6: ...Setting the phone volume 36 Changing the Bluetooth passkey 37 Setting auto connection mode 37 Downloading phonebook contacts automatically 37 Settings 38 Setting the sound 38 Adjusting the sound bala...

Page 7: ...s Operating the unit in an abnormal state may cause electric shock injury or fire Do not disassemble or modify the unit Incorrect procedures can cause electric shock injury fire and equipment malfunct...

Page 8: ...can cause malfunction Do not use unauthorized accessories Unauthorized accessories may cause the unit to malfunction Use authorized accessories only Do not allow the unit to come in contact with mois...

Page 9: ...t the volume Reset button for system rebooting If the unit fails to operate properly press this button with a pen tip or another pointed instrument Microphone Detects voice during phone conversations...

Page 10: ...unction when your Android phone or iPhone is connected to the unit optional Note USB iPod and Bluetooth Audio are not available if there is no device connected Apple CarPlay or Android Auto may not be...

Page 11: ...2 Tap Agree to start the system Note You can also change the language by referring to Selecting the language on page 41 The unit also turns on automatically when a device is connected to the USB Once...

Page 12: ...hen the mute function is activated the mute icon will appear next to the volume control bar To deactivate the mute function press rotate the POWER VOL dial on the unit or press the MUTE or VOL buttons...

Page 13: ...rward a track Drag the progress bar to the target position to rewind or fast forward a track Double tapping X2 Double tap on a page or an image to zoom in Double tap again to return to the previous vi...

Page 14: ...ng procedures Always drive safely and use caution when backing up The rearview camera display may not detect all objects behind the vehicle Caution The rearview camera s purpose is to prevent accident...

Page 15: ...ported depending on your vehicle s options and which region the unit is being used in Radio This section explains how to use radio and access various radio frequencies FM1 FM2 and AM Also it covers au...

Page 16: ...Tap or rotate the AUDIO TUNE dial to manually tune in a desired frequency Storing radio stations manually Up to six preset radio stations can be stored for each frequency band FM1 FM2 and AM Follow t...

Page 17: ...iPod is recognized Note If a USB device with no music video or image files is connected the USB music video and image players cannot be opened USB or iPod music player screen To open the USB or iPod...

Page 18: ...SB devices When a USB device is connected the following file list will be displayed Music Video Image Indicates the media type that is available File list Displays the files in the current folder The...

Page 19: ...e In some cases iPods may be damaged if the ignition is turned off while it is connected to the unit When the iPod is not being used disconnect it before turning the ignition off Note Some USB devices...

Page 20: ...rted or provide compatible connection Only connect the iPod and the unit using approved iPod cables Other connection cables cannot be used The playback functions and the displayed items on iPods may d...

Page 21: ...ng a file from a list 1 From the video player screen tap List The following file list will be displayed Music Video Image Indicates the media type that is available File list Displays the files in the...

Page 22: ...ide the control panel tap the playback area again Tap to skip to the previous or next file File name Displays the name of the current file Slideshow Tap to run the slideshow in full screen mode Tap to...

Page 23: ...lay previous tracks by using the buttons on the unit or the steering wheel if fitted Pairing and connecting with a Bluetooth device For information on how to pair and connect the unit with a Bluetooth...

Page 24: ...le CarPlay home screen will appear Note If your iPhone is locked you need to enter the passcode to unlock the iPhone To access Apple CarPlay while the iPhone is locked on your iPhone tap Settings Gene...

Page 25: ...Tap to play podcasts stored on your iPhone Audiobooks Tap to play audio books stroed on your iPhone Home Tap to return to the Apple CarPlay home screen Note Applications not shown in the Apple CarPla...

Page 26: ...contact Your iPhone will then call the desired contact Making a call using Contacts 1 From the Apple CarPlay home screen tap Phone 2 Tap Show Contacts 3 Select the desired calling option Favorites Ta...

Page 27: ...t a song stored on you iPhone Radio Tap to listen to the iPhone s radio Playlists Tap to listen to the music in default playlists or your own playlists Albums Tap to select an album Artists Tap to sel...

Page 28: ...oom in or zoom out the current location on the map Tap to locate your current position on the map 3D Tap to change the map to a 3D view Destinations Tap to search for desired locations or favorite loc...

Page 29: ...the contact Hearing a text message 1 From the Apple CarPlay home screen tap Messages Show Messages 2 Select a message Siri will read the selected message out loud Podcasts Playing a podcast 1 From the...

Page 30: ...e user agreement screens may differ depending on Android phones The Android Auto screen will appear To end Android Auto unplug the USB cable from the iPod USB port Note To use Android Auto you need an...

Page 31: ...press and hold the PHONE button on the unit to use Google voice commands With Google voice recognition you can make phone calls view maps and play music Note To return to the Home menu screen tap the...

Page 32: ...gation Viewing your current location From the Android Auto screen tap the Navigation icon Your current location will be indicated on the map Tap to locate your current position on the map Tap to chang...

Page 33: ...g on the devices the passkey may be referred to as passcode PIN code or password Connecting devices After the devices are paired subsequent Bluetooth connections for previously paired devices start au...

Page 34: ...asskey is required at the Bluetooth device enter the passkey displayed on the Bluetooth device and tap OK To search for and connect to the unit from a Bluetooth device 1 Press the PHONE button on the...

Page 35: ...devices may only allow a connection using the Head Set Profile HSP In HSP some functions may not be available Disconnecting a Bluetooth device 1 Press the PHONE button on the unit to display the phon...

Page 36: ...acter Tap and hold to clear all digits or characters Contacts Tap to open the smartphone s contact list Recent Tap to display the call history Private Handsfree During a call switch the call between t...

Page 37: ...phone book list To search for a phone book record by name tap Search By Name To search for a phone book record by number tap Search By Number To scroll through the list tap or 4 Tap Call to call the...

Page 38: ...ts to open the phone book 2 Tap Download The records will be updated with the latest data from the smartphone Deleting call history and phone book records To delete a call history record 1 From the ph...

Page 39: ...etting tap Default Value 4 Tap OK Setting auto connection mode 1 From the phone screen tap Setup Device Auto Connection 2 Tap On to activate auto connection or Off to deactivate it When auto connectio...

Page 40: ...lowest range of sounds Beep Tap to adjust the volume of the beep that sounds when you tap the screen To return to the factory default setting tap Default Value Settings 4 Tap OK Selecting the EQ style...

Page 41: ...itial Volume 3 Tap or to adjust the initial volume level To return to the factory default setting tap Default Value 4 Tap OK Setting the display This section explains how to customize the display sett...

Page 42: ...he system This chapter explains how to customize the unit settings and keep the unit up to date Checking Updating Initializing the unit 1 Press the SETUP button on the unit to display the SETUP menu s...

Page 43: ...screen 2 Tap System Language 3 Select a display language 4 Tap OK Setting the time and date 1 Press the SETUP button on the unit to display the SETUP menu screen 2 Tap System Time 3 Select a time form...

Page 44: ...ble Android Auto tap Enabled To disable Android Auto tap Disabled Note If any device is connected to the iPod USB port you cannot set Android Auto on or off When you are using Android Auto you cannot...

Page 45: ...t fails to operate properly See page 7 The unit does not play files The inserted USB device is not formatted for FAT 16 or FAT 32 file systems The unit recognizes USB devices only when they are format...

Page 46: ...e Hands Free Profile Headset Profile Usable media file formats on USB Devices Supported File System FAT16 or FAT32 Only This unit does not recognize NTFS or exFAT file formats Music MP3 WMA WAV OGG Vi...

Page 47: ...or misapplication The Limited Warranty does not cover physical damage to the surface of the Hardware This Limited Warranty does not cover any software that may accompany or be installed on the Hardwar...

Page 48: ...t any legal rights under applicable national legislation governing the sale of consumer goods 8 This Limited Warranty cannot be transferred to any other person LIMITATION OF LIABILITY 9 Neither DEALER...

Page 49: ...10 KOR Email neilsuh motrex co kr Phone 52 1 664 188 9184 Support HOTLINE Motrex Mexico S de RL de CV Antonio Dovali Jaime 70 Torre D 10 Col Santa Fe Del Alvaro Obregon Distrito Federal CP 01210 Mexi...

Page 50: ......

Page 51: ......

Page 52: ...BAPE L3000N Rev 1 0 3264 00158 PN 3264 00158...

Reviews: