background image

 Astro SN-7375 


- 7 - 

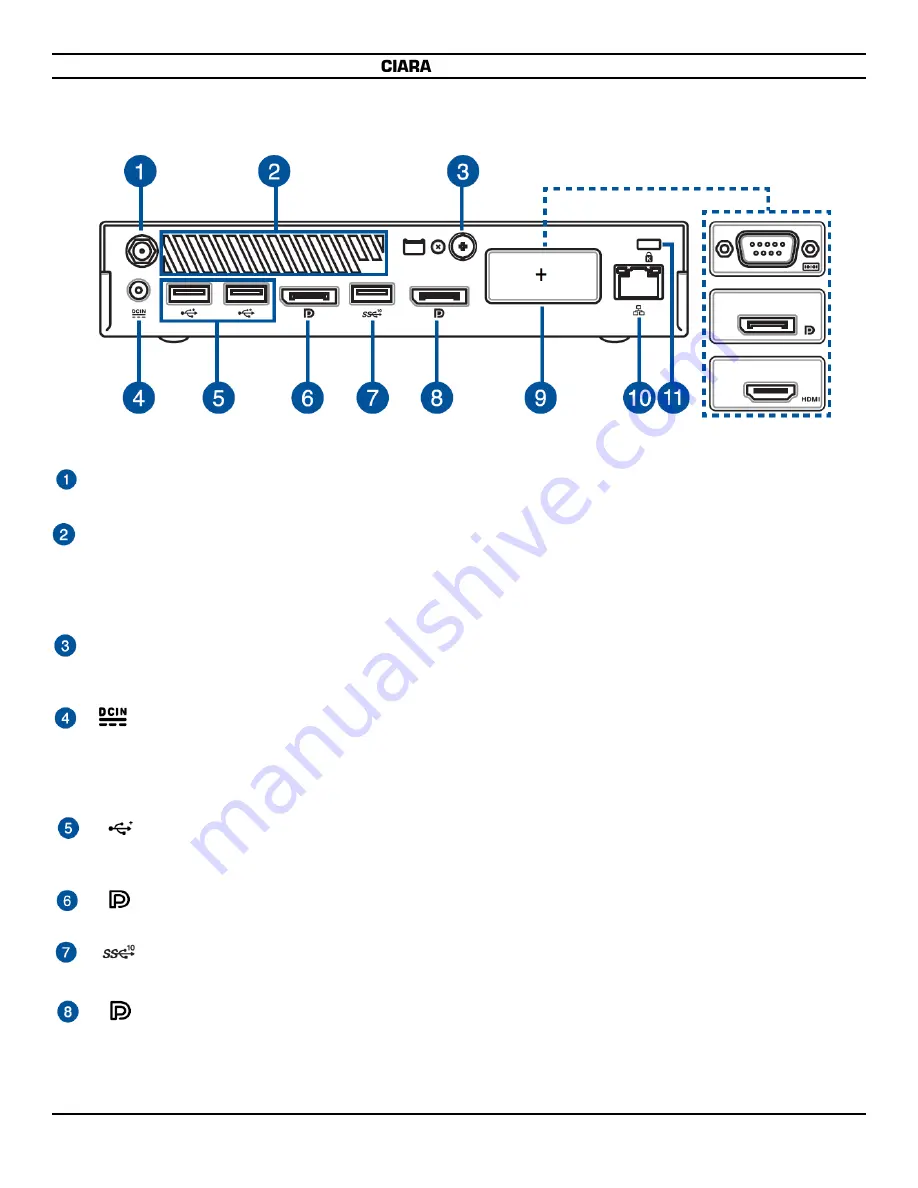
Rear view 


Wireless antenna jack 

The jack is used to connect the supplied wireless antenna to enhance wireless signal reception. 


Air vents (exhaust vent) 

The air vents allow your Micro PC chassis to expel hot air out. 

 
IMPORTANT ! 

For optimum heat dissipation and air ventilation, ensure that the air vents are free from obstructions. 

CAUTION ! 

Be careful of the hot air expelled at the air vents as it may cause discomfort or injuries. 


                Punch-out port 

                By removing the cover screw, the user has access to the inside. He can then remove the cover of the punch-out port   

                 and insert at his choice, an additional port that can be either VGA, HDMI, or Displayport or a serial port. 
 

Power input 

The supplied power adapter converts AC power to DC power for use with this jack. Power supplied through this jack    

                          supplies power to the Micro PC. To prevent damage to the Micro PC, always use the supplied power adapter. 
 

WARNING ! 

The power adapter may become warm to hot when in use. Do not cover the adapter and keep it away from your body. 


USB 2.0 port 

The USB (Universal Serial Bus) port is compatible with USB 2.0 or USB 1.1 devices such as keyboards, pointing   

                            devices, flash disk drives, external HDDs, speakers, cameras and printers. 
 

DisplayPort 

This port allows you to connect your Micro PC to an external display. 


USB 3.1 Gen 2 port


The USB 3.1 Gen 2 (Universal Serial Bus) port provides a transfer rate up to 10 Gbit/s. 


DisplayPort 

This port allows you to connect your Micro PC to an external display. 


Summary of Contents for Ciara Astro PB60S

Page 1: ...Astro PB60S User Guide...

Page 2: ...indows 10 are registered trademarks of Microsoft Corporation Intel and Core are trademarks or registered trademarks of Intel Corporation Asus is a trademark of ASUSTeK Computer Inc All other names bra...

Page 3: ...r 15 3 2 Replacing the top cover 15 3 3 Installing 2 5 HDD or SSD 16 3 4 Installing the M 2 SSD on selected models 18 To install 2242 M 2 SSD 18 To install 2280 M 2 SSD 18 3 5 Installing top memory mo...

Page 4: ...ive solid state drive of your Micro PC Appendix This section includes notices and safety statements your Micro PC Conventions used in this manual To highlight key information in this manual some text...

Page 5: ...bundled accessories may vary with different models For details on these accessories refer to their respective user manuals The device illustration is for reference only Actual product specifications...

Page 6: ...air to enter your Micro PC chassis IMPORTANT For an optimum heat dissipation and air ventilation ensure that the air vents are free from obstructions USB 3 1 Gen 1 Type C port This USB Type C Universa...

Page 7: ...MI or Displayport or a serial port Power input The supplied power adapter converts AC power to DC power for use with this jack Power supplied through this jack supplies power to the Micro PC To preven...

Page 8: ...or printers DisplayPort This port allows you to connect your Micro PC to an external display HDMI port The HDMI High Definition Multimedia Interface port supports a Full HD device such as an LCD TV or...

Page 9: ...Getting started Mounting your PC on the stand To mount your PC on the stand 1 Locate the mounting holes at the bottom of your PC 2 Align the stand s mounting hole with the mounting hole on your PC the...

Page 10: ...erent adapters 65 W Power adapter Input voltage 100 240 Vac Input frequency 50 60 Hz Rating output current 3 42 A 65 W Rating output voltage 19 V 90 W Power adapter Input voltage 100 240 Vac Input fre...

Page 11: ...Astro SN 7375 11...

Page 12: ...B keyboard and mouse to your Micro PC You can also connect a USB dongle for a wireless keyboard and mouse set To connect a keyboard and mouse to your Micro PC Connect the USB cable from your keyboard...

Page 13: ...rn on your Micro PC 2 4 Turning your Micro PC off If your Micro PC is unresponsive press and hold the power button for at least four 4 seconds until your Micro PC turns off 2 5 Putting your Micro PC t...

Page 14: ...lled a new system component that requires further BIOS settings or update WARNING Inappropriate BIOS settings may result to instability or boot failure We strongly recommend that you change the BIOS s...

Page 15: ...s in this guide use a grounded wrist strap or touch a safely grounded object or metal object to avoid damaging them due to static electricity NOTE The illustrations in this section are for reference o...

Page 16: ...lling 2 5 HDD or SSD 1 Remove the four 4 screws then lift the storage bay to remove it from the chassis 2 Insert your HDD or SSD into the storage bay then secure it with four 4 screws 3 Connect the SA...

Page 17: ...7 4 Lift the flap on the SATA connector A connect the SATA cable to the SATA connector then push the flap down to secure the cable B 5 Replace the storage bay and secure it with the four 4 screws remo...

Page 18: ...rt the 2242 M 2 SSD into its slot inside the Micro PC then gently push down the M 2 SSD on top of the screw hole and fasten it using one of the bundled 3mm round screws To install 2280 M 2 SSD 1 Remov...

Page 19: ...rd Visit an authorized CIARA service center or retailer for information on module upgrades for your Micro PC 1 optional Remove the storage bay if a storage bay is installed Follow step 2 under the Ins...

Page 20: ...nal button port CAUTION Take extra care when removing the metal cover Use tools such as a screw driver to bend and remove the metal cover to avoid physical injury 2 Insert the external button connecto...

Page 21: ...ould be installed and operated with a minimum distance of 20cm between the radiator and your body Care during use Do not walk on the power cord or allow anything to rest on it Do not spill water or an...

Page 22: ...tecting our environment We believe in providing solutions for you to be able to responsibly recycle our products batteries other components as well as the packaging materials Please go to https ciarat...

Page 23: ...nd 5470 5725 MHz CAUTION Any changes or modifications not expressly approved by the grantee of this device could void the user s authority to operate the equipment ISED Radiation Exposure Statement fo...

Page 24: ...comply with the ENERGY STAR standard and the power management feature is enabled by default The monitor and computer are automatically set to sleep after 10 and 30 minutes of user inactivity To wake...

Page 25: ...eo display to detect the video display mode for a given application program and automatically switch to that mode BIOS Basic Input Output System Programs permanently stored in the system board s ROM c...

Page 26: ...DVI I detects and chooses digital or analog depending on the connected display Contrast with DVI D which is a digital only interface and DVI A which is an analog only interface Driver A utility progra...

Page 27: ...to its ability to scan at various horizontal and vertical frequencies is capable of displaying a wide variety of resolution modes Parity bit An additional non informational bit appended to a group of...

Page 28: ...ITX or Mini STX motherboards high end upgradable office printers and networking hardware such as routers and NAS devices SRAM Static Random Access Memory A type of memory that does not need to be refr...

Page 29: ...Astro SN 7375 29 NOTES...

Reviews: