
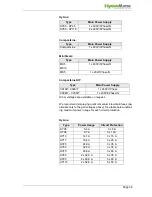


Page 47
»
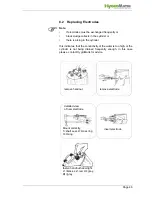
Remove and open cylinder, as described in Section
"Removing and Cleaning Steam Cylinder."
»
Loosen knurled nuts (5) and remove electrodes (48).
»
Install new electrodes and hand tighten the nuts.
»
Use solvent-free, HygroMatik-quality o-rings (for flange,
cylinder base and steam hose adapter).
»
Assemble steam cylinder and place it into cylinder
»
Connect plugs (4) directly to the electrodes (48) (with
gray, red and black knurled nuts). It is not necessary to
detach the knurled nuts!
Warning:
The plug must be pressed down onto the electrode as
far as it will go.
Note:
Connect plugs to the correct electrodes. Pay attention to
the color of the knurled nut.
»
Attach plug (8) to the sensor electrode. (Knurled nut (9)
- gray)
»
Switch breaker back on.
»
Switch on the unit and check for leaks after 15-30 min-
utes of operation.
If leakage occurs, switch off power supply and follow safety
instructions for work on live components.
Note:
In the following cases:
•
the electrodes must be frequently replaced,
•
black slime collects inside the cylinder, or
•
there is "lightning" in the cylinder,
the conductivity of the water is too high or it isn't decanted often
enough. In this case please contact HygroMatik.


