background image


the main power suppy immediately. 


DO NOT operate in dirty or dusty environments. Clean fixtures regularly. 


DO NOT touch any wire during operation as there might be a hazard of electric shock. 


DO NOT let cables twist together. 


The minimum distance between light output and the illuminated surface must be more than 12 

meters. 


Disconnect main power supply before fuse/lamp replacement or servicing. 


Replace fuse/lamp only with the same type. 


In the event of serious operating problem, stop using the unit immediately. 


Never turn the unit on and off repeatedly . 


The housing, the lenses, or the ultraviolet filter must be replaced if they are visibly damaged. 


DO NOT open the unit as there are no user serviceable parts inside. 


Never try to repair the unit by yourself. Repairs carried out by unskilled people can lead to damage 

or malfunction. Please contact the nearest authorized technical assistance center if needed. 


Disconnect the main power supply if the fixture is has not been used for a long time. 


Use the original packing materials before transporting it again. 


Cautions: 


To prevent or reduce the risk of electrical shock or fire, do not expose the unit to rain or moisture. 


Hot lamp explosion hazard. DO NOT open the unit within 15 minutes after switching off. 


Replace the bulb once it is damaged, deformed or life-expired. 


DO NOT look directly at the light while the bulb is on. 


Never touch bulb with bare fingers, as it is very hot after use. 


DO NOT turn on the unit without bulb enclosure or when housing is damaged. 


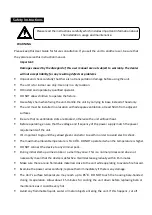
Installation: 

The unit is fully operational in three different mounting positions, hanging upside-down from a ceiling 

or set on a flat level surface. To avoid internal damage to the unit, never mount the unit on its side as 

illustrated  above.  Be  sure  this  fixture  is  kept  at  least  0.5m  away  from  any  flammable  materials 

(decoration  etc.).  Always  use  and  install  the  supplied  safety  cable  as  a  safety  measure  to  prevent 

accidental damage and/or injury in the event the clamp fails. 

Summary of Contents for HMH 150

Page 1: ...User Manual Please read the instructions carefully before use ...

Page 2: ...sure that no ventilation slots are blocked otherwise the unit will overheat Before operating ensure that the voltage and frequency of the power supply match the power requirements of the unit It s important to ground the yellow green conductor to earth in order to avoid electric shock The maximum ambient temperature is TA 40 DO NOT operate it when the temperature is higher DO NOT connect the devic...

Page 3: ...center ifneeded Disconnect the main power supply if the fixture is has not been used for a long time Use the original packing materials before transporting it again Cautions To prevent or reduce the risk of electrical shock or fire do not expose the unit to rain or moisture Hot lamp explosion hazard DO NOT open the unit within 15 minutes after switching off Replace the bulb once it is damaged defo...

Page 4: ...nd maintenance by magnetic home positioning Dimmer Shutter Blackout 0 100 smooth dimming independent shutter and various strobe effect Colour wheel 8 fixed colours plus white Rainbow effect in both directions Gobo wheel 1 Rotating gobo wheel with 7 gobos plus open Prism Prism 6 facet prism and comet prism rotating in both directions Focus Motorized focus Zoom Motorized linear zoom system Protocols...

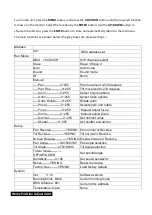
Page 5: ...t 0 270 degrees Color 0 255 Select Colour options Gobo 0 255 Select Gobo options Gobo Rotate 0 255 Rotate gobo Prism 0 255 Select prism and rotate Focus 0 255 Manual adjust focus Zoom 0 255 Manual adjust Zoom Dimmer 0 255 Set dimmer value Shutter 0 255 Set shutter and strobe Setup Pan Reverse YES NO Pan normal or Reverse Tilt Reverse YES NO Tilt normal or Reverse Screen Reverse YES NO Display norm...

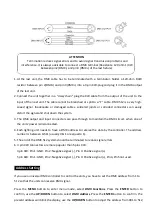
Page 6: ...ss the ENTER button to confirm Connection D MX 51 2 CO NT RO LL ER DMX OUT PARAMETER DEFAULT FUNCTION PAN 128 PAN MOTOR TILT 128 TILT MOTOR COLOUR 128 COLOUR WHEEL GOBO 128 GOBO WHEEL GOBO ROTATE 128 GOBO ROTATION PRISM 128 PRISM SELECTION PRISM I 128 PRISM ROTATION FOCUS 128 FOCUS SELECTION ZOOM 128 ZOOM SELECTION DIMMER 128 DIMMER SELECTION ...

Page 7: ...and input connectors are pass through to maintain the DMX circuit when one of the units power is disconnected 4 Each lighting unit needs to have a DMX address to receive the data by the controller The address number is between 0 511 usually 0 1 are equal to 1 5 The end of the DMX 512 system should be terminated to reduce signal errors 6 3 pin XLR connectors are more popular than 5 pins XLR 3 pin X...

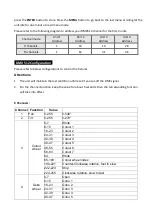
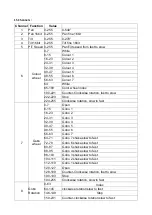
Page 8: ... Attentions 1 The unit will maintain the last condition until reset if you cut off the DMX signal 2 For the channel Function keep the value for about 5 seconds then the corresponding function will take into effect 9 Channels Channel Function Value 1 Pan 0 255 0 540 2 Tilt 0 255 0 270 3 Colour wheel 0 7 White 8 15 Colour 1 16 23 Colour 2 24 31 Colour 3 32 39 Colour 4 40 47 Colour 5 48 55 Colour 6 5...

Page 9: ...146 149 Stop 150 231 Counter clockwise rotation slow to fast 232 255 Bounce slow to fast 6 Prism Prism rotation 0 3 None 4 6 6 facet prism 7 65 6 facet prism clockwise rotation slow to fast 66 123 6 facet prism Counter clockwise rotation slow to fast 124 127 6 facet prism 128 131 None 132 134 Comet prism effect 135 193 Comet prism clockwise rotation slow to fast 194 251 Comet prism Counter clockwi...

Page 10: ...4 255 Clockwise rotation slow to fast 7 Gobo wheel 0 7 Open 8 15 Gobo 1 16 23 Gobo 2 24 31 Gobo 3 32 39 Gobo 4 40 47 Gobo 5 48 55 Gobo 6 56 63 Gobo 7 64 71 Gobo 7 shake slow to fast 72 79 Gobo 6 shake slow to fast 80 87 Gobo 5 shake slow to fast 88 95 Gobo 4 shake slow to fast 96 103 Gobo 3 shake slow to fast 104 111 Gobo 2 shake slow to fast 112 119 Gobo 1 shake slow to fast 120 127 Open 128 189 ...

Page 11: ...ow to fast 146 215 Random slow to fast 216 255 Open 13 Special function 0 7 None 8 15 blackout while Pan Tilt Moving 16 23 blackout while Colour changing 24 31 blackout while Gobo changing 32 39 blackout while Pan Tilt Colour Moving 40 47 blackout while Pan Tilt Gobo Moving 48 55 blackout while Pan Tilt Colour Gobo Moving 56 87 None 96 103 Pan reset 104 111 Tilt reset 112 119 Colour wheel reset 12...

Page 12: ...rco 2 168 183 Sound actived Pan Tilt Marco 3 184 199 Sound actived Pan Tilt Marco 4 200 215 Sound actived Pan Tilt Marco 5 216 231 Sound actived Pan Tilt Marco 6 232 247 Sound actived Pan Tilt Marco 7 248 255 Sound actived Pan Tilt Marco 8 15 Zoom 0 255 From narrow to wide ...

Page 13: ...e channel check the address settings and DMX polarity 3 If you have intermittent DMX signal problems check the pins on connectors or on PCB of the unit or the previous one 4 Try to use another DMX controller 5 Check to see if the DMX cables run near or run alongside to high voltage cables this may cause damage or interference to DMX interface order C One of the channels is not working well 1 The s...

Page 14: ...y depends on the environment in which the fixture operates damp smoky or particularly dirty surrounding can cause greater accumulation of dirt on the unit s optics Clean with soft cloth and use normal glass cleaning liquid Always dry the parts carefully Clean the external optics at least every 20 days Clean the internal optics at least every30 60 days ...

Reviews: