background image

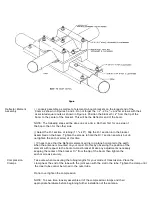
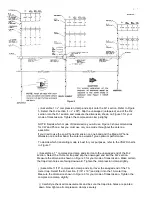
Driven Element            ( ) Select the large set of element-to-boom brackets and loosely assemble on the boom
Assembly                     66" from the center of the reflector element-to-boom bracket as shown in Figure 3. Do not

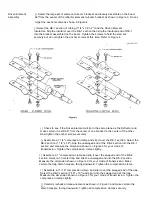
                                    forget the anchor screws as shown in Figure 4.

( ) Select the DE-1 section of tubing (11/4" x 36 1/2") and the Driven Element
insulators. Slip the insulator over the DE-1 section then slip the insulated end of DE-1
into the bracket assembled on the boom. Tighten the screws to hold the element
securely but do not tighten the anchor screws at this time. Refer to Figure 4.

( ) Check to see if the Driven Element will lie in the same plane as the Reflector and
make certain it is still 66" from the center of one bracket to the center of the other.
Now tighten the anchor screws securely.

( ) Assemble a 1 1/4" compression clamp and slip it over the DE-1 section. Select the
DE-2 section (1 1/8”


x 52"). Slip the unswaged end of the DE-2 section into the DE-1

section and measure the dimension shown on Figure 3 for your mode of
transmission. Tighten the compression clamp slightly. .

( ) Assemble a 1 "compression clamp and slip it over the swaged end of the DE-2
section. Select a 10-meter trap and slip the unswaged end into the DE-2 section.
Measure the dimension shown on Figure 3 for your mode of transmission. Make
certain the trap drain holes are facing downward. Tighten the compression clamp

( ) Assemble a 11 /16" compression clamp and slip it over the swaged end of the trap.
Select the DE-3 section (7/16" x 19") and slip it into the swaged end of the trap.
Measure the dimension shown on Figure 3 for your mode of transmission. Tighten the
compression clamp slightly.

( ) Carefully recheck all measurements as shown in Figure 3 and make certain the
trap

drain holes are facing downward. Tighten all compression clamps securely.

Summary of Contents for DB-1015A

Page 1: ... 10 and 15 Meter Duo Band Antenna Order No HY GAIN ELECTRONICS CORPORATION 8601 Northeast Highway 6 Lincoln Nebraska 68505 Telephone 464 9151 Area Code 402 printed copyright Hy Gain Electronics Corporation At rights ...

Page 2: ...al 1 Specifications 1 Theory of Operation 1 SECTION II ASSEMBLY AND INSTALLATION Preparation of Assembly 2 Boom Assembly 2 Reflector Element Assembly 3 Driven Element Assembly 5 Befa Match 6 Director Element Assembly 6 Final Assembly 8 SECTION III PARTS LIST 8 ...

Page 3: ...5 8 O D Wind surface area 3 8 sq ft Wind load 80 mph 97 3 lbs Theory of Operation Hy Gain Hy Q traps are air dielectric parallel resonant circuits which operate as electronic switches On 10 meters the switch is open so only the inner portions of the e ements are operative giving a three element 10 meter beam On 15 meters the switch is closed and the entire element is operative giving a three eleme...

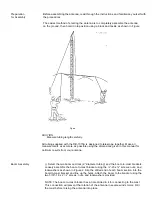
Page 4: ... dimensions given in this manual for optimum results from your antenna Boom Assembly Select the two boom sections 2 diameter tubing and the boom to mast brackets Loosely assemble the boom to mast bracket using the 20 x screws nuts and lockwashers as shown in Figure 2 Slip the drilled end of each boom section into the boomto mast bracket and line up the holes Attach the boom to the bracket using th...

Page 5: ...ely but do not tighten the anchor screw at this time Check to see that the Reflector element will lie in a plane horizontal to the earth when the antenna is mounted on your mast Do this by observing the position of the element with respect to the boom to mast bracket Make any adjustments necessary keeping the center of the bracket 3 from the tip of the boom then tighten the anchor screws securely ...

Page 6: ...ce To decide which transmiting mode is best for your purposes refer to the VSWR charts in Figure 7 Assemble a 1 compression clamp and slip it onto the unswaged end of the R 2 section Select the 10 meter trap and slip the unswaged end into the R 2 section Measure the dimension shown on Figure 3 for your mode of transmission Make certain the trap drain holes are facing downward Tighten the compressi...

Page 7: ...ession clamp and slip it over the DE 1 section Select the DE 2 section 1 1 8 x 52 Slip the unswaged end of the DE 2 section into the DE 1 section and measure the dimension shown on Figure 3 for your mode of transmission Tighten the compression clamp slightly Assemble a 1 compression clamp and slip it over the swaged end of the DE 2 section Select a 10 meter trap and slip the unswaged end into the ...

Page 8: ...10 metal screws and lockwashers Slip the 1 tubing clamps on the driven element near the insulators Loosely attach the pigtails to the tubing clamps using the 20 x 1 screws as shown in Figure 6 Do not tighten the connection at this time The coaxial feedline will connect to this point in a later step Director Element Select the remaining set of element to boom brackets and loosely assemble on the As...

Page 9: ...compression clamp and slip it over the swaged end of D 2 Select a 10 meter trap and slip the unswaged end into the D 2 Measure the dimension shown in Figure 3 for your mode of transmission Make certain the trap drain holes are facing downward and tighten the compression clamp slightly Assemble a 11 16 compression clamp and slip it over the swaged end of the 10 meter trap Select the D 3 section 7 1...

Page 10: ...in balun Model BN 86 available at your local Hy Gain dealer The BN 86 allows the DB 1015A to operate with an efficiency greater than is possible with a homemade choke Your DB 1015A is now ready to be installed on a 1 5 8 O D mast Use one of the methods explained at the beginning of this section When mounting the completed antenna be certain to pin the bracket to the mast as explained in the sectio...

Page 11: ...or improperly installed or used The warranties contained herein are the sole express warranties made by Hy Gam Electronics Corporation on this product _ LIMITATION OF DURATION OF IMPLIED WARRANTIES IMPLIED WARRANTIES INCLUDING WITHOUT LIMITATION WARRANTIES OF MERCHANTABILITY OR FITNESS ARE EXPRESSLY LIMITED IN DURATION TO THE 90 DAY PERIOD OF THIS WARRANTY Some states do not allow limitation on no...

Reviews: