


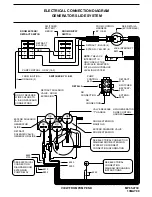

GENERAL INSTRUCTIONS
PREPARATION FOR TRAVEL
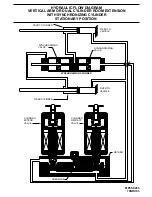
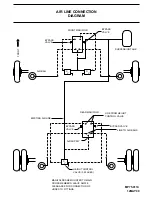
AIR OPERATION
AUTOMATIC AIR LEVELING
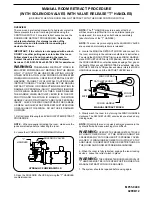
MANUAL AIR LEVELING
Press the "OFF" button at any time to stop the operation of
the system.
may return to travel height.
is not set, the "NOT IN PARK" light will come on and the system
will not operate when the "AIR" button is pressed. The "NOT IN
PARK" light will remain on only while the "AIR" button is pressed.
If the ignition is in the "ON" position and the hand/auto brake
The "DUMP" and "RAISE" buttons will function with the system
and park brake off if the ignition is "ON". See "AIR DUMP AND
RAISE FUNCTIONS".
Start the vehicle’s engine and allow air pressure to build to
the recommended level for traveling.
Before traveling, the red AIR BAG warning lights must be off
1. Set the hand/auto brake in the recommended position for
parking. Leave the engine running to provide air for leveling.
2. Press the "AIR" button once to enter the air mode. The AIR
indicator light and the four AIR BAG warning lights will glow steady.
3. Press the "AIR" button a second time. The AIR indicator
light will start flashing and the air leveling will begin.
4. When all four yellow LEVEL SENSING lights are out the
leveling is complete. The AIR indicator light will stop flashing
and turn steady red. The processor is now in a SLEEP MODE
for 30 minutes. The vehicle’s engine may now be turned off.
After 30 minutes the processor will recheck the vehicle level,
make any corrections required, and return to the SLEEP MODE.
This will continue until the system is turned off by pushing
the "OFF" button or the transmission is taken out of the parking
position and the park brake is released.
If the system was unable to level the vehicle, one or two yellow
LEVEL SENSING indicator lights will remain on and the "EXCESS
SLOPE" light will come on. The system will remain on but
will not go into SLEEP MODE.
1. Place the hand/auto brake in the recommended position
for parking. The engine should be running to provide air for
leveling.
2. Press the "AIR" button. The "AIR" indicator light will glow
steady.
3. Individual RAISE and LOWER buttons (UP and DOWN
ARROWS) will add or dump air from suspension air bags to
raise or lower coach for leveling. These are momentary buttons.
The function will stop when the button is released.
The yellow LEVEL lights indicate a side, end, or corner of
the coach is low. Lower the opposite side or end of the coach to
achieve leveling. If a level position cannot be achieved by dumping
air, raise the coach according to lit yellow "LEVEL" lights.
4. Turn ignition switch "OFF". Turn the system off.
CAUTION:
DO NOT MOVE THE COACH WHEN THE
AIR BAG WARNING LIGHTS ARE ON.
IMPORTANT:
OPERATING PROCEDURES
MP35.4526
02SEP97
NOTE:
CAUTION:
EXCESS SLOPE
NOTE: If the ignition switch is "ON", the vehicle’s air suspension
The "RAISE" and "DUMP" buttons can be used at this
time, but the system will shut off after the button is released.
Always give preference to any side light before
leveling the coach front to rear.
NOTE: If the ignition key is not in the "ON" position, the level-
ing system cannot be turned on. Once the system is on, the
ignition key may be turned off.
DO NOT RELY SOLELY ON WARNING
INDICATORS. IT IS THE OPERATOR’S RESPONSIBILITY
TO CHECK THAT THE VEHICLE IS AT THE PROPER RIDE
HEIGHT BEFORE MOVING THE VEHICLE.
and the "TRAVEL" light must be on. If the vehicle will not return
to the proper ride height for traveling, see the BYPASS VALVE
SECTION.
IMPORTANT: The bypass valves must be closed (turned clock-
wise) for the air leveling system to function.


