


9-2) If it is Dynamic IP DHCP Mode,
1) Please connect the network cable to the printer.
2) Please set up the small switch 1 of DIP switch 1 *ON (Dynamic IP Mode).*ON: (DIP switch) up
3) Please set up the small switch 2 of DIP switch 1 *OFF (Boot into User Value).
*OFF: (DIP switch) down
4) Please power on the printer.
5) You can see the ERROR LED, the PAPER LED *in and out, every one second.
*in and out : on and off.
It means the protocol is exchanging with the host.
6) The LED *in and out will stop.
*in and out : on and off.
It means the protocol is complete exchanging.
Title Rev.
Page
HMK(P)-081,HMC-081 Ver1.0
65
Connecting : The ERROR LED, the PAPER LED *in and out,
every one second.
Complete : The LED *in and out will stop. The printer is ready.
7) Please power off the printer.
8) Please power on the printer, once you press down the button feed.
Then you can see the parmater is printing as you did catch up Dynamic IP DHCP Mode automatically.
9) Please check the parameter you did automatically.
10) Please power off, and on the printer. The parameter you did automatically is boot up.
You can use the paramer at the application.
11) You don’t need to change DIP switch.
Caution)
The parameter you did automatically is changed every time,
when Dynamic IP DHCP Mode is boot up. Please take care about it.
We recommend you use the Dynamic IP DHCP Mode,
if you boot up Static IP Mode and need to change the parameter, if the IP is collied with network IP.
We recommend Static IP Mode, when you communicate with application.
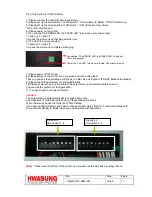
Dip switch 1
Small switch 1~8
Notice :
Please see the bottom of the printer, and you can see the dip switch as image above.
Dip switch 2
Small switch 1~8