background image

5

02954

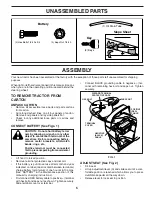
UNASSEMBLED PARTS

ASSEMBLY

When right or left hand is mentioned in this man ual, it means 
when you are in the operating po si tion (seated be hind the 
steer ing wheel).

TO REMOVE TRACTOR  FROM    
CAR TON

UNPACK CARTON

•      Remove all accessible loose parts and parts cartons  

from carton.

•     Cut along dashed lines on all four panels of carton. 

Remove end panels and lay side panels fl at.

•     Check for any additional loose parts or cartons and 

remove.

Your new tractor has been assembled at the factory with the exception of those parts left unassembled for shipping 
puposes.

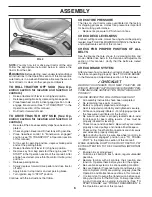
FIG. 1

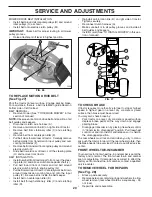
ADJUST SEAT (See Fig. 2)

•      Sit in seat.
•      Lift up adjustment lever (A) and slide seat until a com-

fortable position is reached which allows you to press 
clutch/brake pedal all the way down.

•      Release lever to lock seat in position.

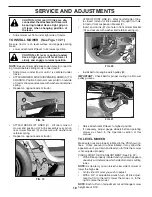
(2) Keys

Slope Sheet

Key

(1) Oil Drain Tube 

(2) Hex Bolts 1/4-20 x 3/4

(2) Keps Nut 1/4-20

Battery

CONNECT BATTERY (See Figs. 1)

CAUTION:  Do not short battery termi-
nals by allowing a wrench or any other 
object to contact both terminals at the 
same time.  Before connecting battery, 
remove metal bracelets, wristwatch 
bands, rings, etc.

Positive terminal must be connected 
fi rst to prevent sparking from accidental 
ground ing. 

•      Lift hood to raised position.
•      Remove terminal protective caps and discard.
•      If this battery is put into service after month and year 

indicated on label (label located between terminals) 
charge battery for minimum of one hour at 6-10 amps. 
(See "BATTERY" in the Maintenance section of this 
manual for charg ing in struc tions).

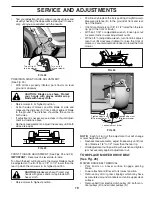
•         First connect RED battery cable to positive (+) terminal 

with hex bolt and keps nut as shown.  Tighten securely. 
Slide terminal cover over terminal.

HEX BOLT

NEGATIVE
(BLACK)
CABLE

POSITIVE
(RED)
CABLE

KEPS NUT

TERMINAL 
COVER

DISCARD TER MI NAL 
PROTECTIVE CAPS

•     Connect BLACK grounding cable to negative (-) ter-

minal with remaining hex bolt and keps nut.  Tighten 
securely. 

Summary of Contents for YTH2042XP

Page 1: ...03002 YTH2042XP Owner s Manual ...

Page 2: ...undandcauseyou to lose control of your tractor Operate machine only in daylight or good artificial light Do not operate the machine while under the influence of alcohol or drugs Watch for traffic when operating near or crossing road ways Use extra care when loading or unloading the machine into a trailer or truck Always wear eye protection when operating ma chine Data indicates that operators age 60 ...

Page 3: ...ach towed equipment except at the hitch point Follow the manufacturer s recommendation for weight limits for towed equipment and towing on slopes Never allow children or others in or on towed equip ment On slopes the weight of the towed equipment may cause loss of traction and loss of control Travel slowly and allow extra distance to stop V SERVICE SAFE HANDLING OF GASOLINE To avoid personal injur...

Page 4: ...act your nearest authorized servicecenter department We have competent well trained technicians and the proper tools to service or repair this tractor Please read and retain this manual The instructions will enable you to assemble and maintain your tractor properly Always observe the SAFETY RULES CUSTOMER RESPONSIBILITIES Read and observe the safety rules Follow a regular schedule in maintaining c...

Page 5: ...ts 1 4 20 x 3 4 2 Keps Nut 1 4 20 Battery CONNECT BATTERY See Figs 1 CAUTION Do not short battery termi nals by allowing a wrench or any other object to contact both terminals at the same time Before connecting battery remove metal bracelets wristwatch bands rings etc Positive terminal must be connected firsttopreventsparkingfromaccidental grounding Lift hood to raised position Remove terminal pro...

Page 6: ...e Become familiar with all controls their location and function Operate them before you start the engine Be sure brake system is in safe operating condition Be sure Operator Presence System and Reverse Op eration System ROS are working properly See the Operation and Maintenance sections in this manual It is important to purge the transmission before oper ating your tractor for the first time Follow...

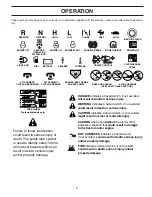
Page 7: ...entify safety inform ation about hazards which can result in death serious injury and or property damage DANGER indicates a hazard which if not avoided will result in death or serious injury WARNING indicates a hazard which if not avoided could result in death or serious injury CAUTION indicates a hazard which if not avoided might result in minor or moderate injury CAUTION when used without the al...

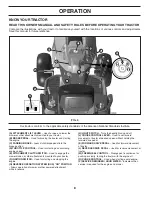
Page 8: ...oling engine speed E ATTACHMENT CLUTCH SWITCH Used to engage the mower blades or other attachments mounted to your tractor F IGNITION SWITCH Used for starting and stopping the engine G REVERSE OPERATION SYSTEM ROS ON POSITION Allows operation of mower or other powered attachment while in reverse H LIGHT SWITCH Turns the headlights on and off J CRUISE CONTROL LEVER Used to set forward movement of t...

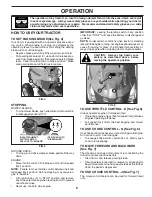
Page 9: ...hrottle control D between half and full speed fast position NOTE Failure to move throttle control between half and full speed fast position before stopping may cause en gine to backfire Turn ignition key F to STOP position and remove key Always remove key when leaving tractor to prevent unauthorized use Never use choke to stop engine OFF PUSH IN TO DISENGAGED ON ATTACHMENT CLUTCH SWITCH PULL OUT TO...

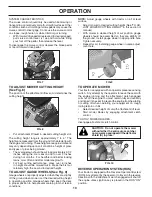
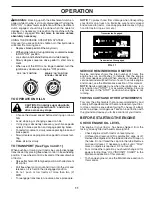
Page 10: ...ed when they are slightly off the ground when mower is at the desired cutting height in operating position Gauge wheels then keep the deck in proper position to help prevent scalping in most terrain conditions FIG 8 FIG 9 TO OPERATE MOWER Your tractor is equipped with an operator presence sensing switch Any attempt by the operator to leave the seat with the engine running and the attachment clutch...

Page 11: ...e and mower see the Maintenance section of this manual NOTE Service reminder runs when the ignition key is in any position but STOP For accurate reading be sure key remains in the STOP position when engine is not running WARNING Backing up with the attachment clutch en gaged while mowing is strongly discouraged Turning the ROS ON to allow reverse operation with the attachment clutch engaged should...

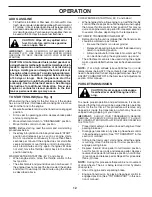
Page 12: ... restart the engine and allow it to warm up for one minute using the choke as described above COLD WEATHER STARTING 50 F and below When engine starts allow engine to run with the throttle controlinthechokepositionuntiltheenginerunsroughly then move throttle control to fast position This may re quire an engine warm up period from several seconds to several minutes depending on the temperature AUTOM...

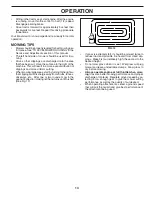
Page 13: ...e hazard from dried clip pings Make first cut relatively high the second to the desired height Do not mow grass when it is wet Wet grass will plug mower and leave undesirable clumps Allow grass to dry before mowing Always operate engine at full throttle when mow ing to assure better mowing performance and proper discharge of material Regulate ground speed by se lecting a low enough gear to give the...

Page 14: ...ractor does not cover items that have beensubjectedtooperatorabuseornegligence Toreceive full value from the warranty operator must maintain tractor as instructed in this manual Some adjustments will need to be made periodically to properly maintain your tractor At least once a season check to see if you should make any of the adjustments described in the Service and Adjustments section of this ma...

Page 15: ...RATOR PRESENCE SYSTEM AND REVERSE OP ERATION SYSTEM ROS Be sure operator presence and reverse operation systems are working properly If your tractor does not function as described repair the problem immediately The engine should not start unless the brake pedal is fully depressed and the attachment clutch control is in the disengaged position CHECK OPERATOR PRESENCE SYSTEM Whentheengineisrunning a...

Page 16: ...6 The fuel filter should be replaced once each season If fuel filter becomes clogged obstructing fuel flow to carburetor replacement is required With engine cool remove filter and plug fuel line sec tions 02463 CLOSED AND LOCKED POSITION YELLOW CAP DRAIN TUBE OIL DRAIN VALVE FIG 15 TO CHANGE ENGINE OIL See Figs 14 and 15 Determine temperature range expected before oil change All oil must meet API serv...

Page 17: ...gasoline FIG 17 D C B H E F M A SERVICE AND ADJUSTMENTS WARNING TO AVOID SERIOUS INJURY BEFORE PERFORMING ANY SERVICE OR ADJUST MENTS Depress brake pedal fully and set parking brake Place attachment clutch in DISENGAGED position Turn ignition key to STOP and remove key Make sure the blades and all moving parts have completely stopped Disconnect spark plug wire from spark plug and place wire where ...

Page 18: ...racket H and secure with washer and retainer spring J E F H J M FIG 20 FIG 21 Install belt onto engine clutch pulley M IMPORTANT Check belt for proper routing in all mower pulley grooves Raise attachment lift lever to highest position If necessary adjust gauge wheels before operating mower as shown in the Operation section of this manual TO LEVEL MOWER Make sure tires are properly inflated to the P...

Page 19: ...or on a level surface Engage parking brake Lower attachment lift lever to its lowest position Remove any dirt or grass clippings which may have accumulated around mandrels and entire upper deck surface Remove belt from electric clutch pulley M both man drel pulleys R and all idler pulleys S PRECISION SIDE TO SIDE ADJUSTMENT See Fig 23 With all tires properly inflated park tractor on level ground or...

Page 20: ...arness A Make sure belt is in all pulley grooves and inside all belt guides and keepers Install mower See TO INSTALL MOWER in this sec tion of manual electric 02953 A B C D E F G H J FIG 27 TO REMOVE WHEEL FOR REPAIRS See Fig 28 Block up axle securely Remove axle cover retaining ring and washers to allow wheel removal rear wheel contains a square key Do not lose Repair tire and reassemble FRONT WH...

Page 21: ...curely back into the hole in the backside of the grill Close hood INTERLOCKS AND RELAYS Loose or damaged wiring may cause your tractor to run poorly stop running or prevent it from starting Check wiring See electrical wiring diagram in the Repair Parts section TO REPLACE FUSE Replace with 20 amp automotive type plug in fuse The fuse holder is located behind the dash TO REMOVE HOOD AND GRILL ASSEMB...

Page 22: ...FUEL SYSTEM PARTS SUCH AS CARBURETOR FUEL FILTER FUEL HOSE OR TANK DURING STORAGE ALSO EXPERIENCE INDICATES THAT ALCOHOL BLENDED FUELS CALLED GASOHOL OR USING ETHANOLORMETHANOL CANATTRACTMOISTUREWHICH LEADSTOSEPARATIONANDFORMATIONOFACIDSDURING STORAGE ACIDIC GAS CAN DAMAGE THE FUEL SYSTEM OF AN ENGINE WHILE IN STORAGE Empty the fuel tank by starting the engine and let it run until the fuel lines a...

Page 23: ... Check all wiring 7 Faulty ignition switch 7 Check replace ignition switch 8 Faulty solenoid or starter 8 Check replace solenoid or starter 9 Faulty operator presence switch es 9 Contact an authorized service center department Engine clicks but will not 1 Weak or dead battery 1 Recharge or replace battery start 2 Corroded battery terminals 2 Clean battery terminals 3 Loose or damaged wiring 3 Chec...

Page 24: ... air pressure 5 Check tires for proper air pressure 6 Worn bent or loose blade 6 Replace blade Tighten blade bolt 7 Buildup of grass leaves and trash under mower 7 Clean underside of mower housing 8 Mower drive belt worn 8 Replace mower drive belt 9 Blades improperly installed 9 Reinstall blades sharp edge down 10 Improper blades used 10 Replace with blades listed in this manual 11 Clogged mower d...

Page 25: ... AC 3600 RPM REGULATOR DISCONNECTED CHARGING SYSTEM OUTPUT 15 AMP DC 36 RPM OPTIONAL NON REMOVABLE CONNECTIONS REMOVABLE CONNECTIONS WIRING INSULATED CLIPS NOTE IF WIRING INSULATED CLIPS WERE REMOVED FOR SERVICING OF UNIT THEY SHOULD BE REPLACED TO PROPERLY SECURE YOUR WIRING 02928 194276_Regulated Tex IGNITION SWITCH CIRCUIT POSITION OFF B A1 RUN OVERRIDE B S A1 START M G A1 B A1 RUN MAKE L A2 02...

Page 26: ...26 TRACTOR MODEL NO YTH2042XP 96041000300 PRODUCT NO 960 41 00 03 ELECTRICAL 30 33 24 42 40 26 28 71 194276D 29 34 43 25 27 41 50 Battery _28 8 1 99 100 91 2 27 22 21 16 55 46 46 90 ...

Page 27: ...0 15 45 Switch Seat 30 532 19 33 50 Switch Ignition 33 532 14 04 01 Key Ignition Molded Generic 34 532 11 07 12 Switch Light Reset 40 532 40 11 04 Harness Ignition Dash 41 817 72 04 08 Screw Thd Cut 1 4 20 x 1 2 42 532 13 15 63 Cover Terminal Red 43 532 19 25 07 Solenoid 46 532 19 81 38 Gauge Hourmeter 50 532 17 46 51 Switch PTO 55 817 49 05 12 Screw Thdrol 5 16 18 x 3 4 59 532 40 03 03 Outlet 12 ...

Page 28: ...130 37 194 194 52 52 181 181 182 68 68 189 216 216 176 176 176 175 178 165 228 228 185 52 184 99 152 150 202 203 204 210 208 18 15 25 207 211 209 212 180 215 217 139 139 213 213 68 218 34 130 130 5 161 156 156 199 162 177 196 221 162 176 176 205 206 58 189 189 chassis tex_18 gt husq 195 ...

Page 29: ...30 25 Bushing Mtg Fender Crgo 182 532 19 47 87 Dash Lower 184 532 19 57 80 Spacer 185 872 11 05 10 Bolt Carr 5 16 18 x 1 1 4 Gr 5 NOTE All component dimensions given in U S inches 1 inch 25 4 mm KEY PART NO NO DESCRIPTION 189 817 00 05 12 Screw 5 16 18 x 3 4 194 873 90 05 00 Nut Lock Hex Flange 5 16 18 195 532 40 41 37 Plug Hole Dash Lower 12V 196 532 40 02 99 Console Asm Deck Lift 199 532 19 82 5...

Page 30: ...20 74 213 171 197 196 206 26 207 209 186 189 49 187 50 51 190 52 51 51 52 208 153 210 170 211 211 125 125 166 222 64 185 188 116 162 162 2 2 169 169 17 33 205 161 35 1 184 221 221 167 160 160 42 drive tex_9 husq hydro 203 116 33 163 214 148 215 92 125 37 37 183 183 205 29 159 15 15 159 ...

Page 31: ... 19 90 00 Rod Pedal Control 166 532 19 72 90 Nut Push 625 167 532 19 62 11 Latch Brake Parking 169 874 49 05 60 Bolt Hex Flghd 5 16 18 x 3 75 170 532 19 43 22 Keeper Belt Centerspan 171 872 11 06 16 Bolt 183 532 13 70 57 Spacer Split 184 532 40 31 18 Handle Parking Brake 185 872 11 06 20 Bolt Rdhd Sqnk 3 8 16 x 2 1 2 186 532 19 43 21 Spacer Retainer 187 819 13 32 10 Washer 188 532 19 43 23 Link Cl...

Page 32: ...532 18 67 37 Adapter Wheel Steering 22 532 19 48 45 Bushing Strg Blk 26 532 19 36 52 Insert Wheel Steering 28 817 00 06 12 Screw 3 8 16 x 3 4 35 532 19 47 32 Gear Sector Plate 45 819 18 38 12 Washer 9 16 x 2 3 8 x 12 Ga NOTE All component dimensions given in U S inches 1 inch 25 4 mm KEY PART NO NO DESCRIPTION 51 873 94 08 00 Nut Hex Jam Toplock 1 2 20 unf 53 532 18 89 67 Washer Hardened 793 x 1 6...

Page 33: ... x 3 4 Single Lead Hex 22 532 19 15 96 Control Choke 28 532 14 21 58 Fuel Line 29 532 13 71 80 Spark Arrester Kit 31 532 14 50 06 Clip Push In 37 532 12 34 87 Clamp Hose 41 532 12 61 97 Washer 1 1 2 OD x 15 32 ID x 250 42 810 04 07 00 Washer Lock 7 16 45 873 51 04 00 Nut Keps Hex 1 4 20 unc 62 532 14 66 29 Shield Heat Muffler 69 Gasket Order part from Eng Mfg 70 532 14 66 99 Tube Exhaust LH KEY PAR...

Page 34: ...rsn 8 532 17 18 77 Bolt 5 16 18 uncx 3 4 w Sems 10 532 19 69 77 Pan Seat 21 532 17 18 52 Bolt Shoulder 5 16 18 37 873 80 05 00 Nut Lock 5 16 18 unc 40 532 19 76 61 Handle Slide Seat 41 532 19 82 00 Spring Latch Seat 43 874 76 06 12 Bolt 3 8 16 x 3 4 44 819 13 38 12 Washer 13 32 x 2 3 8 x 12 Ga KEY PART NO NO DESCRIPTION KEY PART NO NO DESCRIPTION NOTE All component dimensions given in U S inches 1...

Page 35: ...Service Item Only 11 532 13 83 37 Rim Assembly Rear 532 14 43 34 Sealant Tire 10 oz Tube 14 2 1 532 40 03 89 Decal Warning Syms CE 2 532 40 21 28 Decal Hood Insert 3 532 19 63 57 Decal Warning Deflect Cutfinger 4 532 19 68 41 Decal Warning Eng Syms 5 532 14 08 37 Decal Saddle Brake Parking 6 532 17 83 02 Decal Oper Cruise Sym 7 532 16 88 69 Decal Tick Mark 8 532 16 03 96 Decal Mower Sch 9 532 14 50 ...

Page 36: ...00 03 MOWER DECK 15 14 13 11 8 16 68 30 31 32 33 145 190 34 55 56 57 62 188 189 1 69 21 21 21 115 115 20 59 40 19 19 6 6 42_D_elec Tex_5 21 24 25 26 27 29 23 189 188 36 40 117 116 118 119 117 119 116 118 113 117 116 118 119 21 2 112 21 117 119 116 2 111 118 113 ...

Page 37: ... 90 Washer Spacer Mower Vented 32 532 17 34 36 Pulley Mandrel 33 532 40 02 34 Nut Toplock 34 872 11 06 12 Bolt Carr SH 3 8 16 x 1 1 2 Gr 5 36 532 19 61 06 Pulley Idler Flat 40 873 90 06 00 Nut Lock 3 8 16 45 532 17 79 68 Pulley Idler Glat 55 532 19 72 49 Arm Idler 56 532 19 90 92 Spacer Retainer 57 817 00 06 16 Screw 3 8 16 x 1 59 532 14 10 43 Guard TUV Idler 61 532 17 48 82 Spring Ext Elect Clutc...

Page 38: ...14 Spring Torsion 87 532 19 42 09 Pin Cotter 7 16 Bow Tie Lock 88 532 19 53 04 Spring Lift Assist 89 819 19 19 12 Washer Clear Zinc KEY PART NO NO DESCRIPTION NOTE All component dimensions given in U S inches 1 inch 25 4 mm KEY PART NO NO DESCRIPTION 90 532 19 42 08 Pin Cotter 5 16 Bow Tie Lock 91 532 19 51 81 Link Lift Susp Mower Rear 97 817 06 06 12 Screw 3 8 16 x 75 Smgml Tap R Z 98 532 19 52 7...

Page 39: ...the face Do not mow slopes greater than 15 degrees Make turns gradually to prevent tipping or loss of control Exercise extreme caution when changing direction on slopes 1 Fold this page along dotted line indicated above 2 Hold page before you so that its left edge is vertically parallel to a tree trunk or other upright structure 3 Sight across the fold in the direction of hill slope you want to me...

Page 40: ...ll claims must be sent to the appropriate manufacturer 4 Lawn and garden attachments are covered by a third party which gives a warranty all claims for war ranty should be sent to the manufacturer and 5 Emission Control System components necessary to comply with CARB TIER II and EPA regulations which are manufactured by third party engine manufacturer SECTION 4 EXCEPTIONS AND LIMITATIONS This warr...

Reviews: