40
41
7.44 Replace Intermediate Gear
1) Remove bottom pan (Section 7.42).
2) Remove bolts holding lower handle to left
side of frame.
3) Remove four 1⁄2” nuts that secure the gear
and the Auxiliary Plate.
4) Remove bolt through center of gear.
NOTE:
Inspect pinion on Hex Shaft, if
damaged replace. Lubricate Hex Shaft.
5) Replace gear and reassemble reversing the
process. Torque nuts at
4-6 Ft.Lbs.
Lubricate center of gear with grease.
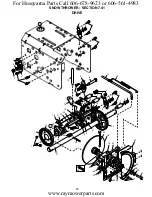
7.45 Replace Drive Plate Assembly
1) The Drive Belt must be removed from the
Engine Pulley. (Section 7.32)
2) If equipped with power steering, remove the
screw holding the power steering cover at
lower front on both sides.
3) Remove the 1⁄2” nut holding the clutch rod to
the drive control bellcrank.
4) Remove the 4 screws (2 each side) from
the frame that hold the mounting drive plate
in place. The zinc plated screws on left side
are slightly longer.
5) Remove belt from pulley
6) Slide Drive Plate Assembly out.
NOTE:
Whenever this assembly is removed,
it is strongly suggested to lubricate the
Hex Shaft with anti-seize compound. See
Section 7.46 for instructions.
7) Place belt on pulley in correct position, be
sure the clutch rod is through the hole in
top left end of plate. Reverse the order to
reassemble.
8) The top left corner of the Drive Plate
Assembly will fit into Frame Slot.
9) Install 1⁄2” nut at bellcrank so two threads are
showing on clutch rod. See Section 6.22
.
NUTS
FRAME
BOTTOM
PAN
LOWER
FRONT
SCREW
POWER
STEERING
COVER
DRIVE PLATE
ASSEMBLY
SCREWS
DRIVE PLATE
ASSEMBLY
SCREWS
FRAME SLOT
For Husqvarna Parts Call 606-678-9623 or 606-561-4983
www.mymowerparts.com


