background image

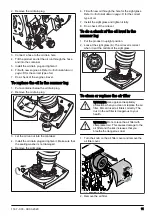
2. Remove the oil drain plug.

3. Connect a hose to the oil drain hole.
4. Tilt the product and let the oil run through the hose

and into the container.

5. Install the oil drain plug and tighten it.
6. Fill with new engine oil. Refer to 

Technical data on

page 13

 for the correct type of oil.

7. Do a check of the engine oil level.

To replace the oil in the rammer leg

1. Put a container below the oil drain plug.
2. Remove the oil drain plug.

3. Let the oil run out into the container.
4. Install the oil drain plug and tighten it. Make sure that

the sealing washer is not damaged.

5. Remove the sight glass.

6. Fill with new oil through the hole for the sight glass.

Refer to 

Technical data on page 13

 for the correct

type of oil.

7. Install the sight glass and tighten it fully.
8. Do a check of the oil level.

To do a check of the oil level in the

rammer leg

1. Put the product in upright position.
2. Look at the sight glass (A). The oil level is correct

when it is at the middle of the sight glass.

A

To clean or replace the air filter

WARNING: Use approved respiratory

protection when you clean or replace the air

filter. Discard used air filters correctly. The

dust in the air filter is dangerous to your

health.

WARNING: Do not clean the air filter with

compressed air. This causes damage to the

air filter and the risk increases that you

breathe the dangerous dust.

1. Turn the knob on the air filter cover and remove the

air filter cover.

2. Remove the air filter.

1167 - 003 - 09.03.2020

11

Summary of Contents for LT 8005

Page 1: ...LT 8005 EN Operator s manual 2 16 ...

Page 2: ... operation only The product is used for compaction in trenches around pipes or other small spaces Examples of such work are house foundations and parking lots Do not use the product for other tasks Product overview 7 13 14 5 1 3 2 4 12 6 8 9 11 10 1 Vibration damping units 2 Type plate 3 Throttle control 4 Fuel tank 5 Handle 6 Fuel filter 7 Operator s manual 8 Air filter 9 Starter rope handle 10 O...

Page 3: ...rred to in the EC directive The emission of the product is specified in Technical data on page 13 and on the label This product is in compliance with applicable EC directives Note Other symbols decals on the product refer to special certification requirements for some markets Type plate 1 2 3 8 4 6 5 7 1 Product type 2 Serial number with production date year week and sequence number 3 Rated power ...

Page 4: ...death we recommend persons with medical implants to speak to their physician and the medical implant manufacturer before operating this product Keep the product clean Make sure that you can clearly read signs and decals Do not use the product if it is defective Do not change this product Do not operate the product if it is possible that it is changed by other persons Safety instructions for operat...

Page 5: ...ystem that decreases the vibrations from the handles to the operator Let the product do the work Do not push the product with force Hold the product at the handles lightly but make sure that you control the product and operate it safely Do not push the handles into the end stops more than necessary Keep your hands on the handle or handles only Keep all other body parts away from the product Stop t...

Page 6: ...s and long legs Fire extinguisher Keep a fire extinguisher near during operation Use a powder fire extinguisher of ABE class or a carbon dioxide fire extinguisher of BE type Safety devices on the product WARNING Read the warning instructions that follow before you use the product Do not use a product with defective safety devices Do a check of the safety devices regularly If the safety devices are...

Page 7: ...duct dry before you start the engine Examine the engine for leaks regularly If there are leaks in the fuel system do not start the engine until the leaks are repaired Do not use your fingers to examine the engine for leaks Keep fuel in approved containers only When the product and fuel is in storage make sure that fuel and fuel fumes cannot cause damage Drain the fuel in an approved container outd...

Page 8: ...starts 5 Let the engine operate at idle speed for 2 3 minutes before you apply full throttle To do if the engine does not start If the engine does not start and white smoke shows do the procedure that follows 1 Set the throttle control to the stop position 2 Slowly pull and release the starter rope handle 5 times 3 Do the start procedure again To operate the product 1 Set the throttle control in t...

Page 9: ...ke sure that nuts and screws are tightened Examine the throttle control for damage Make sure that the throttle control can move smoothly Lubricate the throttle control and the engine throttle wire X Do a check of the oil level in the rammer leg X X X Replace the oil in the rammer leg X X Tighten the bolts on the rammer shoe X Engine maintenance Before use each 10 h After the first 20 h Weekly each...

Page 10: ...re tightened correctly To tighten the bolts on the rammer shoe Tighten the bolts on the rammer shoe with a wrench Note A 280 mm 11 in wide rammer shoe has 13 bolts A 330 mm 13 in wide rammer shoe has 19 bolts To do a check of the engine oil level 1 Put the product in an upright position 2 Remove the oil tank cap and dipstick 3 Clean the oil from the dipstick 4 Put the dipstick back fully into the ...

Page 11: ...r the sight glass Refer to Technical data on page 13 for the correct type of oil 7 Install the sight glass and tighten it fully 8 Do a check of the oil level To do a check of the oil level in the rammer leg 1 Put the product in upright position 2 Look at the sight glass A The oil level is correct when it is at the middle of the sight glass A To clean or replace the air filter WARNING Use approved ...

Page 12: ... heavy and can cause injury or damage if it falls or moves during transportation Transport wheels let you move the product manually for shorter distances For longer distances lift the product to move it or put the product on a vehicle CAUTION Do not tow the product behind a vehicle To move the product on the transport wheels 1 Set the throttle control in the stop position 2 Tilt the product forwar...

Page 13: ...arts Apply a thin layer of oil on the rammer shoe to prevent corrosion Clean the air filter before storage Carefully pull the starter rope handle until there is a small resistance Put a protective cover on the product Keep the product in a dry and frost free area Keep the product in a locked area to prevent access for children or persons that are not approved Disposal Obey the local recycling requ...

Page 14: ...ance with the same directive or standards These declared values are not suitable for use in risk assessments and values measured in individual work places may be higher The actual exposure values and risk of harm experienced by an individual user are unique and depend upon the way the user works in what material the product is used as well as upon the exposure time and the physical condition of th...

Page 15: ... A A Height mm in 1088 42 8 D Length mm in 796 31 3 B Rammer shoe contact area m2 sq ft 0 065 0 70 0 075 0 81 E Rammer shoe width mm in 280 11 330 13 C Rammer shoe length mm in 330 13 F Width mm in 444 17 5 1167 003 09 03 2020 15 ...

Page 16: ...o machinery 2000 14 EC relating to outdoor noise and that the following harmonized standards and or technical specifications are applied EN 500 1 A1 2009 EN 500 4 2011 Notified body 0038 Lloyd s Register Verification Limited 71 Fenchurch Street London EC3M 4BS UK has certified conformity with the Council s Directive 2000 14 EC Annex VIII Full Quality Assurance For information relating to noise emi...

Page 17: ...1167 003 09 03 2020 17 ...

Page 18: ...18 1167 003 09 03 2020 ...

Page 19: ...1167 003 09 03 2020 19 ...

Page 20: ...www husqvarnacp com Original instructions 1141124 26 2020 03 12 ...

Reviews:

Related manuals for LT 8005