21
8
9
10
11
12
13
15
14
16
18
17
19
20
18 – Operating the machine
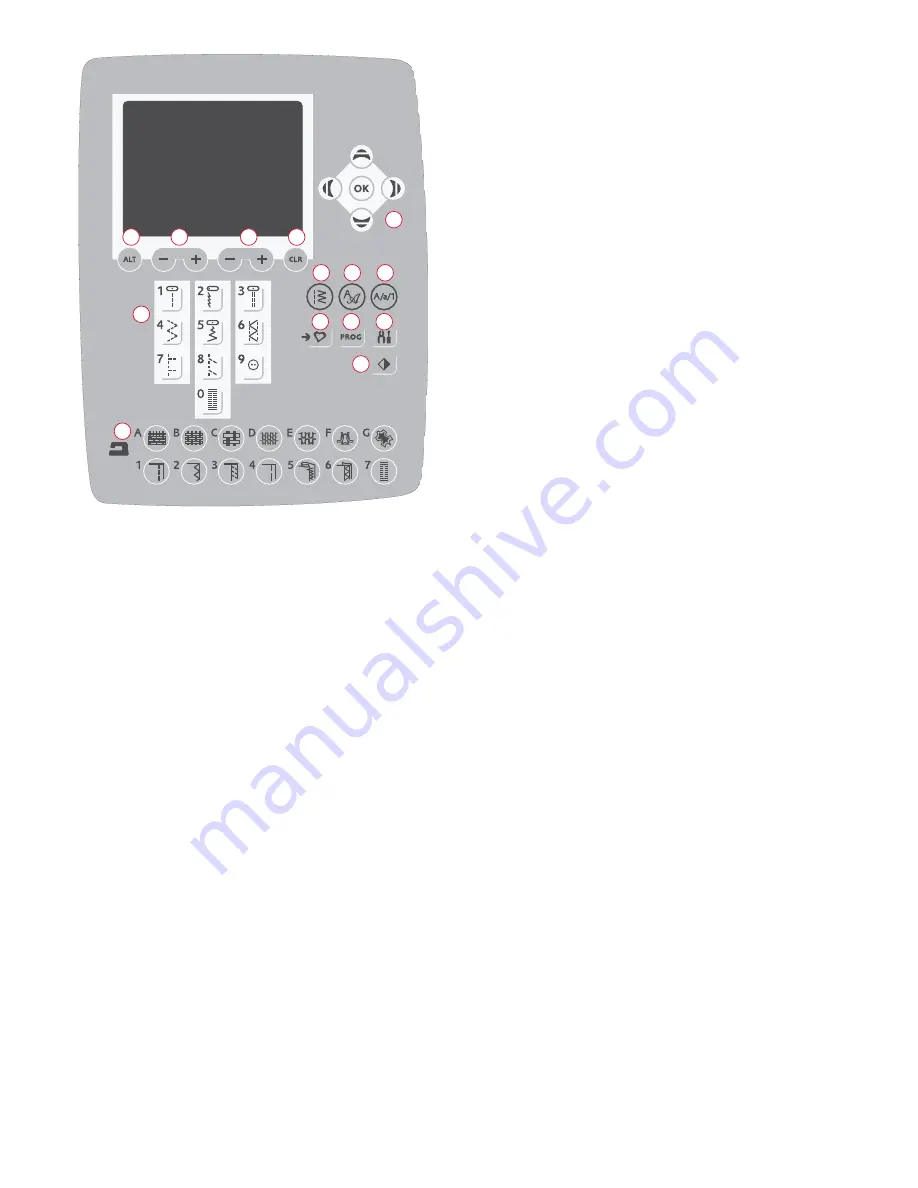
FUNCTION BUTTONS ON THE TOUCH PANEL
8. Alternate View
When you select a satin stitch the length and width settings
will be shown on the GraphicDisplay. By pressing the
Alternate View button the density setting will be shown
instead of the length setting.
9. Stitch Length/Density
When you select a stitch, your machine automatically
sets the best stitch length. The stitch length is visible on
the GraphicDisplay. You can change the stitch length by
pressing the + or – button.
If you have selected a buttonhole the GraphicDisplay will
show the density setting instead of the stitch length setting.
You will now be able to change the density setting by
pressing the + and – buttons.
If you press the Alternate View button the GraphicDisplay
will show the density setting for satin stitches. Use the +
and – buttons to change the setting.
10. Stitch Width/Needle position
The stitch width is set in the same manner as the stitch
length. The preset width is visible on the GraphicDisplay.
The width can be adjusted between 0 and 7 mm. Some
stitches have a limited stitch width.
If a straight stitch is selected, the + and – buttons are used
to move the needle to the left or right in 29 positions.
11. Clear
Press this button to delete a single stitch or all stitches in
a stitch program. Or use it to delete your saved stitches
and stitch programs in the My Stitches Menu. This button
is also used to activate tapering for Decorative Tapering
Stitches.
12. Stitch Selection Buttons
By pressing any of the 0 to 9 buttons you select the stitch
illustrated on that button immediately.
By pressing two digits in quick succession you will be able to
select a stitch from 10 and up from the selected stitch menu.
If the stitch number does not exist in the selected stitch
menu you will hear a beep and the fi rst entered digit will be
selected as a stitch.
13. Navigator Arrow Buttons
Make your selections with the arrow buttons and confi rm
your selections or changes with the OK button.
Use the left/right arrow buttons to select stitches step by
step in numerical order within the selected stitch menu.
The arrow buttons are also used when programming to
select stitches within the program or to select letters to
insert in the program.
The up and down arrow buttons are also used to set the
size of a buttonhole and to set the number of stitches
when sewing on a button.
14. Stitch Menu
Press this button to select a stitch from any of the stitch
menus shown on the GraphicDisplay.
15. Font Menu
Press this button to open the Font Menu on the
GraphicDisplay to select a font.
16. Shift to upper-case, lower-case or numbers
Press this button to shift to lower or upper-case or numbers
when programming letters.
17. Save to My Stitches
This button opens the menu where you can save your own
personal stitches or stitch programs. Press the button again
to exit the My Stitches mode.
18. Program Mode
Press this button to open the mode for programming. Press
the button again to exit the program mode.


