INSTALLATION
4
Mount the Installation Brackets — Inside Mount
Prepare the Installation Brackets
■
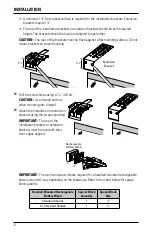
Use pliers or heavy duty scissors to remove the top
tabs on the installation brackets.
NOTE:
Save these tabs once removed. They may be
used as shims, if necessary.
Mount the Installation Brackets
■
Mark 2" to 3" from each jamb for bracket location.
➤
If more than two installation brackets came with your order, space additional bracket(s)
evenly between the two end brackets and mark their location.
Allow a minimum
of 18" between the brackets on the motor end for the rechargeable battery
wand.
Mount into wood whenever possible.
NOTE:
Before the headrail is installed, the bracket levers need to be
fully to the left
, and
once the headrail is properly in place, levers automatically click to the right.
■
Center the brackets on your marks and mark the location of the screw holes.
➤
The depth required for fully recessed mounting will vary depending on the shade size
and power option. Refer to the chart below for depth.
■
Use a level to check that the
mounting surface is level. Shim
the brackets, if necessary (use the
top tab that was removed from the
brackets.)
■
Drill the screw holes using a
3
⁄
32
" drill bit.
CAUTION:
Use drywall anchors when mounting into drywall.
Tab
Remove Tab
Back Cover Bracket
Bracket Lever
Space Evenly
Space Evenly
2" to 3"
2" to 3"
Jamb
Jamb
Top View
Minimum Mounting Depths
Battery Wand
Headrail-Mounted
Rechargeable
Battery Wand
Standard Shades
1"
1
1
⁄
4
"
Oversized Shades
1"
1
1
⁄
2
"
Fully Recessed Standard Shades
3
3
⁄
16
"
4"
Fully Recessed Oversized Shades
3
3
⁄
4
"
4
1
⁄
4
"
Recessed
Depth
Nearest
Obstruction
Head Jamb


