background image

4

GETTING STARTED

Required Components


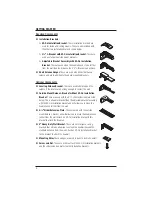
Installation Brackets:


EZ-On Installation Bracket. 

These installation brackets are

used for inside and ceiling mounts. They are also included with
the other two installation brackets shown below.


3½" L-Bracket with EZ-On Installation Bracket.

 These are

used as standard outside mount brackets.


Adjustable Bracket Assembly with EZ-On Installation 
Bracket.

 These are used when the headrail needs to be further 

from the wall than the distance the 3

1

/

2

" L-Bracket can achieve.


Short Valance Hanger. 

These are used with blinds that have a

valance and are in addition to the above mounting brackets. 

 Optional  Components


Leveling Valance Bracket. 

These are used to help support the 

valance if the returns are not long enough to contact the wall.


Outside Mount Deluxe L-Bracket without EZ-On Installation
Bracket. 

These are used with the 4

1

/

2

" slider extension plate listed 

below. This is a heavier bracket than the adjustable bracket assembly 
with the EZ-On installation bracket and will allow you to move the 
headrail even further from the wall.


4

1

/

2

" Slider Extension Plate. 

These are used with the outside

mount deluxe L-bracket and will allow you to move the headrail even 
further from the wall. Attach an EZ-On installation bracket to this 
bracket to attach the headrail.


4" Heavy-Duty Wall Bracket. 

These are vertical space-saving

brackets that will also allow you to extend the headrail beyond the 
standard distance from the wall. Attach an EZ-On installation bracket 
to this bracket to attach the headrail. 


Mounting Shim. 

These wedges are used in pairs to level a headrail.


Screw and Nut. 

These are used to attach the EZ-On installation brackets 

and the slider extension plates to other installation brackets.

Summary of Contents for Cadence Soft Vertical Blinds

Page 1: ...Installation Operation Care Cadence Soft Vertical Blinds with the Paramount Contoured Headrail System...

Page 2: ...2 Mounting Types and Window Terminology 3 Installation Components Needed 3 Tools and Fasteners Needed 5 Installation Valance Assembly 6 Inside or Ceiling Mount Installation 9 Outside Mount Installati...

Page 3: ...GETTING STARTED 1 Product View Standard PermaTilt Wand Control System Optional Cord and Chain Control System Headrail Louvers Optional PermAssure Safety Wand Control System...

Page 4: ...es are not shipped assembled Product View Crestover Wood Valance Optional Cadence Valance Return Left Cadence Corner Valance Inserts Right Cadence Corner Dust Cover Valance Valance Assembly Clip Assem...

Page 5: ...installation brackets are mounted correctly the rest of the installation process follows very easily To prepare for this important rst step review the mounting types and basic window terminology illu...

Page 6: ...ll Outside Mount Deluxe L Bracket without EZ On Installation Bracket These are used with the 41 2 slider extension plate listed below This is a heavier bracket than the adjustable bracket assembly wit...

Page 7: ...work with your speci c mounting surface s 8 Hex Head Screws Provided Two 2 screws are provided per installation bracket Longer 8 Hex Head Screws Not Provided Use 8 mounting screws long enough for a se...

Page 8: ...e curved edge of the top valance insert over the round end of the assembly clip Slide the curved edge of the bottom valance insert onto the bottom edge of the assembly clip IMPORTANT The lower edge of...

Page 9: ...ust cover Install the valance corners and the returns IMPORTANT Angle the corner as it is inserted into the louvers Dust Cover Top Insert Valance Assembly Clip Dust Cover Side View Dust Cover Dust Cov...

Page 10: ...clips attached to the wood valance face into the corresponding grooves on the valance returns NOTE If the returns are too long they can be shortened using a cut off saw to remove material from the ba...

Page 11: ...dditional brackets to support the stacked louvers Install Installation Brackets and Assembled Valance IMPORTANT The inside surface of the dust cover has three parallel grooves use the center groove to...

Page 12: ...orward then roll the headrail back toward the rear of the blind Push up and snap into place Test the Headrail Operation For a headrail with the cord and chain control system unpack the chain and cord...

Page 13: ...he desired height The brackets should be level and aligned CAUTION The rear of the brackets must be ush against a at mounting surface Do not mount brackets on curved molding Drill the screw holes usin...

Page 14: ...e Test the Headrail Operation For a headrail with the cord and chain control system unpack the chain and cord Check that the chain wand will rotate the louver hooks Check that the cord wand will trave...

Page 15: ...ioner Kit to secure the cord tensioner to the window casement WARNING It is imperative that the cord tensioner be properly secured to the wall or window frame to reduce children s access to the cord l...

Page 16: ...e cord tension with the cord tensioner Test for proper cord tension Cut the excess cord To Reduce Cord Length on Split Stack Blinds Release the tension on the cord with the cord tensioner see Attach t...

Page 17: ...all the way and remains there while installing the valance Hold the valance assembly up to the headrail Push the edge of the dust cover into the short valance clips Push the entire valance assembly al...

Page 18: ...aversing your louvers use one hand to hold the tether to keep it from moving while pulling the tensioned cord up or down with your other hand NOTE Do not over torque the wand It can cause the louvers...

Page 19: ...that the product meets cord safety standard PermaTilt Wand Control Tilting gray arrows When tilting your louvers use one hand to hold the tether to keep it from moving while turning the wand handle wi...

Page 20: ...or close your louvers Twist the wand to open or close the louvers gray arrows IMPORTANT Do not over torque the wand It can cause the louvers to kick out at the bottom of the blind Cord and Chain Use...

Page 21: ...w releasing it from the installation brackets CAUTION Removing long headrails will require more than one person to avoid damaging the headrail Cleaning Procedures Dusting Regular light dusting with a...

Page 22: ...prevent children from pulling cord loops around their necks Hunter Douglas provides a cord tensioner installation kit with instructions for attaching the cord tensioner For the blind to operate proper...

Page 23: ...IMITED WARRANTY Hunter Douglas window fashion products are covered for defects in materials workmanship or failure to operate for as long as the original retail purchaser owns the product unless short...

Reviews: