


3
42700-01 • 01/15/08 • Hunter Fan Company
Installer’s Choice and Optional Accessories
Understanding Mounting and Installer’s Choice
®
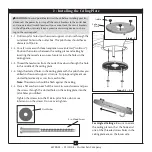
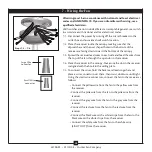
Hunter’s patented 3-position mounting system provides you maximum
installation flexibility and ease. You can install your Hunter fan in one
of three ways, depending on ceiling height and your preference: Low
Profile, Standard, or Angled mounting. The steps in this manual include
instructions for all three Installer’s Choice mounting methods.
Considering Optional Accessories
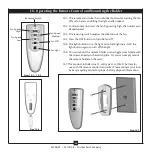
Consider using Hunter’s optional accessories, including a wall-mounted
or remote speed control. To install and use the accessories, follow
the instructions included with each product. For quiet and optimum
performance of your Hunter fan, use only Hunter speed controls.
For ceilings higher than 8 feet, you can purchase
Hunter extension downrods. All Hunter fans use
sturdy 3/4 in. diameter pipe to assure stability and
wobble-free performance.
Standard Mounting
hangs from the
ceiling by a downrod (included).
Angled Mounting
recommended for a
vaulted or angled ceiling
Support Brace
Standard
Mounting
Style
Ceiling
Outlet Box
Support Brace
Ceiling
Outlet Box
Angled
Mounting
Style
Low Profile Mounting
fits close to the
ceiling, recommended for ceilings less
than 8 feet high
Support Brace
Low Profile
Mounting
Style
Ceiling
Outlet Box
8
12
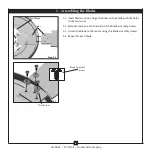
CAUTION:
To
reduce the risk of
personal injury, attach
the fan directly to the
support structure of
the building according
to these instructions,
and use only the
hardware supplied.


