background image

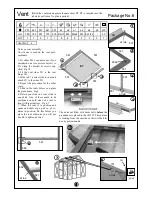
(Build the vent around polycarbonate sheet B7. B7 is inserted into the 
rebated vent frame. No glue required) 

Package No.6 


Vent


6


201


521


531


541


551


a1


a2


a7


a9


a4


p3


p10


mm


300


724


601


707


678


M6x10


M6


M4x8


M4


Φ4.2x9.5


-


40


QTY


1


1


2


1


1


8


8


2


2


2


2


1


Vent No.


2


1


541


531


a1/a2


2


531


551


a1/a2


3


551


201


a7/a9


4


682


521


5


1


2


3


541


531


531


551


b7


521


682


a1/a2


5


6


p3/a4


701


541 

p3/a4 

Notes on vent assembly 
No  silicone  is  used  on  the  vent  poly-
carbonate. 
 
1. Fit either 201 or an autovent, if you 
purchased  one  (see  picture  below),  to 
551  using  the  bracket  &  screws  sup-
plied. Fig 3/8 
2.  Fit  the  vent  sides  531  to  the  vent 
hinge 541. 
3. Slide in b7 (correct side to sun) and 
attach 551 to the sides 531  
4.  Repeat  the  procedure  for  the  other 
vents. 
5.  Slide  in  the  vents  before  you  glaze 
the greenhouse. Fig 4 
6.  Before  you  slide  in  a  vent,  slide  in 
one  p3/a4.  One  of  these  needs  to  be 
positioned  on  both  sides  of  a  vent  to 
stop it sliding sideways. Fig 6, 7 
7.  When  the  vent  is  in  position  and 
opens  and  shuts  nip  up  a4  so  p3  re-
mains  in  position.  Do  this  before  you 
glaze  the  roof  otherwise  you  will  not 
be able to tighten a4 later. 

The  autovent  fitted  with  6mm  bolts 

before

  the 

greenhouse is glazed to the sill 521. This picture 
is  looking  from  the  outside  so  this  will  be  hid-
den by polycarbonate. 

Summary of Contents for Titan 79 EB

Page 1: ...Titan 79 EB Greenhouse Assembly Instructions Model Titan 79 EB Hunkin Garden Products Ltd sales hunkin co nz www hunkin co nz Ph 0800 14 48 65...

Page 2: ...the customer is charged for the other half The guarantee is invalid if the greenhouse is not assem bled according to these instructions The guarantee does not cover wind snow and storm damage or other...

Page 3: ...s The greenhouse is assembled by means of the following tools Spirit level Spanner socket spanner 8 and 10 mm Screw driver a battery drill with a clutch is very handy for quicker assembly Caulking gun...

Page 4: ...t some undercut before concreting the base pegs in The pegs must be concreted into hard ground not loose fill The base is powder coated green This protects the base from ground salts and makes it far...

Page 5: ...1198 1995 1634 710 M6x10 M6 1623 1995 QTY 1 1 2 1 1 1 2 2 26 26 1 2 2 1 1 2 3 4 5 7 6 612 641 641 661 670 711 712 712 655 656 622 723 711 723 1 612 641 723 612 661 711 2 3 4 5 6 7 641 711 712 m2 641...

Page 6: ...1634 1623 M6x10 M6 2009 M6x15 QTY 1 2 1 1 1 2 2 2 22 24 1 2 1 2 1 2 3 4 5 7 6 633 641 641 663 664 711 782 657 658 723 711 723 782 1 633 641 723 633 663 711 2 7 657 658 m1 3 4 5 6 641 711 782 782 m2 a...

Page 7: ...embly Used for eave braces later 7 671 666 753 682 1 3 632 666 671 714 724 753 a1 a2 mm 2802 1535 2802 1674 1674 400 M6x10 M6 Titan 709 2 6 2 4 4 6 44 44 666 666 632 671 714 724 714 724 3 4 2 1 2 3 4...

Page 8: ...the eave and ridge have been attached These bolts will be used to connect the eave brace Vent parts 521 also need these bolts 4 701 715 725 a1 a2 682 mm 2802 1374 1374 M6x10 M6 1198 Titan 709 1 4 4 2...

Page 9: ...he bracket screws sup plied Fig 3 8 2 Fit the vent sides 531 to the vent hinge 541 3 Slide in b7 correct side to sun and attach 551 to the sides 531 4 Repeat the procedure for the other vents 5 Slide...

Page 10: ...a6 a9 a11 a1 Size M6 3 5x19 3 5x25 M4 M4x25 M6x10 QTY 7 12 4 2 2 7 5 571 581 582 583 591 592 791 594 384 p4 p5 m10 n1 Size 1235 623 633 633 1967 1967 406 903 QTY 1 1 1 1 1 1 1 4 1 2 2 2 4 1 3 4 5 1 2...

Page 11: ...l 571 fig7 To get past the frame upright 664 gently pull the bottom of the door out so it clears it Having 622 slightly loose helps Close the doors and slide p4 down until it engages the bottom runner...

Page 12: ...ame is secured you are free to glaze at any time Glazing could take up to a day to complete so choose a day where it is going to be virtually windless and rain free The silicone glue requires time to...

Page 13: ...is square All the criss cross braces should be tight so adjust the frame until they are It is easiest to fit the polycarbonate to the roof first be cause you can put a leg of a ladder through the uncl...

Page 14: ...onate is treated with UV protection and must therefore be positioned with the text side out Remove the plastic protective film from both sides Mark one side with a felt pen so you don t get confused 4...

Page 15: ...e only the polycarbonate panel may move sideways making it very difficult to insert the PVC locking strip to the other side Do a trial run before you the sealer on one sheet so you get the hang of it...

Page 16: ...il you receive extra PVC locking strips The strips go in quite easily once you know how A few pictures are shown below to make this process a little clearer Run a bead of glue sealer down the vertical...

Reviews: