Humzor NEXZSYS NS706 User Manual Download Page 18


18


Figure 5-7 Sample Location Permission Prompt Box 
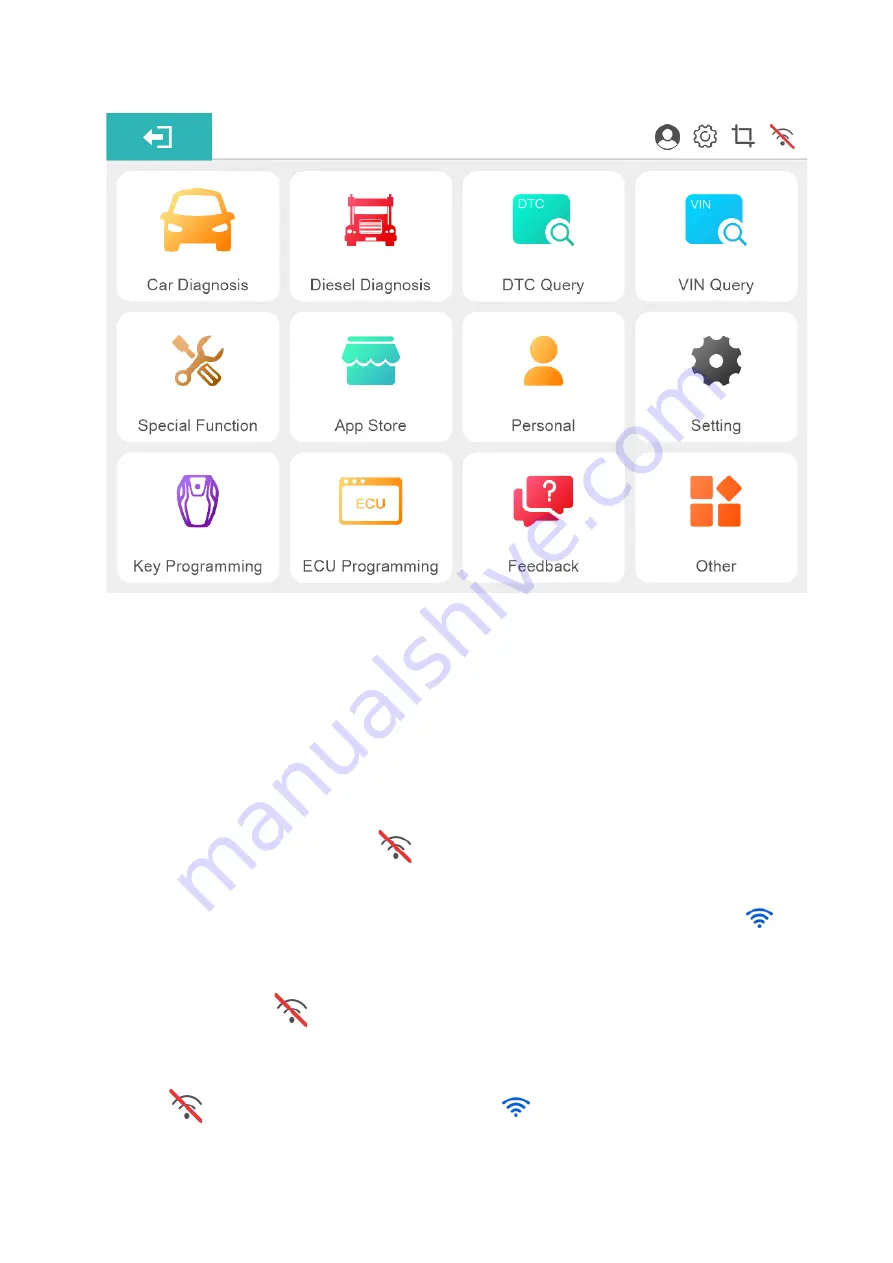
 

5.3 WIFI Connection 

After  you  select  the  product  serial  number  to  enter  the  "HUMZOR"  main  interface,  you  can  view  and 

connect  to  the  VCI  device  with  the  corresponding  serial  number  you  have  purchased  through  the  following 
steps: 

1. Insert the VCI of the HUMZOR NEXZSYS product you purchased tightly into the OBD port. At this 

time, the WIFI icon on the top right side is.


2. Turn on the ignition switch, the NEXZSYS application will automatically scan and recognize the VCI 

device, and establish a WIFI connection. At this time, the WIFI icon on the top right-side changes to

, and 

the WIFI connection is successful. 

3. If the NEXZSYS application cannot automatically connect to your VCI device, or the device fails to 

connect,  please  click  the 

icon  button  on  the  top  right  to  reconnect,  or  check  whether  the  VCI  is  well 

connected to the car’s OBD port. 


Figure 5-8 NEXZSYS N

ot Connected                             

Figure 5-9 NEXZSYS Connected


Summary of Contents for NEXZSYS NS706

Page 1: ...ons in this manual are based on the latest information available at the time of printing HUMZOR reserves the right to make changes at any time without notice While information of this manual has been...

Page 2: ...se the device only as described in this manual Read understand and follow all safety messages and instructions in this manual Safety Messages Safety messages are provided to help prevent personal inju...

Page 3: ...Any distraction may cause an accident Refer to the service manual for the vehicle being serviced and adhere to all diagnostic procedures and precautions Failure to do so may result in personal injury...

Page 4: ...REGISTRATION 12 5 2 LOGIN 14 5 3 WIFI CONNECTION 18 6 DIAGNOSTICS 19 6 1 ESTABLISH VEHICLE COMMUNICATION 19 6 2 PROTOCOL SUPPORTED 19 6 3 GETTING STARTED 20 7 SPECIAL FUNCTION 30 8 KEY PROGRAMMING 33...

Page 5: ...ion that if not avoided may result in damage to the tablet or vehicle 1 1 3 Illustrations Illustrations used in this manual are samples and the actual testing screen may vary for each vehicle being te...

Page 6: ...ant repairs gathered from experienced industry experts but provides step by step guidance to ensure the repair is done correctly and efficiently There are two main components to the NEXZSYS NS706 NS80...

Page 7: ...7 2 1 2 Package Figure 2 2 NEXZSYS Package View 2 2 VCCI Vehicle Communication and Check Interface...

Page 8: ...arn the basic information and the existed faults of the vehicle in real time through the software etc making vehicle maintenance become more convenient 2 3 2 Features Wide coverage of vehicle brands o...

Page 9: ...ion 3 Getting Started Make sure the computer has sufficient power or is connected to the external power supply 3 1 Start Up The system boots up and shows the main interface with 3 entry functional are...

Page 10: ...O Reset menu DTC Query Accesses the DTC Query functions VIN Query Accesses the VIN Query functions APP Store Accesses system function download menu Personal Accesses saved consumer information and cha...

Page 11: ...P has a fully functional Windows with the standard windows operating system status icons Refer to windows documentation for additional information 3 2 Shut Down All vehicle communications should be te...

Page 12: ...application 2 On the Login interface click the Register button to enter the registration interface 3 Enter your mailbox or mobile phone number in the Email column 4 Click the GET CAPTCHA button to get...

Page 13: ...13 Figure 5 1 Sample Login and Registration Interface Figure 5 2 Sample Registration Interface...

Page 14: ...e successful and the system will guide you to the serial number binding and selection interface 5 2 1 Change Password If you forget your password or need to set a new password you can follow the steps...

Page 15: ...rd Reset Interface 5 2 2 Serial Number Binding After the user logs in successfully it comes to the serial number binding interface Users can add delete and select products here Figure 5 4 Sample Bindi...

Page 16: ...inding is successful Figure 5 5 Sample Binding Serial Number Interface 2 Scan code to binding A Click the Add a new product button and the Binding serial number interface will pop up B Click the scan...

Page 17: ...e right becomes 2 Click the Next step button and the system will guide you to the main interface of HUMZOR 5 2 6 Enable Location Permission IMPORTANT Windows7 or above the tablet need to get tablet ad...

Page 18: ...ime the WIFI icon on the top right side is 2 Turn on the ignition switch the NEXZSYS application will automatically scan and recognize the VCI device and establish a WIFI connection At this time the W...

Page 19: ...eed CAN offers baud rates from 40 Kbit s to 1 Mbit sec depending on cable length This is the most popular standard for the physical layer since it allows for simple cable connection between devices Hi...

Page 20: ...ting with the PC 6 3 1 Vehicle Menu Layout Manufacturer Buttons The Manufacturer buttons display the various vehicle brand names Select the manufacturer button after the VCCI device is properly connec...

Page 21: ...d 6 3 2 Vehicle Identification The NEXSYS diagnostic system supports two methods of Vehicle Identification 1 Vehicle Manual Select 2 Vehicle Select by VIN Figure 6 3 Sample Diagnostic Menu Selection 6...

Page 22: ...ing the technician to quickly identify the exact vehicle and scan its available systems for fault codes Click on BMW and the system will acquire VIN information automatically or allow users to input t...

Page 23: ...he NEXT button at the bottom right corner of the screen See Figure 6 5 to open the Main menu page This section consists of various functions commonly used including quick test Control Unit and more Th...

Page 24: ...Test function performs a comprehensive scanning of all the systems in the vehicle ECU to locate faults and retrieve DTCs Systems with no faults detected will display OK systems containing faults will...

Page 25: ...ou to the diagnostic function menu after a few choices you ve made Figure 6 10 Sample Function Menu Screen Available functions may vary by vehicle The function menu may include System information disp...

Page 26: ...certain component after repairs Depending on the test vehicle this selection may sometimes appear 6 3 5 System Information This function retrieves and displays the specific information for the tested...

Page 27: ...ad DTCs retrieves and displays the DTCs from the vehicle control system The Read Codes screen varies for each vehicle being tested 6 3 6 2 Clear DTCs After reading the retrieved codes from the vehicle...

Page 28: ...2 A warning message displays to inform you of data loss when this function is applied a Tap YES to continue A confirming screen displays when the operation is successfully done b Tap NO to exit 3 Tap...

Page 29: ...s used to access vehicle specific subsystem and component tests Available tests vary by vehicle During an active test the software sends commands to the ECU to activate the actuators This test determi...

Page 30: ...on of the test screen Follow the on screen instructions and make appropriate selections to complete the tests Tap the Exit functional button to exit the test when finished 7 Special Function These fun...

Page 31: ...31 For example Click on Special Function OIL RESET Europe BMW interface as image such as Figure 7 2 Sample Special Function Screen 2 Figure 7 3 Sample Special Function Screen 3...

Page 32: ...32 Figure 7 4 Sample Special Function Screen 4 Figure 7 5 Sample Special Function Screen 5...

Page 33: ...ample Special Function Screen 7 8 Key Programming These functions perform various key programmer including add and erase keys reset immobilizer replace engine or immobilizer ECU and so on For example...

Page 34: ...34 Figure 8 1 Sample Key Programmer Screen 1 Figure 8 2 Sample Key Programmer Screen 2...

Page 35: ...35 Figure 8 3 Sample Key Programmer Screen 3 Figure 8 4 Sample Key Programmer Screen 4...

Page 36: ...data Figure 9 1 Sample Basic Data Screen 9 1 Vehicle You can download the car model through the following steps 1 On the App store interface click the Vehicle button at the top to display the Vehicle...

Page 37: ...37 Figure 9 2 Sample Vehicle Model Interface Figure 9 3 Sample Vehicle Model Download Interface...

Page 38: ...icon or click the button at the bottom right to select multiple model functions 3 Click the download button at the bottom right to start the download function 4 After the special function is download...

Page 39: ...or click the button at the bottom right to select multiple model functions 3 Click the download button at the bottom right to start the download function 4 After the models have been downloaded and de...

Page 40: ...l On the HUMZOR main interface click the Personal icon button and the system will guide you to the Personal interface 11 1 Editing Personal Information If you need to add or modify some personal infor...

Page 41: ...erface click the Update icon button 2 Click the Update button on the right to start downloading the new version 11 3 Product Serial Number Switch If you need to switch the current product to another s...

Page 42: ...he following ways 1 On the HUMZOR main interface click the Remote Assistance icon button 2 If you have not installed the TeamViewer Remote Control application please click the OK button to download an...

Page 43: ...ry Figure 12 2 Sample Feedback Interface 13 Settings In the Settings page users can make a choice of the Language Auto Update Windows Size Connection Method Logo Size Logo Type Font 13 1 About In the...

Page 44: ...e language supported by each product is configured by the server Figure 13 2 Sample Language Interface 13 3 Auto Update After selecting automatic update the software will automatically check and downl...

Page 45: ...45 Figure 13 3 Sample Auto Update Interface 13 4 Windows Size After selecting full screen the software will adapt to the size of the screen Figure 13 3 Sample Windows Size Interface...

Page 46: ...osis the software will automatically disconnect the previously connected WIFI WIFI manual connection When downloading a car model the user needs to manually connect to the Internet and when entering t...

Page 47: ...47 Figure 13 6 Sample Logo Size Interface 13 7 Logo Type Currently if the language is set to non Chinese the original logo cannot be selected Figure 13 7 Sample Logo Type Interface...

Page 48: ...tton and the system will guide you to the other interface 14 1 Data Playback Data stream playback function 14 2 Data Management You can manage the downloaded models functions screen recordings screens...

Page 49: ...del to select single or multiple pictures Then click the Delete icon button at the bottom right and then click the YES button in the pop up window to delete it successfully Figure 14 1 Sample Data Man...

Page 50: ...nshot When you use the NEXZSYS application you can save a screenshot of the current interface through the following steps On the main interface of HUMZOR click the icon on the right side of the top na...

Reviews: