background image

GT1561

14

EN

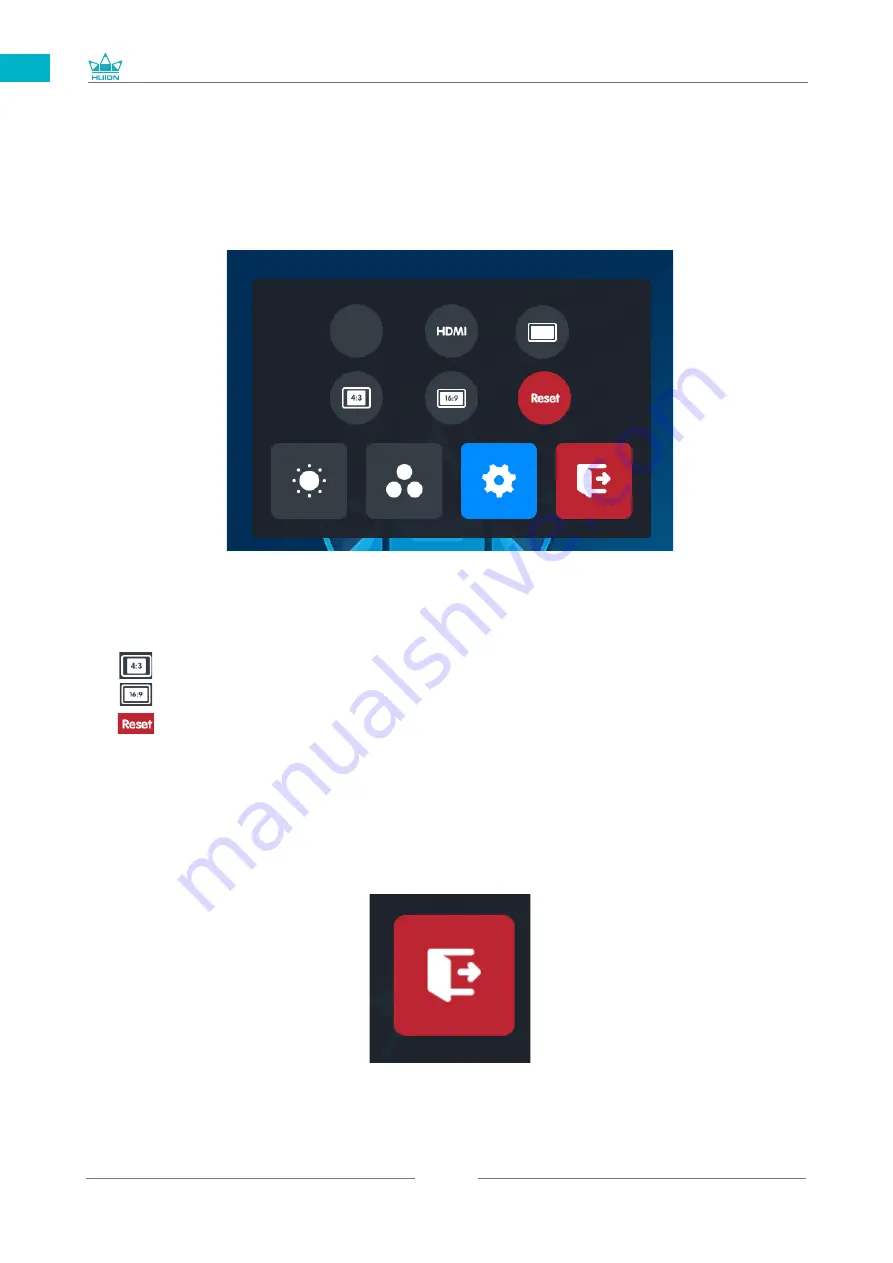
4.1.3 General Settings

There are four mode of "6500K", "9300K", "sRGB" and "User" can be choosed. In "User" 
mode, you can adjust the Color temperature by dragging the bar on the upper right.
right.

[1] TypeC/HDMI: Display the current signal connection mode.
[2] FULL: Switch the display ratio to FULL
[3]           : Switch the display ratio to 4:3.
[4]           : Switch the display ratio to 16:9.
[5]           : All the setting options will be restored to the default setting.

4.1.4 Exit button

Click the exit button to exit the OSD menu.

TypeC

FULL

Summary of Contents for GT1561

Page 1: ...2 30 51 72 93 114 User Manual Benutzerhandbuch Manuel d utilisateur Manuale d uso Manual de Usuario GT1561 KAMVAS Pro 16 4K...

Page 2: ...ck 11 3 4 Move 11 3 5 Use the side buttons 11 3 6 Pen Nib Replacement 12 4 Pen enabled OSD Menu 13 5 Function Setting 16 5 1 Working Area Setting 16 5 2 Display Setting 18 5 3 Pen Buttons Function Set...

Page 3: ...lease consult the distributor of your display To protect your display please switch off the power when it is not in use During blackouts or not using for long time please unplug the display from the s...

Page 4: ...reation and full of fun You can freely paint and write depicting different lines and colors just as the pen writes on the paper which brings you a real shock experience To give you a better understand...

Page 5: ...ttery free pen Replacement Nibs inside the pen holder Pen Holder Quick Start Guide Warranty Card USB Extension Cable Cleaning Cloth Pen Nib Clip inside the pen holder 3 in 1 Cable USB C Cable Power Ca...

Page 6: ...s ergonomic adjustable stand specially for your KAMVAS display you can adjust the angle of the display according to your usage habit and make you feel more comfortable when painting and creating 2 2 2...

Page 7: ...Cable 1 Connect the display to your computer with 3 in 1 cable Connect the power adapter to the power cable When the power cable is not long enough to be connected to the power adapter an extension c...

Page 8: ...USB C cable Connect the power adapter to the power cable The USB C to USB C and power cable can be purchased separately Please notice the USB C to USB C cable must meet the requirements of USB3 1 GEN1...

Page 9: ...the old driver of this product 2 Before installing please close all graphics software and anti virus software to avoid unnecessary mistake 2 4 Install Driver 2 4 1 OS Support Windows 7 or later macOS...

Page 10: ...he desk Do not place the pen on the surface of screen which may interfere with the use of other screen cursor positioning equipment may also cause your computer can not enter the sleep mode 3 2 Positi...

Page 11: ...open it 3 4 Move Select the object then slide the pen tip across the screen to move it 3 5 Use the side buttons The buttons on the pen can be set to two different customizable functions You can use t...

Page 12: ...e then you need to replace a new nib 1 Anticlockwise rotate the pen holder to open the cover take a new nib out 2 Insert the pen nib into the pen nib clip and tilt the pen to pull out the old nib 3 In...

Page 13: ...pen to adjust the settings The user interface is designed in a minimalist way where options including Brightness Color Temperature General Settings and Exit are reserved while seldom used ones are el...

Page 14: ...by dragging the bar on the upper right right 1 TypeC HDMI Display the current signal connection mode 2 FULL Switch the display ratio to FULL 3 Switch the display ratio to 4 3 4 Switch the display rat...

Page 15: ...EN 4 2 Method 2 1 Click the in the upper right corner of the driver to set 2 Click on the Activate OSD button and then you can adjust the screen scene mode brightness contrast and color Start OSD OSD...

Page 16: ...ted monitor on the driver interface which you are going to map to If your monitors are in mirror mode All monitors display the same content the display maps to the entire space on each monitor and the...

Page 17: ...GT1561 17 EN 5 1 3 Rotate Working Area By changing the direction of the display to adapt to the left and right hand operation You can rotate the display by 0 90 180 or 270...

Page 18: ...including General settings Hotkeys and Updates 5 2 1 General settings 1 Add App Shortcut key function can be set by adding different programs When opening different programs the driver will automatic...

Page 19: ...ickly open the driver interface The default value is Ctrl Alt H which can be set according to usage habits Start OSD OSD Adjustment 2 OSD Adjustment Click on the Activate the OSD button and then you c...

Page 20: ...GT1561 20 EN 5 2 3 Updates You can view the driver version number click Check for Update view the latest driver version and update according to the system prompt...

Page 21: ...ieved on the pop up dialog box then click Apply or OK to take effect 5 4 Enable the Windows Ink Feature Microsoft Windows provides extensive support for pen input Pen features are supported in such as...

Page 22: ...k a lot of pressure produces less pressure Click the button at the bottom right of the Settings box to reset the pressure sensitivity to the default state For example apply N respectively the same pre...

Page 23: ...tton to clear all the ink 5 7 Pen Nib Activity Setting The pen nibs can be set to be Active Inactive as needed Click the drop down option to select and click OK again to save the Settings In Active mo...

Page 24: ...5 8 Data Export and Import The driver supports exporting and importing your custom configuration data of the product which is convenient for you to use different software and avoid the trouble of repe...

Page 25: ...Color 16 7M 8bit Touch Touch Type Battery Free Electromagnetic Resonance Resolution 5080LPI Pressure Level 8192 Accuracy 0 3 mm Center 2 mm Corner Sensing Height 10mm Pen Model PW517 Dimension 163 7...

Page 26: ...roken or bent If so please replace the signal wire No signal 1 Make sure the cables are well connected 2 If you use a desktop make sure the HDMI port is plugged into the graphic card on the tower but...

Page 27: ...Duplicate Mac OS System Preference Displays Arrangement Check Mirror Displays 3 If you decide to use in Extended mode Make sure to choose pen display as Work Area in Driver It is usually Display 2 La...

Page 28: ...does not work 1 Make sure the Press Keys function was enabled in the driver 2 Make sure you have correctly defined the Press Keys 3 Check if the press lock switch is on the unlock position The compute...

Page 29: ...r 4 HuaiDeCuiGang Industrial Park Fuyong Street Bao an District Shenzhen 518106 China The information in this manual is subject to change without notice For more information please contact us by email...

Page 30: ...Position the cursor 39 3 3 Klicken 39 3 4 Bewegung 39 3 5 Verwendung der Seitenschalter 39 3 6 Ersetzen von Stiftspiten 40 4 Funktionseinstellungen 41 4 1 Einstellungen zum Arbeitsbereich 42 4 2 Druck...

Page 31: ...play verwendet werden Wenn Sie Fragen ber ihren Netzadapter haben wenden Sie sich bitte an den Vertriebspartner des Ger ts Schalten Sie das Display zum Schutz aus wenn Sie es nicht verwenden Ziehen Si...

Page 32: ...vit t deutlich erh hen kann und dazu auch einfach Spa macht Sie k nnen v llig frei zeichnen und schreiben in verschiedenen Farben wie mit einem Stift auf Papier Es ist eine erfrischende Erfahrung Bitt...

Page 33: ...aler Stift Schnellanleitung Garantiekarte Verl ngerungskabel 3 in 1 Kabel Reinigungstuch Spitzenclip Innerhalb des Stifthalters Stifthalter Stiftspitzen Innerhalb des Stifthalters Stiftetui Standfu US...

Page 34: ...er Dieser St nder wurde speziell f r das KAMVAS Display entwickelt Sie k nnen den Winkel des Displays frei nach ihren Nutzungsgewohnheiten justieren um komfortabel Zeichnen und ihre Kreativit t ausleb...

Page 35: ...inden Sie das Display mit einem 3 in 1 Kabel mit dem Computer Schlie en Sie den Adapter an das Kabel an Wenn das Netzkabel nicht lang genug ist um an das Netzteil angeschlossen zu werden k nnen Sie ei...

Page 36: ...bel Schlie en Sie den Adapter an das Kabel an The USB C to USB C and power cable can be purchased separately Please notice the USB C to USB C cable must meet the requirements of USB3 1 GEN1 and DP1 2...

Page 37: ...ber hat das Display erkannt und Sie k nnen es jetzt verwenden 2 4 3 Treiberoberfl che Machen Sie nach dem erfolgreichen Download einen Doppelklick um den Treiber zu ffnen Verbinden Sie das Display mit...

Page 38: ...em Tisch Legen Sie den Stift nicht auf dem Bildschirm ab um St rungen mit dem Mauszeiger zu vermeiden Der Stift auf dem Display k nnte auch Ihren Computer daran hindern den Schlafmodus zu aktivieren 3...

Page 39: ...as zu ffnen 3 4 Bewegung W hlen Sie ein Objekt aus und ziehen Sie die Stiftspitze ber den Bildschirm um es zu bewegen 3 5 Verwendung der Seitenschalter Die Schalter auf dem Stift k nnen zwei verschied...

Page 40: ...den Uhrzeigersinn um ihn zu ffnen Nehmen Sie eine neue Stiftspitze heraus 2 F hren Sie die alte Stiftspitze in die ffnung auf der Unterseite des Stifthalters ein und neigen Sie den Stift um die alte S...

Page 41: ...rfl che den Bildschirm ausw hlen auf dem Sie Ihre Zeigerbewegungen registrieren m chten Falls Sie Ihre Monitore spiegeln alle Monitore zeigen dasselbe Bild deckt das Display den gesamten Bereich auf j...

Page 42: ...561 42 DE 4 1 3 Rotation des Arbeitsbereichs Die Ausrichtung des Display kann ge ndert werden um es links oder rechtsh ndig zu verwenden Sie k nnen das Display in den Schritten 0 90 180 oder 270 rotie...

Page 43: ...op up Dialogbox und klicken Sie auf Anwenden oder OK um sie zu bernehmen 4 3 Windows Ink aktivieren Microsoft Windows bietet erweiterte Unterst tzung f r Stift Input Ihr Stift wird in Programmen wie M...

Page 44: ...ch gro er Druck verursacht nur geringen Druck Klicken Sie die Schaltfl che unten rechts in der Einstellungs Box um den Standardwert der Drucksensitivit t wiederherzustellen Zum Beispiel Gleichbleibend...

Page 45: ...n Klicken Sie auf die Schaltfl che um die Tinte zu entfernen 4 6 Exportieren und Importieren Der Treiber unterst tzt das Exportieren und Importieren Ihrer benutzerdefinierten Konfigurationsdaten des P...

Page 46: ...sRGB Displayfarben 16 7M 8bit Touch Touch Type Passive Electromagnetic Resonance Aufl sung 5080LPI Drucklevel 8192 Genauigkeit 0 5 mm Mitte 2 mm Ecken Erkennungsh he 10mm Stift Modell PW517 Dimensione...

Page 47: ...esch digt oder verbogen rsetzen Sie in diesem Fall das Signalkabel Kein Signal 1 Stellen Sie sicher dass die Kabels korrekt verbunden sind 2 Falls Sie einen Desktop PC verwenden stellen Sie sicher das...

Page 48: ...ellungen Displays Arrangement Check Mirror Displays 3 Wenn Sie den Erweiterungsmodus verwenden m chten stellen Sie sicher dass das Pen Display als Arbeitsfl che im Treiber definiert ist Sie wird blich...

Page 49: ...nktionieren nicht 1 Stellen Sie sicher dass die Druckschalter Funktionen im Treiber aktiviert wurden 2 Stellen Sie sicher dass Sie die korrekten Funktionen definiert haben 3 Stellen Sie sicher dass de...

Page 50: ...Cuigang Fuyong Bezirk Bao an Shenzhen Die Informationen in diesem Handbuch k nnen ohne vorherige Ank ndigung ge ndert werden F r weitere Informationen kontaktieren Sie uns bitte per E Mail service hu...

Page 51: ...0 3 4 Mouvement 60 3 5 Utilisation des boutons lat raux 60 3 6 Remplacement de la point du stylet 61 4 R glages des fonctions 62 4 1 R glage de l espace de travail 62 4 2 Boutons de fonctions 63 4 3 R...

Page 52: ...tions sur l alimentation merci de contacter le distributeur de votre appareil Pour pr server votre appareil teignez le lorsque vous ne l utilisez pas Lorsque vous ne l utilisez pas veuillez d brancher...

Page 53: ...de mani re ludique Vous pourrez crire et dessiner en utilisant les diff rents styles et couleurs de la m me mani re que si vous utilisiez un crayon sur du papier un r el choc pour cette nouvelle exp...

Page 54: ...t Guide Carte de Garantie C ble 3 in 1 Chiffon de Nettoyage 2 2 1 Accessoires Pointes de rechange Porte stylet Remplace pointe C ble rallonge C ble USB C C ble d Alimentation Adaptateur lectrique R gl...

Page 55: ...HDMI USB Power Type C 2 2 3 Support r glable Nous avons con u ce support r glable sp cialement pour la KAMVAS Vous pouvez r gler l angle en fonction de vos habitudes et besoin d utilisation pour am li...

Page 56: ...1 GEN1 1 Connectez la Tablette Graphique votre ordinateur avec c ble 3 en 1 Connectez l adaptateur d alimentation au c ble d alimentation Quand le c ble d alimentation n est pas assez long pour tre b...

Page 57: ...utilisant le c ble USB C vers USB C Connectez l adaptateur d alimentation au c ble d alimentation Il est normal que la machine chauffe pendant le travail Le c ble USB C vers USB C et le c ble d alimen...

Page 58: ...reconnu la tablette et que vous pouvez l utiliser 2 4 3 Page des pilotes Apr s avoir t l charg avec succ s les pilotes double cliquez pour lancer l installation Connectez la appareil votre ordinateur...

Page 59: ...n utilisez pas le stylet rangez le dans son tui ou sur votre bureau Ne le laissez pas sur l cran cela pourrait perturber l utilisation Cela pourrait galement emp cher le passage de votre ordinateur e...

Page 60: ...ur l ouvrir 3 4 Mouvement S lectionner un objet et glissez le l cran en bougeant le stylet 3 5 Utilisation des boutons lat raux Les boutons lat raux du stylet peuvent tre r gl s avec 2 fonctions perso...

Page 61: ...inverse des aiguilles d une montre le couvercle du porte style pour l ouvrir et prenez une nouvelle pointe 2 Ins rez la pointe du stylo dans le trou du bas du support et inclinez le stylo pour retire...

Page 62: ...ue vous tes en mode tendu vous devez choisir le moniteur associ dans le param trage des pilotes Si vos crans sont en mode miroir tous les crans affichent la m me chose l affichage correspond tout l es...

Page 63: ...GT1561 63 FR 4 1 3 Rotation de la zone de travail En tournant la tablette il est possible d adapter la rotation de l affichage Vous pouvez faire une rotation de 0 90 180 ou 270 rotieren...

Page 64: ...buer et valider par Appliquer ou par OK 4 3 Activer la fonction Windows Ink Microsoft Windows permet une prise en charge de la saisie au stylet Les fonctions de stylet sont support es dans les logicie...

Page 65: ...ssion Faire glisser vers le bas droite le changement de pression est faible beaucoup de pression produit moins de pression Cliquez le bouton en bas droite dans la boite de dialogue pour remettre la se...

Page 66: ...nter la pression sur le stylet pour tester son niveau de sensibilit Cliquez sur pour tout effacer 4 6 Export et import des donn es Les pilotes permettent l export et l import de vos param trages de l...

Page 67: ...120 sRGB Couleurs d affichage 16 7M 8bit Tactile Type tactile lectromagn tique R sonance sans batterie R solution 5080LPI Niveaux de pression 8192 Pr cision 0 3mm Center 2mm Corner Hauteur de d tectio...

Page 68: ...ez si le c ble de connexion n est pas pli ou cass Si tel est le cas remplacez le Pas de signal 1 Assurez vous que le c ble est bien connect 2 Si vous utilisez un ordinateur v rifiez que le port HDMI e...

Page 69: ...choisir Affichage Miroir 3 Si vous choisissez d utiliser le mode tendu assurez vous d avoir choisi la tablette comme zone de travail dans le pilote G n ralement il s agit de Affichage 2 Manque de coul...

Page 70: ...Les boutons ne fonctionnent pas 1 Assurez vous que les boutons sont bien activ s dans le pilote 2 Assurez vous d avoir bien d finit les boutons 3 V rifier que le bouton de verrouillage soit en positio...

Page 71: ...dustrial Park Fuyong Bao an District Shenzhen Chine Les informations contenues dans ce manuel sont susceptibles d tre modifi es sans pr avis Pour plus d informations veuillez nous contacter par mail s...

Page 72: ...GT1561 72 JP 1 73 2 74 2 1 74 2 2 75 2 3 77 2 4 79 3 80 3 1 80 3 2 81 3 3 81 3 4 81 3 5 81 3 6 82 4 83 4 1 83 4 2 84 4 3 84 4 4 Windows Ink 85 4 5 86 4 6 87 4 7 87 5 88 6 89 7 92...

Page 73: ...GT1561 73 JP 1 USB A B C LCD D...

Page 74: ...GT1561 74 JP 2 2 1 HUION KAMVAS Pro 16 4K Windows Windows MacOS 2 2...

Page 75: ...GT1561 75 JP 3 in 1 2 2 1 USB C...

Page 76: ...GT1561 76 JP USB HDMI USB Type C 2 2 2 3 in1 2 2 3 KAMVAS 2 3 1...

Page 77: ...GT1561 77 JP 2 3 3in1 USB C PC 1 3 in 1 PSE PC USB C USB3 1 GEN1 DP1 2...

Page 78: ...GT1561 78 JP 2 PC Android USB to USB C USB C to USB C USB C to USB C USB3 1 GEN1 DP1 2...

Page 79: ...GT1561 79 JP 2 4 2 4 1 OS Windows 7 mac OS 10 12 2 4 2 OS www huion com jp download 2 4 3 Huion Display 1 2...

Page 80: ...GT1561 80 JP 3 3 1 3 2...

Page 81: ...GT1561 81 JP 3 3 3 4 3 5 10mm...

Page 82: ...GT1561 82 JP 3 6 1 2 3...

Page 83: ...GT1561 83 JP 4 4 1 4 1 1 4 1 2 1 2 16 9 3 1 2...

Page 84: ...GT1561 84 JP 4 1 3 0 90 180 270...

Page 85: ...GT1561 85 JP 4 2 4 3 Windows Ink Microsoft Windows Microsoft Office Windows Journal Adobe Photoshop CC Sketch Book 6...

Page 86: ...GT1561 86 JP 4 4 N 1 N N N 2...

Page 87: ...GT1561 87 JP 4 5 4 6...

Page 88: ...16 9 UHD LCD IPS 345 6 x 194 4mm 1000 1 220cd m2 25ms 89 89 H 89 89 V Typ CR 10 120 sRGB 16 7M 8bit 5080 LPI 8192 0 3 mm 2 mm 10mm PW517 163 7 14 3mm 5V 3A USB C 3 in 1 USB C USB 3 1 402 7 x 257 4 x 1...

Page 89: ...GT1561 89 6 1 1 2 3 4 5 1 2 HDMI HDMI 3 Windows OS Windows P 4 HDMI HDMI USB HDMI USB DVI VGA Display Port Type C Thunderbolt HDMI 2560 1440 6 1...

Page 90: ...GT1561 90 1 2 Windows Windows P Mac OS 3 2...

Page 91: ...GT1561 91 6 2 1 2 1 2 3 10mm USB USB USB...

Page 92: ...GT1561 92 JP 7 SHENZHEN HUION ANIMATION TECHNOLOGY CO LTD 28 service huion com www huion com...

Page 93: ...2 3 5 Utilizzare i pulsanti laterali 102 3 6 Sostituzione del pennino 103 4 Impostazione di Funzione 104 4 1 Impostazione Area di Lavoro 104 4 2 Impostazione Funzione dei tasti a pressione 105 4 3 Imp...

Page 94: ...e del display Per proteggere il display si prega di spegnere l alimentazione quando non in uso In caso di blackout o mancato utilizzo per un lungo periodo scollegare il display dalla presa Accertarsi...

Page 95: ...ra e creazione in modo divertente Puoi dipingere e scrivere liberamente tracciando linee di colori diversi proprio come la penna scrive sul foglio per un esperienza davvero sconvolgente Per una miglio...

Page 96: ...prolunga Cavo 3 in 1 Clip del pennino dentro il porta penna 2 2 1 Accessori Pennini sostitutivi dentro il porta penna Porta penna Panno pulente Scheda di garanzia Cavo USB C Cavo di Alimentazione Ada...

Page 97: ...3 in1 2 2 3 Supporto del Display Abbiamo progettato questo supporto appositamente per il tuo display KAMVAS permette di regolare l angolazione del display in base alle tue abitudini di utilizzo per fa...

Page 98: ...putadora mediante un cable 3 en 1 Conecte el adaptador de corriente con el cable de alimentaci n Quando il cavo di alimentazione non abbastanza lungo per essere collegato all adattatore di alimentazio...

Page 99: ...nte con el cable de alimentaci n normale che la macchina si scaldi quando si lavora possibile acquistare separatamente il cavo da USB C a USB C e il cavo di alimentazione Si prega di notare che il cav...

Page 100: ...gnifica che il driver ha riconosciuto il Display e ora si pu iniziare a usarlo ora 2 4 3 Pagina del Driver Al termine del download fare doppio clic per aprire il driver collegare lo schermo al compute...

Page 101: ...custodia o sulla scrivania Non posizionare la penna sulla superficie dello schermo perch potrebbe interferire con il posizionamento del cursore dello schermo e inoltre il computer potrebbe non essere...

Page 102: ...Selezionare l oggetto quindi fare scorrere la punta della penna sullo schermo per spostarlo 3 5 Utilizzare i pulsanti laterali I pulsanti sulla penna possono essere impostati su due diverse funzioni p...

Page 103: ...ntiorario il portapenne per aprire il coperchio estrarre un nuovo pennino 2 Inserire il pennino nel foro nella parte inferiore del supporto e inclinare la penna per estrarre il pennino vecchio 3 Inser...

Page 104: ...monitor sull interfaccia del driver su cui si desidera mappare Se i monitor sono in modalit mirror tutti i monitor visualizzano lo stesso contenuto la visualizzazione viene mappata nell intero spazio...

Page 105: ...GT1561 105 IT 4 1 3 Ruotare l Area di Lavoro Modificando la direzione del Display per adattarsi all operazione a sinistra e a destra possibile ruotare il Display di 0 90 180 o 270...

Page 106: ...tra di dialogo a comparsa quindi fare clic su Conferma o OK per renderla effettiva 4 3 Enable Windows Ink Microsoft Windows offre un ampio supporto per l input penna Le funzionalit della penna sono su...

Page 107: ...mbiamento di pressione debole molta pressione produce meno pressione Cliccare il pulsante in basso a destra nella casella delle impostazioni per ripristinare la sensibilit della pressione allo stato p...

Page 108: ...pressione Fare clic sul pulsante per cancellare tutto l inchiostro 4 6 Esportazione e importazione dei dati Il driver supporta la funzione di esportazione e importazione dei dati personalizzati di co...

Page 109: ...sRGB Colore Display 16 7M 8bit Tocco Tipo di tocco Passive Electromagnetic Resonance Risoluzione 5080LPI Livello di pressione 8192 Accuratezza 0 3 mm Center 2 mm angolo Altezza di sensore 10mm Penna...

Page 110: ...spezzato o danneggiato In tal caso sostituire il cavo del segnale Nessun segnale 1 Accertarsi che i cavi siano ben collegati 2 Se si utilizza un desktop assicurarsi che la porta HDMI sia collegata al...

Page 111: ...S Preferenze di sistema Display Disposizione Controlla Mirror Display 3 Se si decide di utilizzare in modalit estesa assicurarsi di selezionare il display interattivo come area di lavoro nel driver Di...

Page 112: ...1 Make sure the Press Keys function were enabled in the driver 2 Make sure you have correctly defined the Press Keys 3 Check if the press lock switch is on the unlock position Il computer non in grad...

Page 113: ...gang Industrial Park Fuyong Bao an District Shenzhen Le informazioni contenute in questo manuale sono soggette a modifiche senza preavviso Per ulteriori informazioni vi preghiamo di contattarci via e...

Page 114: ...miento 123 3 5 Uso de los botones Laterales 123 3 6 Cambiar la Punta del L piz 124 4 Configuraci n de Funciones 125 4 1 Configuraci n del rea de Trabajo 125 4 2 Configuraci n de las Teclas Presionable...

Page 115: ...ntalla apague la alimentaci n cuando no est en uso Durante apagones o no se usa durante mucho tiempo desconecte la pantalla de la toma de corriente Aseg rese de que no entren objetos extra os dentro d...

Page 116: ...omo tambi n llenarlo de diversi n Puede pintar y escribir libremente representando diferentes l neas y colores tal y como el bol grafo escribe en el papel por lo que proporciona una experiencia de sho...

Page 117: ...i n Cable 3 in 1 2 2 1 Accesorios Puntas de Recambio Dentro del soporte del l piz Soporte del L piz Clip de Puntas del L piz Dentro del soporte del l piz Tarjeta de Garant a Pa o de Limpieza Cable de...

Page 118: ...C 2 2 2 Cable 3 en 1 2 2 3 Soporte para la pantalla Dise amos estos soportes especialmente para su pantalla KAMVAS puede ajustar el ngulo de la pantalla de acuerdo con su h bito de uso y hacer que se...

Page 119: ...a su computadora mediante un cable 3 en 1 Conecte el adaptador de corriente con el cable de alimentaci n Cuando el cable de alimentaci n no es lo suficientemente largo como para conectarse al adaptado...

Page 120: ...n el cable de alimentaci n Es normal que la m quina se caliente cuando trabaja El cable USB C a USB C y el cable de alimentaci n se pueden comprar por separado Tenga en cuenta que el cable USB C a USB...

Page 121: ...ca que el controlador ya ha reconocido la Displaya y puede comenzar a usarla ahora 2 4 3 Pagina del Controlador Despu s de que la descarga sea exitosa haga doble clic para abrir el controlador conecte...

Page 122: ...l escritorio No coloque el l piz sobre la superficie de la Pantalla ya que puede interferir con el uso de otro equipo de posicionamiento del cursor de la Pantalla tambi n puede causar que su computado...

Page 123: ...y haga doble clic para abrirlo 3 4 Movimiento Seleccione el objeto luego deslice la punta del l piz por la Pantalla para moverlo 3 5 Uso de los botones Laterales Los botones en el l piz se pueden conf...

Page 124: ...1 En sentido antihorario gire el soporte del l piz para abrir la tapa saque una punta nueva 2 Inserte la punta de la pluma en el orificio de la parte inferior del soporte e incline la pluma para extr...

Page 125: ...nado en la interfaz del controlador al que va a asignar Si sus monitores est n en modo espejo todos los monitores muestran el mismo contenido la Pantalla se asigna a todo el espacio en cada monitor y...

Page 126: ...GT1561 126 ES 4 1 3 Rotate Working Area Rotar el rea de Trabajo By changing the direction of the display to adapt to the left and right hand operation You can rotate the display by 0 90 180 or 270...

Page 127: ...o emergente luego haga clic en Aceptar u Aplicar para que tenga efecto 4 3 Habilitar la funci n de Windows Ink Microsoft Windows proporciona un amplio soporte la se al de entrada del l piz Las caracte...

Page 128: ...o derecha el cambio de presi n es d bil mucha presi n produce menos presi n Haga clic en el bot n en la parte inferior derecha del cuadro de configuraci n para restablecer la sensibilidad a la presi n...

Page 129: ...presi n Haga clic en el bot n para borrar toda la tinta 4 6 Exportaci n e importaci n de datos El controlador admite la exportaci n e importaci n de sus datos de configuraci n personalizados para el...

Page 130: ...20 sRGB Color de la pantalla 16 7M 8bit Toque Tipo de toque Resonancia Electromagn tica Pasiva Resoluci n 5080LPI Niveles de Presi n 8192 Precisi n 0 3 mm Centro 2 mm Esquina Altura de detecci n 10mm...

Page 131: ...cable 5 El cable de se al est roto o doblado Si es as reemplace el cable de se al Sin se al 1 Aseg rese de que los cables est n bien conectados 2 Si utiliza un ordenador de escritorio aseg rese de qu...

Page 132: ...uego elija Duplicar Mac OS Preferencia del sistema Pantallas Disposici n Marque Duplicar pantallas 3 Si decide utilizarlo en modo Extendido Aseg rese de elegir la pantalla con rotulador como rea de tr...

Page 133: ...esionables no funcionan 1 Aseg rese de que la funci n Presionar teclas est habilitada en el controlador 2 Aseg rese de haber definido correctamente los botones presionables 3 Compruebe si el interrupt...

Page 134: ...parque industrial Huaide Cuigang Fuyong distrito de Bao an Shenzhen La informaci n de este manual est sujeta a cambios sin previo aviso Para obtener m s informaci n cont ctenos por correo electr nico...

Page 135: ......

Reviews: