NOTE/ 说明
a
1
1
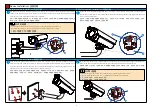
Fix the camera to the wall-mount bracket with two screws in No. 1 holes. Loosen screws a on the universal
joint for the universal joint to rotate freely. Adjust the horizontal and vertical shooting angles and tighten all
screws on the universal joint.
通过标识 1 位置的两个螺钉将摄像机固定到吊装支架上,拧松万向节上的 a 螺钉,使得万向节可以自由转动。初步调整
好垂直监控角度,拧紧万向节上的所有螺钉。
6
Device Installation/ 设备安装
F. Ceiling-mounted Installation/ 吊顶安装
F. Ceiling-mounted Installation/ 吊顶安装
2
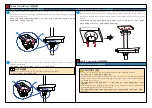
Place the mount in the desired installation position. Use a marker to mark the screw installation locations.
Select a drill bit with a diameter of 8 mm to drill holes with a depth of about 45 mm. Use a hammer to
carefully drive the white plastic expansion tubes into the holes. Use screws to fix the wall-mount bracket to
the wall.
将支架放置于安装位置 , 使用记号笔绘制螺钉安装位置,选择直径为 8mm 的钻头,钻取深约 45mm 的导孔。使用羊角
锤将白色膨胀螺栓打入钻好的孔内。 使用螺钉将壁装支架固定到墙壁上。
3
Adjust the surveillance angle. Fasten all screws on the universal joint, fix the universal joint. Then, adjust the
position of the sunshield.
调整好监控角度,拧紧万向节上的所有螺钉,固定万向节。同时调整好遮阳板位置。
a: Loosen the screw here. Then, you can adjust the vertical angle of the camera.
a:通过拧松该处螺钉,可调节摄像机垂直角度。
a
1
A. Cable Connection/ 连接线缆
Cable Connection/ 连接线缆
A. Cable Connection/ 连接线缆
CAUTION/ 注意
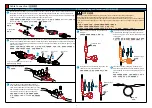
• In areas prone to lightning strikes, the lightning arrester must be installed and grounded.
在易受雷击的区域,必须安装避雷器,避雷器必须接地。
• Strong and weak current cables must be kept at least 5 cm apart from each other. When connecting the
cables to the device, take care to avoid connecting strong current cables to weak current interfaces or
you will damage your device.
强电和弱电必须分开布线,两者间的距离不小于 5cm。线缆与设备连接时,禁止将强电接到弱电接口上,以免造
成设备损坏。
• Wrap all pigtail cables in insulated, waterproof, rubber tape to prevent short circuits or water damage.
Cutting off the pigtail cables will void your warranty.
请务必使用绝缘胶带和防水胶带对所有尾线进行绝缘和防水处理,以免造成短路和漏水。尾线不能剪断,若剪断,
则无法维保。


