background image

7 Routing Cables

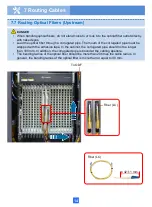
Fiber (LC)

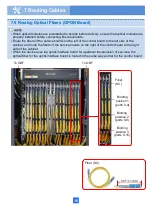
• When optical modules are preinstalled to boards before 

delivery, ensure that optical modules are properly 
installed before connecting fibers to boards. 

• To facilitate the subsequent maintenance, bundle the 

newly routed optical fiber with the originally routed 
optical fiber firmly. Ensure that the height of the bundled 
optical fibers is lower than 55 mm.

15

To ODF

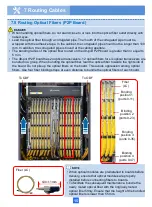
• When handling optical fibers, do not stand close to or look into the optical fiber outlet directly with 

naked eyes.

• Lead the optical fiber through a corrugated pipe. The mouth of the corrugated pipe must be 

wrapped with the adhesive tape. In the cabinet, the corrugated pipe should not be longer than 100 
mm. In addition, the corrugated pipe is bound at the cabling aperture.

• The bending radius of the optical fiber routed on the 48-port P2P board is greater than or equal to 

5 mm.

• The 48-port P2P board has 24 optical transceivers. 12 optical fibers for six optical transceivers are 

bundled in a group. When bundling the optical fiber, lean the optical fiber towards the right side of 
the board. Do not pile up the optical fibers on the board. This avoids oppression among optical 
fibers. Use four fiber binding straps at even distance to bundle the optical fibers of each board.

7.8 Routing  Optical Fibers (P2P Board)

Binding 

position 1 

(ports 0-11)

Binding 

position 3 

(ports 0-35)

Binding 

position 4 

(ports 0-47)

Binding 

position 2 

(ports 0-23)

Fiber 

(LC)

≤30

±

1mm

To ODF

Summary of Contents for SmartAX MA5800-X15

Page 1: ...HUAWEI TECHNOLOGIES CO LTD SmartAX MA5800 X15 Quick Installation Guide Issue 02 Date 2017 03 31 ...

Page 2: ...or or moderate injury Indicates a potentially hazardous situation which if not avoided could result in equipment damage data loss performance deterioration or unanticipated results NOTICE is used to address practices not related to personal injury Calls attention to important information best practices and tips NOTE is used to address information not related to personal injury equipment damage and...

Page 3: ...ack and Another Device 6 6 Installing the Service Subrack 7 7 Routing Cable 8 7 1 Cabinet with Routed Cables 8 7 2 Routing the External Power Cables and PGND Cable 9 7 3 Routing the Power Cables and PGND Cable of the Equipment 10 7 4 Routing Clock Cables 11 7 5 Routing Network Cable 12 7 6 Routing Trunk Cables 13 7 7 Routing Optical Fibers Upstream 14 7 8 Routing Optical Fibers P2P Board 15 7 9 Ro...

Page 4: ...d distinctive guidelines for hardware installation This document does not describe operations for the pre delivery installation Instead this document describes only the operations for on site installation Electrostatic Discharge Before touching the device or holding the boards and IC chips wear the ESD gloves or the ESD wrist strap to prevent the electrostatic discharge of the human body from dama...

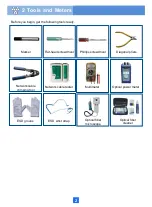
Page 5: ...trap Optical power meter Multimeter Network cable crimping tool Network cable tester Before you begin get the following tools ready Marker Flat head screwdriver Phillips screwdriver Diagonal pliers Optical fiber cleaner Optical fiber microscope ...

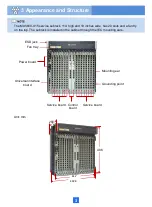
Page 6: ... inches wide has 20 slots and a fan try on the top The subrack is installed in the cabinet through the IEC mounting ears Unit mm 3 442 482 6 Fan tray Universal interface board Service board Power board Grounding point Control board Mounting ear ESD jack Service board 486 287 ...

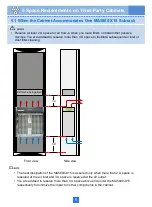
Page 7: ...ets are grounded through mounting bars Ensure that third party cabinets are properly grounded based on site conditions Power distribution requirements Ensure that an over current protection mechanism has been deployed on the upper level device A 60 A over current protection mechanism is recommended for the MA5800 X15 Ensure that the circuit breaker trip value of the upper level device is greater t...

Page 8: ...UN ALM BSY PON 0 2 4 6 1 3 5 7 0 1 2 3 4 5 6 7 GPBD RUN ALM BSY PON 0 2 4 6 1 3 5 7 0 1 2 3 4 5 6 7 GPBD RUN ALM BSY PON 0 2 4 6 1 3 5 7 0 1 2 3 4 5 6 7 GPBD RUN ALM BSY PON 0 2 4 6 1 3 5 7 0 1 2 3 4 5 6 7 GPBD RUN ALM BSY PON 0 2 4 6 1 3 5 7 0 1 2 3 4 5 6 7 GPBD RUN ALM BSY PON 0 2 4 6 1 3 5 7 0 1 2 3 4 5 6 7 GPBD RUN ALM BSY PON 0 2 4 6 1 3 5 7 0 1 2 3 4 5 6 7 GPBD RUN ALM BSY PON 0 2 4 6 1 3 5 ...

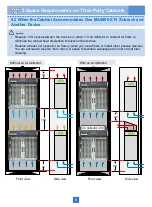
Page 9: ...al heat dissipation impacts on the devices Reserve at least 2 U space for air flow in when you route fibers or install other passive devices You are advised to reserve more than 4 U space to facilitate subsequent air inlet or dust filter cleaning 5 2 When the Cabinet Accommodates One MA5800 X15 Subrack and Another Device 5 Space Requirements on Third Party Cabinets 3U 10U 4U 2U 4U Air deflector 3 ...

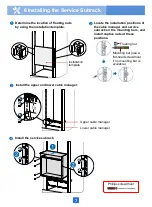
Page 10: ... manager Install the service subrack Installation template Phillips screwdriver Upper cable manager Lower cable manager Locate the installation positions of the cable manager and service subrack on the mounting bars and install captive nuts at these positions Floating nut Mounting bar use a flat head screwdriver if no mounting bar is available ...

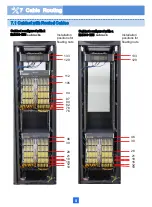
Page 11: ...t configured with 2 MA5800 X15 subracks Installation positions for floating nuts Cabinet configured with a MA5800 X15 subrack Installation positions for floating nuts 133 129 82 112 105 94 87 84 78 76 46 39 28 21 18 16 12 10 133 129 46 39 28 21 18 16 12 10 ...

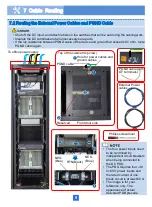
Page 12: ... that will be set during the cabling work Insulate the DC terminals and all unnecessary bare parts If the lap resistance between PGND cable of the device and ground bar exceeds 0 1 ohm route PGND cable again To office power supply The four power inputs need to be controlled by independent circuit breakers when being connected to the DC PDU The PDU requires four 48 V 60 V power inputs and the rated...

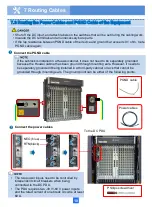
Page 13: ...e either of the following points The two power inputs need to be controlled by independent circuit breakers when being connected to the DC PDU The PDU requires two 48 V 60 V power inputs and the rated current of one break circuit is at least 60 A 7 3 Routing the Power Cables and PGND Cable of the Equipment Shut off the DC input and attach labels on the switches that will be set during the cabling ...

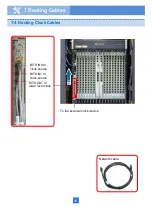
Page 14: ...Network cable 7 Routing Cables 7 4 Routing Clock Cables BITS IN0 to clock source BITS IN1 to clock source BITS OUT to lower level clock To the external clock device 11 ...

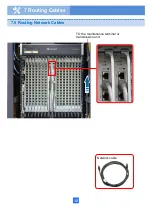
Page 15: ...7 Routing Cables Network cable 7 5 Routing Network Cables TO the maintenance terminal or transmission unit 12 ...

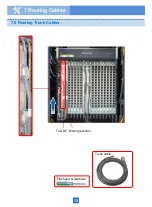
Page 16: ...7 Routing Cables 7 6 Routing Trunk Cables Trunk cable Flat head screwdriver Binding position 13 To DDF ...

Page 17: ...pipe must be wrapped with the adhesive tape In the cabinet the corrugated pipe should not be longer than 100 mm In addition the corrugated pipe is bound at the cabling aperture The bending radius of the optical fiber should be more than 20 times the cable radius In general the bending radius of the optical fiber is more than or equal to 40 mm 7 7 Routing Optical Fibers Upstream 42 1 mm To ODF Fibe...

Page 18: ...e tape In the cabinet the corrugated pipe should not be longer than 100 mm In addition the corrugated pipe is bound at the cabling aperture The bending radius of the optical fiber routed on the 48 port P2P board is greater than or equal to 5 mm The 48 port P2P board has 24 optical transceivers 12 optical fibers for six optical transceivers are bundled in a group When bundling the optical fiber lea...

Page 19: ...installed before connecting fibers to boards Route the fibers of the service boards on the left of the control board to the left side of the cabinet and route the fibers of the service boards on the right of the control board to the right side of the cabinet When the device uses the uplink interface board for upstream transmission of services the optical fiber for the uplink interface board is rou...

Page 20: ...y and vertically without crossover Proper margins must be reserved at the turning Observe 7 The power cables and ground cables must be connected correctly and reliably Observe 8 The identifiers on the power cable and ground cable must be correct legible and neat Observe 9 The power cables ground cables and signal cables must be routed separately Observe 10 Signal cables must be long enough and mus...

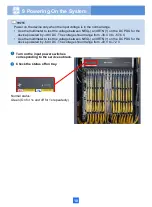
Page 21: ...range Use the multimeter to test the voltage between NEG and RTN on the DC PDU for the device powered by 48 V DC The voltage should range from 38 4 V to 57 6 V Use the multimeter to test the voltage between NEG and RTN on the DC PDU for the device powered by 60 V DC The voltage should range from 48 V to 72 V Turn on the input power switches corresponding to the service subrack ...

Reviews: