background image

SmartACBox 12-In 1-Out Smart AC Combiner  Box 
User Manual 

7 Maintenance 


Issue 03 (2018-05-15) 

Copyright © Huawei Technologies Co., Ltd. 

63 


Skip this step when replacing an AC input circuit breaker. 

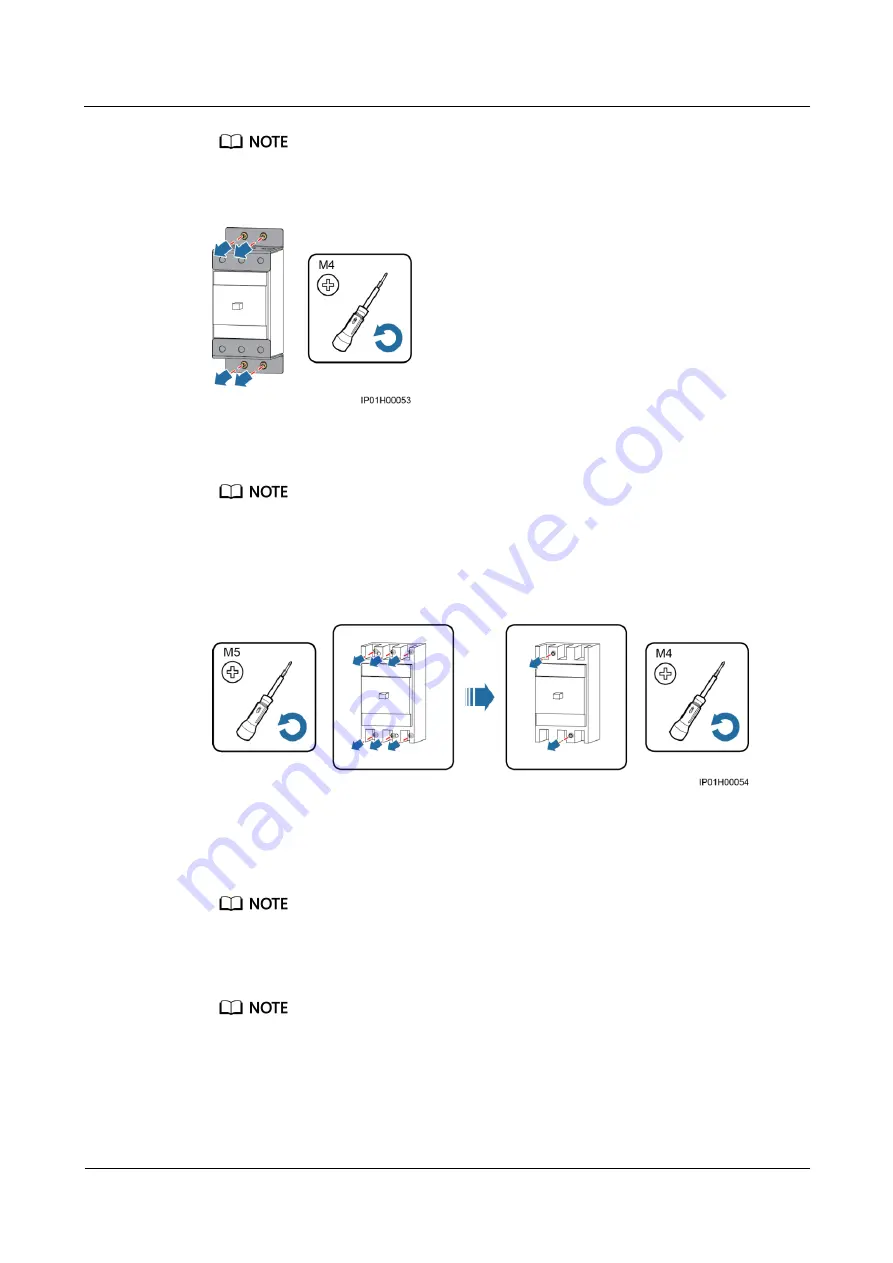
Figure 7-1


Removing a wiring terminal shielding cover 


Step 2


Remove the cables from the faulty circuit breaker and label the cables. 


When replacing an AC input circuit breaker, remove the copper bar and cables from the faulty circuit 
breaker. 

Step 3


Unscrew the circuit breaker. 

Figure 7-2


Removing a faulty circuit breaker 


Step 4


Install the new circuit breaker. 

Step 5


Connect the cables to the new circuit breaker based on the labels. 


When replacing an AC input circuit breaker, connect the copper bar and cables to the new circuit breaker 
based on the cable labels. 

Step 6


Reinstall the wiring terminal shielding cover. 


Skip this step when installing an AC input circuit breaker. 

----End 

Summary of Contents for SmartACBox-12/1-JP

Page 1: ...SmartACBox 12 In 1 Out Smart AC Combiner Box User Manual Issue 03 Date 2018 05 15 HUAWEI TECHNOLOGIES CO LTD ...

Page 2: ...tomer All or part of the products services and features described in this document may not be within the purchase scope or the usage scope Unless otherwise specified in the contract all statements information and recommendations in this document are provided AS IS without warranties guarantees or representations of any kind either express or implied The information in this document is subject to c...

Page 3: ...mbol Conventions The symbols that may be found in this document are defined as follows Symbol Description Indicates a hazard with a high level of risk which if not avoided will result in death or serious injury Indicates a hazard with a medium level of risk which if not avoided could result in death or serious injury Indicates a hazard with a low level of risk which if not avoided could result in ...

Page 4: ...etween document issues are cumulative The latest document issue contains all updates made in previous issues Issue 03 2018 05 15 Updated 4 6 Opening the Enclosure Door Updated 4 7 Installing the Router Updated 5 5 Installing Router Cables Issue 02 2018 02 12 Updated 5 1 Cable Specifications Issue 01 2017 10 16 This issue is used for first office application FOA ...

Page 5: ... 4 4 1 Wall mounted Installation 17 4 4 2 Support mounted Installation 19 4 4 3 Pole mounted Installation 21 4 5 Installing the SmartACBox 22 4 6 Opening the Enclosure Door 24 4 7 Installing the Router 26 5 Electrical Connections 30 5 1 Cable Specifications 30 5 2 Crimping the OT Terminal 31 5 3 Knocking Off Barrier Chips from Cable Holes 32 5 4 Installing the PE Cable 33 5 5 Installing Router Cab...

Page 6: ...iguring the Router Network 47 6 7 Setting the SmartLogger1000 Communications Parameters 47 6 7 1 LCD Monitoring Panel 48 6 7 2 Embedded WebUI 56 7 Maintenance 61 7 1 Routine Maintenance 61 7 2 Parts Replacement 62 7 2 1 Replacing the Single Phase Power Circuit Breaker or AC Input Circuit Breaker 62 7 2 2 Replacing the AC Output Circuit Breaker 64 7 2 3 Replacing the SmartLogger1000 65 7 2 4 Replac...

Page 7: ...any device damage caused by violation of the storage transportation installation and operation regulations specified in this document The safety precautions provided in this document do not cover all the safety precautions Huawei shall not be liable for any consequence caused by the violation of the safety operation regulations and design production and usage standards Local Laws and Regulations F...

Page 8: ...ed in a damp environment ensure that the equipment is dry When water is found in the cabinet or the cabinet is damp switch off the power supply immediately Equipment Security Before operation ensure that the equipment is firmly anchored to the floor or other solid objects such as a wall or an installation rack Use a tool to tighten screws when installing components After the installation remove th...

Page 9: ...ks which may cause fire or personal injury Before installing or removing a power cable turn off the upstream power switch and use a multimeter to check that the AC voltage of the input port is zero Before connecting a power cable check that the label on the power cable is correct Do not connect a single phase AC power cable reversely Otherwise equipment may be damaged Component To ensure the safe ...

Page 10: ...4 125KTL JP and SUN2000L 4 95KTL JP are both abbreviated as SUN2000L in the following text The SmartACBox is embedded with a SmartLogger that connects to Huawei SUN2000L over RS485 to collect data from SUN2000Ls so that the SUN2000Ls can be managed in a centralized manner The user purchases and installs a 3G 4G router and connects the router to the 3G 4G network over which the collected SUN2000L d...

Page 11: ...tACBox applies to a low voltage single phase three wire grid tied PV system that typically consists of PV strings grid tied inverters and AC combiner boxes Figure 2 2 shows the position of the SmartACBox in a low voltage single phase three wire grid tied PV system Figure 2 2 System application A PV string B SUN2000L C SmartACBox D Low voltage power grid ...

Page 12: ...Box User Manual 2 Overview Issue 03 2018 05 15 Copyright Huawei Technologies Co Ltd 6 2 2 Appearance Dimensions Figure 2 3 Dimensions Front View Figure 2 4 Front view 1 Monitoring compartment door 2 Enclosure door lock 3 Power compartment door ...

Page 13: ...i Technologies Co Ltd 7 Rear view Figure 2 5 Rear view 1 Mounting plate Bottom view Figure 2 6 Bottom view Table 2 1 Bottom description No Component Name Silk Screen Description 1 Cable gland for the RS485 communications cable COM Connects to a peripheral RS485 communications cable Inner diameter 25 5 mm ...

Page 14: ...ter 76 mm 5 Cable hole 1 for the AC input power cable AC INPUT1 Connects to the AC input power cable Inner diameter 76 mm 6 Cable hole 2 for the AC input power cable AC INPUT2 Connects to the AC input power cable Inner diameter 76 mm 7 USB port USB Connects to a USB flash drive for the SmartLogger1000 to import data export data and upgrade firmware 8 Ventilation valve N A N A 9 PE point N A N A 2 ...

Page 15: ... contains the model information technical specifications and compliance symbols as shown in Figure 2 7 Figure 2 7 Nameplate 1 Trademark product name and model number 2 Important technical specifications 3 Compliance symbols 4 Company name and country of manufacture The nameplate figure is for reference only Table 2 3 Compliance label description Label Name Meaning Environmentally friendly use peri...

Page 16: ...s embedded with a SmartLogger that forms a monitoring system by working with the router purchased and installed by users The monitoring system uploads collected SUN2000L information to the cloud server in order to monitor SUN2000Ls in real time Figure 2 8 shows the SmartACBox working principles by using the access from 12 SUN2000L 4 125KTL JP units as an example Figure 2 8 Working principles 2 5 M...

Page 17: ...SmartACBox 12 In 1 Out Smart AC Combiner Box User Manual 2 Overview Issue 03 2018 05 15 Copyright Huawei Technologies Co Ltd 11 Figure 2 9 Monitoring system network diagram ...

Page 18: ...rtACBox Keep the storage temperature at 30 C to 70 C and the humidity at 5 95 RH The SmartACBox should be stored in a clean and dry place and be protected from dust and water vapor corrosion A maximum of three SmartACBoxes can be stacked Regular inspection is required during the storage Replace the packing materials when necessary After long term storage an inspection and test conducted by qualifi...

Page 19: ...pack the SmartACBox and contact the dealer immediately You are advised to remove the outer packaging within 24 hours before installing the SmartACBox Package Contents After unpacking the SmartACBox check that the contents are intact and complete If any damage is found or any component is missing contact your dealer For details about the number of contents see the Packing List in the packing case 4...

Page 20: ...4 Type Tools and Instruments Torque screwdriver Wire stripper Diagonal pliers Rubber mallet Utility knife Cable cutter Hydraulic pliers Crimping tool Multimeter SPD module extracting unit Flat head screwdriver Adjustable wrench open end 32 mm Vacuum cleaner Marker Measuring tape Bubble or digital level Heat shrink tubing Heat gun ...

Page 21: ...rs or outdoors Do not install the SmartACBox in areas with flammable or explosive materials Installation Environment Requirements The SmartACBox must be installed in a well ventilated environment to ensure good heat dissipation so that the SmartACBox can operate in the temperature range of 20 C to 50 C Mounting Structure Requirements The mounting structure where the SmartACBox is installed must be...

Page 22: ...ox enclosure dimensions W x H x D are 995 mm x 815 mm x 225 mm The SmartACBox can be mounted on a wall pole or support Reserve sufficient space around the SmartACBox to facilitate installation and cable connection Figure 4 1 Installation space 4 4 Installing the Mounting Bracket Figure 4 2 shows the SmartACBox mounting bracket dimensions Figure 4 2 Mounting bracket dimensions ...

Page 23: ...re Step 1 Determine the positions for drilling holes using the mounting bracket Level the positions of mounting holes using a bubble or digital level and mark the positions with a marker Figure 4 3 Determining hole positions Step 2 Drill holes using a hammer drill and install expansion bolts Avoid drilling holes in the utility pipes and or cables attached to the back of the wall M12x60 expansion b...

Page 24: ...el the head of the expansion sleeve with the concrete wall after removing the bolt spring washer and flat washer Otherwise the mounting bracket will not be securely installed on the concrete wall 1 Drill a hole at a marked hole position in the wall using a hammer drill 2 Vertically insert an expansion bolt into a hole and knock the expansion bolt completely into the hole using a rubber mallet 3 Pa...

Page 25: ... 6 Securing a mounting bracket End 4 4 2 Support mounted Installation Procedure Step 1 Determine the positions for drilling holes using the mounting bracket Level the positions of mounting holes using a bubble or digital level and mark the positions with a marker Figure 4 7 Determining hole positions Step 2 Drill holes using a hammer drill ...

Page 26: ...int on the hole positions for protection Figure 4 8 Drilling holes Step 3 Align the mounting bracket holes with the drilled holes insert bolt assemblies flat washers spring washers and M12x40 bolts into the holes through the mounting bracket and secure them using the supplied stainless steel nuts and flat washers M12x40 bolt assemblies are supplied with the SmartACBox ...

Page 27: ...equisites To pole mount a SmartACBox you need to prepare pole mounting brackets by yourself based on the mounting bracket dimensions You are advised to use M12 U shaped bolts to secure the pole mounting brackets Figures provided in this chapter are for reference only The actual poles and pole mounting brackets prevail Procedure Step 1 Secure the pole mounting brackets to the pole and tighten the U...

Page 28: ...washers and M12x40 bolts into the holes through the mounting bracket and secure them using the supplied stainless steel nuts and flat washers M12x40 bolt assemblies are supplied with the SmartACBox Figure 4 11 Securing a mounting bracket End 4 5 Installing the SmartACBox Procedure Step 1 Two operation personnel hold the handles on both sides of the SmartACBox lift the SmartACBox from the packing c...

Page 29: ...porally place the SmartACBox on the ground use foam paper or other protection material to prevent damage to its cover Figure 4 12 Transporting a SmartACBox Step 2 Remove the security torx wrench and enclosure door key from the base of the enclosure and save them for later use Figure 4 13 Positions for the security torx wrench and key Step 3 Install the SmartACBox on the mounting bracket and align ...

Page 30: ...allation Issue 03 2018 05 15 Copyright Huawei Technologies Co Ltd 24 Figure 4 14 Mounting a SmartACBox Step 4 Tighten the security torx screws using a security torx wrench Figure 4 15 Tightening security torx screws End 4 6 Opening the Enclosure Door Prerequisites ...

Page 31: ...s take protective measures to prevent rain and snow entering the cabinet If it is impossible to take protective measures do not open the enclosure door in rainy or snowy days Procedure Step 1 Insert the key in the lock hole to unlock the enclosure door Step 2 Open the enclosure door and use the support bar to stabilize the door Figure 4 16 Stabilizing a door using a support bar Step 3 Hold the cov...

Page 32: ...uter so you need to purchase and install a router by yourself This document introduces how to install an SC RRX230 or SC RRX280 router produced by SUN DENSI in Japan An SC RRX230 or SC RRX280 router is supplied with a 1P184 FMM800W 5M5 or 1P184 DP BR0 RE remote outdoor antenna Procedure Step 1 Install the router antenna For the 1P184 FMM800W 5M5 antenna a Remove the screw assemblies from the route...

Page 33: ... b Install the antenna support in the upper part of the left wall of the enclosure and secure it using the removed M4 screw assemblies c Secure the router antenna on the support by attaching the antenna base to it Figure 4 19 Installing a router antenna For the 1P184 DP BR0 RE antenna a Remove the screw assemblies from the router tray and then remove the router antenna support ...

Page 34: ...th the holes in the antenna support and secure the antenna base to the antenna support using screws The screws used for tightening are supplied M5 screw assemblies c Install the antenna support in the upper part of the left wall of the enclosure and secure it using the removed M4 screw assemblies Figure 4 21 Installing a router antenna Step 2 Install the router SIM card The router supports the SIM...

Page 35: ... 3 Secure the router 1 Loosen the captive screws and remove the router tray 2 Horizontally place the router on the tray and ensure that the DC IN port on the router faces the power compartment Then secure the router by routing the supplied M4 Phillips screws through the holes at the bottom of the router tray and the holes at the bottom of the router 3 Place the router tray back onto the router sup...

Page 36: ...lation of the cable connection regulations specified in this document Only certified electricians are allowed to connect cables Ware proper PPE at all time when connecting cables The cable colors shown in cable connection diagrams are for reference only Select cables according to local cable specifications 5 1 Cable Specifications No Cable Recommended Model or Specifications Cross sectional Area R...

Page 37: ...ut power cable Three core outdoor armored copper cable with an OT M4 terminal protective earthing 2 5 5 mm2 Prepared by the customer 4 RS485 input cable Two core outdoor shielded RS485 communications cable single core rigid cable recommended 0 5 1 mm2 Prepared by the customer 5 PE cable Single core green outdoor copper cable with an OT M6 terminal 3 5 22 mm2 Prepared by the customer 5 2 Crimping t...

Page 38: ... example When using the heat gun protect devices from being scorched Figure 5 1 Crimping the OT Terminal A Core wire B Insulation layer C Heat shrink tubing D Hydraulic pliers E Heat gun 5 3 Knocking Off Barrier Chips from Cable Holes Before connecting the PE cable or AC input and output power cables for the first time knock off the barrier chips from the cable holes 1 and 2 for the AC input power...

Page 39: ...the cable holes for the AC input and output power cables Figure 5 2 Knocking off the barrier chip from a cable hole 5 4 Installing the PE Cable Prerequisites The PE cable and OT M6 terminal are available Procedure Step 1 Crimp an OT terminal on the PE cable Step 2 Optional Knock off the barrier chip from a cable hole at the bottom of the SmartACBox For details see 5 3 Knocking Off Barrier Chips fr...

Page 40: ...the PE cable through the cable hole 1 for the AC input power cable before connecting it Step 3 Secure the PE cable Figure 5 3 Connecting a PE cable End Follow up Procedure To enhance the corrosion resistance of a ground terminal apply silica gel or paint around the terminal after connecting the PE cable 5 5 Installing Router Cables The SmartACBox is not factory installed with a router so you need ...

Page 41: ...Insert the two core white output terminal of the factory installed power adapter into the DC IN port of the router Figure 5 4 Connecting a power cable from the power adapter to the router The SmartACBox is factory installed with two power adapter output terminals Select an appropriate output terminal based on the router type End 5 5 2 Installing the Network Cable Between the Router and the SmartLo...

Page 42: ...ntennas Procedure Step 1 Remove the sealing nuts from the 3G 4G cable glands at the bottom of the SmartACBox and remove the bolts from the sealing nuts Step 2 Route router antennas through the two 3G 4G cable glands respectively and connect them to the MOBILE1 and MOBILE2 ports on the router If there is only one antenna route it through either one of 3G 4G cable glands and connect it to the MOBILE...

Page 43: ...Copyright Huawei Technologies Co Ltd 37 Figure 5 6 Connecting a router antenna Step 4 Use clips to secure the router antenna cable Figure 5 7 shows how to secure one antenna using clips Antenna clips and M4 screw assemblies are supplied with the SmartACBox Figure 5 7 Securing a router antenna cable End ...

Page 44: ...itions No Port on the JX01 Terminal Block Definition 1 RS485 1 _COM1 RS485 1 RS485 differential signal 2 RS485 1 _COM1 RS485 1 RS485 differential signal 3 RS485 2 _COM2 RS485 2 RS485 differential signal 4 RS485 2 _COM2 RS485 2 RS485 differential signal Procedure Step 1 Prepare an RS485 communications cable Figure 5 8 Stripping an RS485 communications cable Step 2 Remove the gland from the COM cabl...

Page 45: ...uisites A single phase power cable and its OT M4 terminal are available Context The power cables from the SmartACBox to the SmartLogger1000 and router have been factory installed If an external power source is required to power the SmartLogger1000 and router disconnect the power cable from the JX02 terminal block and then connect the external single phase power cable to the JX02 terminal block Pro...

Page 46: ... 3 Disconnect cables JX02 1 BOT and JX02 2 BOT from the JX02 terminal block Insulate the disconnected cables JX02 1 BOT and JX02 2 BOT Step 4 Remove the gland from the AC INPUT cable gland at the bottom of the SmartACBox and remove the cap from the gland Step 5 Route the cable through the gland and then the AC INPUT cable gland and finally to the JX02 terminal block Figure 5 11 Connecting a single...

Page 47: ...wire stripper The lengths of the jackets and insulation layers that need to be removed from the AC input power cables to input circuit breakers QF01 to QF06 are different When connecting a stripped cable ensure that the exposed insulation layer is all in the enclosure and the jacket is all outside the enclosure For the lengths of the jackets and insulation layers that need to be removed from the A...

Page 48: ...uit breakers QF01 to QF05 and QF07 to QF12 are connected in the same way To avoid device damage do not mix up the U O and W terminals when connecting cables Figure 5 13 Connecting an AC input power cable End 5 9 Installing the AC Output Power Cable Prerequisites The AC output power cable and OT M12 terminal are available Procedure Step 1 Remove an appropriate length of the jacket and insulation la...

Page 49: ...the enclosure and the jacket is outside the enclosure Figure 5 14 Stripping anAC output power cable 1 Core wire 2 Insulation layer 3 Jacket Step 2 Crimp an OT terminal Step 3 Route the cable through the cable hole for the AC output power cable Step 4 Connect the AC output power cable to the U O and W terminals on circuit breaker QF13 and tighten the bolts using a torque wrench Figure 5 15 Connecti...

Page 50: ...t Smart AC Combiner Box User Manual 5 Electrical Connections Issue 03 2018 05 15 Copyright Huawei Technologies Co Ltd 44 When using a torque wrench to tighten a bolt use an M12 wrench to tighten the nut at the same time End ...

Page 51: ...le holes at the enclosure bottom are blocked by fireproof material 4 Unused USB ports are plugged with watertight caps 5 Idle waterproof connectors are plugged and the locking caps are tightened 6 All switches in the enclosure are off 7 The enclosure interior is clean without dust dirt or foreign matter 8 The paint on the enclosure exterior is intact If paint has flaked off repaint that area to pr...

Page 52: ...he AC output side to ON Step 2 Switch circuit breakers QF01 to QF12 on the AC input side to ON one by one Step 3 Switch circuit breaker QF14 in the monitoring compartment to ON End 6 4 Powering Off the System Prerequisites You have put on insulation gloves Procedure Step 1 Switch circuit breaker QF14 in the monitoring compartment to OFF Step 2 Switch circuit breakers QF01 to QF12 on the AC input s...

Page 53: ... SmartLogger1000 and NMS For details about how to configure the router network see Configuring the SC RRX230 280 Network or the instruction supplied with the router 6 7 Setting the SmartLogger1000 Communications Parameters After installing a router in the SmartACBox set the SmartLogger1000 communications parameters correctly to ensure that the SmartLogger1000 can successfully upload the collected ...

Page 54: ...ger V100R001C00SPC111 Data on the snapshots are for reference only Procedure Step 1 Set initialization parameters If the SmartLogger1000 is started for the first time set initialization parameters on the LCD monitoring panel If the SmartLogger1000 is not started for the first time the system automatically searches for devices and displays the default screen after the search is complete LCD Operati...

Page 55: ...ress To set the parameter value press or The date and time are displayed in the formats of YYYY MM DD and hh mm ss respectively YYYY stands for the year MM the month DD the date hh the hour mm the minute and ss the second NOTICE After Date Time is successfully set this time can be synchronized in all the inverters connected to the SmartLogger 5 Set the Ethernet parameters and then press 6 Set the ...

Page 56: ...et parameters of the SmartLogger1000 LCD Operation Procedure 1 On the default screen press to enter the main menu 2 Choose and press 3 Enter the User name and Password by pressing or and then press NOTE Because of the limited permission select the User name as Advanced User The initial password for Advanced User is 000001 After passing the permission validation the system keeps the authentication ...

Page 57: ...85 ports RS485 1 RS485 2 and RS485 3 RS485 1 RS485 3 respectively correspond to communications ports COM1 COM3 on the SmartLogger1000 6 Set RS485 parameters and then press The following baud rates are supported 4800bps 9600bps 19200bps and 115200bps 9600bps is recommended 1 Start Address End Address 247 The address segments for these three ports can overlap Set the address scope properly The broad...

Page 58: ... IP addresses In this case you must ensure that a DHCP server is working on the network Set the gateway address to the IP address of the router Ensure that the IP address of the SmartLogger is in the same network segment as the gateway address Set the domain name server DNS address to the IP address of the router or obtain the DNS address from the network provider Step 3 Connect the SmartLogger100...

Page 59: ...in within 30 seconds no authentication is required 4 Choose Device Mgmt and press Perform step 5 to enable the SmartLogger1000 to automatically search for devices Perform step 6 to add devices to the SmartLogger1000 5 Choose Auto Search and press Before performing the automatic search ensure that all the devices can normally communicate with the SmartLogger1000 NOTE After you add delete or replace...

Page 60: ...cedure 6 Choose Add Manually and press NOTE If the communication is abnormal or the address on the port has been used the device cannot be added Step 4 Set NetEco parameters to ensure that a connection is set up between the SmartLogger1000 and the NMS LCD Operation Procedure 1 On the default screen press to enter the main menu 2 Choose and press ...

Page 61: ...ication information for 30 seconds If you exit the screen and log in again within 30 seconds no authentication is required 4 Select Comm Param and press 5 Press select NetEco and press 6 Set NetEco parameters and then press NOTE Port number If Huawei NMS is connected set this parameter to 16100 by default If a third party NMS is connected set this parameter to the number of the service port opened...

Page 62: ... IP address for the SmartLogger1000 The default IP address is 192 168 0 10 Step 2 Specify Language User Name and Password and then click Log In Because of the permission restriction log in as Advanced User or Special User For the SmartLogger software versions that are SmartLogger V100R001C00SPC111 and later the initial password is Changeme After the first login it is recommended that you change th...

Page 63: ...ddress Set DNS Server Address to the router IP address usually or to an address obtained from the network carrier Step 4 Log in as Advanced User On the Settings tab page choose Comm Param RS485 to set RS485 parameters Figure 6 5 Setting RS485 parameters RS485 1 RS485 3 respectively correspond to communications ports COM1 COM3 on the SmartLogger1000 The values of Protocol Parity and Baud rate for t...

Page 64: ...igure 6 6 Searching for devices automatically b Click Confirm The system starts to search for devices automatically When a device cannot access due to address conflict perform Auto Assign Address to assign a new device address and then click Auto Search to access the device Method 2 Adding devices manually a Log in as Advanced User or Special User On the Maintenance tab page choose Device Mgmt Con...

Page 65: ...e choose Comm Param NetEco to set NetEco parameters and upload the security certificate Figure 6 8 Setting NetEco parameters NetEco server IP address for the NMS server Port number If Huawei NMS is connected set this parameter to 16100 by default If a third party NMS is connected set this parameter to the number of the service port opened by the system Address mode Select Comm Address or Logical A...

Page 66: ...hout being encrypted which may result in user data theft Therefore exercise caution when deciding to set SSL encryption to Disable Second challenge authentication If you set this parameter to Disable the result of the second challenge authentication is not checked which may result in user data theft Therefore exercise caution when deciding to set Second challenge authentication to Disable 2 Click ...

Page 67: ...sure that the SmartACBox is de energized and will not cause personal injury If you need to open the cabinet door in rainy or snowy days take protective measures to prevent rain and snow entering the cabinet If it is impossible to take protective measures do not open the cabinet door in rainy or snowy days Table 7 1 Maintenance checklist Item Check Method Maintenance Interval Cabinet Check that the...

Page 68: ...e 6 4 Powering Off the System After disconnecting the power supply wait 1 minute and then start parts replacement After replacing a component check the SmartACBox and then power on the SmartACBox to verify that the replacement component works properly For details see 6 1 Checking Before Power On and 6 3 Powering On the System Dispose of faulty components in accordance with the local disposal act f...

Page 69: ...ing an AC input circuit breaker remove the copper bar and cables from the faulty circuit breaker Step 3 Unscrew the circuit breaker Figure 7 2 Removing a faulty circuit breaker Step 4 Install the new circuit breaker Step 5 Connect the cables to the new circuit breaker based on the labels When replacing an AC input circuit breaker connect the copper bar and cables to the new circuit breaker based o...

Page 70: ...ut circuit breaker using a socket wrench that has an extension rod and label the cables Figure 7 3 Removing cables and a copper bar When removing connecting copper bars and cables using a socket wrench arrange another person to hold the nuts using an M12 wrench Step 2 Remove the wiring copper plates from the bottom of the faulty AC output circuit breaker using a socket wrench that has an extension...

Page 71: ...copper plates at the bottom of the AC output circuit breaker Step 8 Connect the copper bar and cables to the new circuit breaker based on the cable labels End 7 2 3 Replacing the SmartLogger1000 Prerequisites The SmartLogger1000 is faulty A spare SmartLogger1000 of the same model is available and functional Procedure Step 1 Disconnect cables from the faulty SmartLogger1000 and label the cables Ste...

Page 72: ...ith a certain force until the sliding guide buckles under the SmartLogger1000 deform 3 Pull the SmartLogger1000 outwards with a certain force until the buckles above the SmartLogger1000 separate from the guide rail Figure 7 6 Removing the sliding guide from the SmartLogger1000 Step 5 Install the sliding guide and installation panel on the new SmartLogger1000 Step 6 Secure the new SmartLogger1000 i...

Page 73: ...the faulty RS485 signal SPD Figure 7 7 Removing a faulty RS485 signal SPD Step 3 Install the new RS485 signal SPD Step 4 Connect the cables to the RS485 signal SPD based on the cable labels End 7 2 5 Replacing the Power SPD Prerequisites The power SPD is faulty A spare power SPD of the same model is available and functional If an SPD is damaged or its indication window is displayed in red replace ...

Page 74: ... is faulty A spare power adapter of the same model is available and functional Procedure Step 1 Disconnect the input power cable from the faulty power adapter Step 2 Disconnect the cables from the power input port on the SmartLogger1000 and the power input port on the router Step 3 Remove the faulty power adapter Figure 7 9 Removing a faulty power adapter Step 4 Install the new power adapter Indic...

Page 75: ...er1000 and the power input port on the router End 7 2 7 Replacing the USB Port Prerequisites The USB port is faulty A spare USB port of the same model is available and functional Procedure Step 1 Disconnect the cable from the USB port and label the cable Step 2 Remove the faulty USB port Figure 7 10 Removing a USB port Step 3 Install the new USB port When installing the new USB port ensure that th...

Page 76: ...t AC Combiner Box User Manual 7 Maintenance Issue 03 2018 05 15 Copyright Huawei Technologies Co Ltd 70 Figure 7 11 Position of a rubber ring 1 Rubber ring Step 4 Connect the cable to the new USB port based on the cable label End ...

Page 77: ...ing temperature 20 C to 50 C Humidity 5 95 RH Maximum altitude 3000 m Ingress Protection Rating IP65 Rated operating voltage 202 V 1φ3W Rated operating frequency 50 Hz 60 Hz Rated input current 12 x 20 5 A or 10 x 24 5 A Rated output currenta 246 A Communication mode RS485 Cable routing Routed in and out from the bottom Maintenance mode Maintained from the front Installation mode Installed on a wa...

Page 78: ...ue 03 2018 05 15 Copyright Huawei Technologies Co Ltd 72 A Acronyms and Abbreviations 3G Third Generation 4G Fourth Generation A AC alternating current C COM Communication D DC direct current F FE fast Ethernet L LAN local area network N NMS network management system R RH relative humidity ...

Page 79: ...t AC Combiner Box User Manual AAcronyms and Abbreviations Issue 03 2018 05 15 Copyright Huawei Technologies Co Ltd 73 S SIM subscriber identity module SPD surge protective device U USB Universal Serial Bus W WAN wide area network ...

Reviews: