background image

16

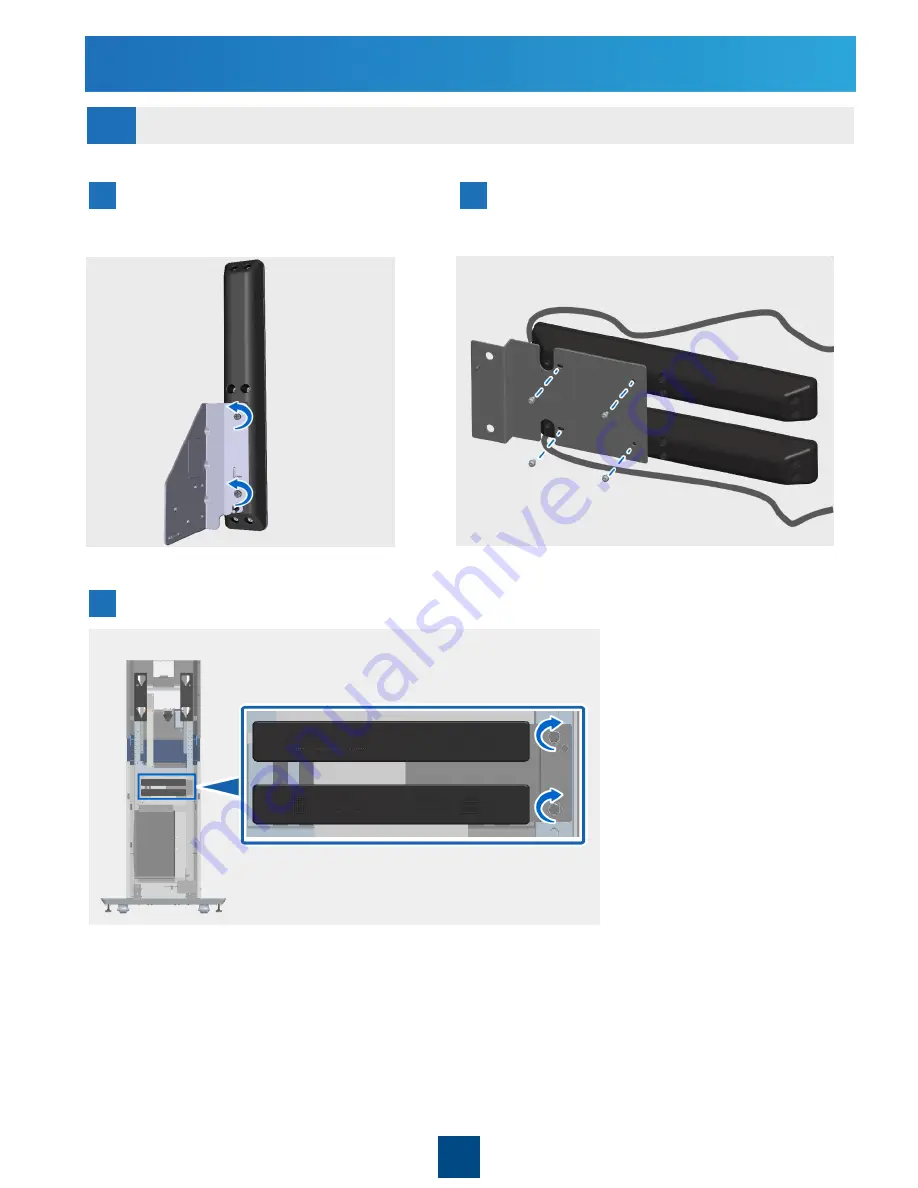
Remove the speaker from its fixture
provided by LG.

Install the fixture provided by Huawei at 
the back of the speakers.

Install the speakers onto the rack.

Use the screws removed in step 1.

9.4

Use a Phillips 
screwdriver to 
remove screws 
used to affix the 
speakers to the 
fixture. Keep the 
screws secure 
for future use.

3

1

2

9 Installing Components in the Rack

Installing Speakers (For LG-47LS33A and LG-55LS33A only) 

Summary of Contents for RP100

Page 1: ...HUAWEI TECHNOLOGIES CO LTD HUAWEI RP100 RP200 Room Presence V500R002C00 Installation Guide Issue 06 Part number 31043833 Date 2017 06 26 ...

Page 2: ...king the Items in It 7 6 1 Checking the Box Before Unpacking It 7 6 2 Unpacking 9 6 3 Checking the Packing List 9 6 4 Powering On RP Components 10 7 Labeling Cables 10 7 1 Cable Label 10 7 2 Cable List 11 8 Securing the Rack 13 9 Installing Components in the Rack 14 9 1 Removing the Panel 14 9 2 Laying Rack Embedded Cables Out 14 1 Product Introduction 1 9 3 For RP S Only Installing the Power Adap...

Page 3: ...pacer 18 10 2 Installing the HD Display 19 11 Installing the RP200 HD Display 25 11 1 Removing the Camera Spacer 25 11 2 Installing the HD Display 25 12 Installing the TE30 VPC600 36 13 Connecting Cables 39 14 Checking After the Installation 42 15 Powering On the RP 42 Appendix A Elevating the Rack 43 Follow up Procedure 46 Viewing the Open Source Software Notice 46 ...

Page 4: ...48DCE 2 TE30 RP200 46A LG 47LS33A LG 49SE3KB Samsung LH48DCE 2 TE50 VPC600 RP200 55S TCL B55F360 Samsung LH55DCE 2 TE30 RP200 55A LG 55LS33A LG 55SE3KB Samsung LH55DCE 2 TE50 VPC600 The TE30 adapter and integrated cable must be installed for the RP S Speakers must be installed for the LG 47LS33A display and the LG 55LS33A display Adapting frames must be installed for the 49 LG 49SE3KB display and ...

Page 5: ...two figures show the appearance of the RP100 and RP200 respectively 1 Product Introduction HD display TE30 or VPC600 RP100 S A Appearance HD display TE30 or VPC600 RP200 S A Appearance Video source Presentation source ...

Page 6: ...installation must be done in accordance with the local safety regulations Only personnel qualified to perform high voltage AC operations are allowed to install AC power supply devices Do not wear any conductive items such as metal watches chains bracelets or rings during operations Isolate the power supply before installing or removing power cables Before you connect the power cables verify that t...

Page 7: ...Connect cables Power on the RP Install the camera Install the RP100 HD display Install the RP200 HD display Tools delivered with the RP are placed in the tool box on the base If you have purchased the optional touch panel ensure that you have received it intact Connect the LG HD display infrared control cable before you attempt to operate it Embedded cables do not need to be labeled Remove the pan...

Page 8: ... Spirit level Retractable utility knife ESD gloves M12 open end wrench M6 hex socket wrench M6 Allen wrench The following tools are delivered with the RP ESD electrostatic discharge 4 Preparing Installation Tools The items in the preceding figures are for reference only It is recommended that you wear ESD clothing for installing the RP NOTE ...

Page 9: ...cipant s face when the participant is seated facing the HD display is higher than 250 lux Color temperature A method of describing the color characteristics of light usually either warm or cool The unit of color temperature is Kelvin K In an RP conference room the color temperature of a light source is supposed to be about 4000 K CRI A quantitative measure of the effect of a light source on the co...

Page 10: ...ed in 2 The box s appearance is intact without severe damage or soaking 3 The box is not upside down Here the single screen box is used as an example If the tiltwatch label turns red the box has ever been tilted However you cannot reject the box only because of this 4 The display is intact 5 Power on the display and check whether it can start up properly Not tilted up Tilted up 5 Checking the Inst...

Page 11: ...hat is powered on Protection foam panoramic photo of foam corresponding to the broken part of the screen If protection foam is broken provide close up photos of the broken foam including the fixture foam at the top and bottom and protection foam on the left and right Paper carton label photo with a clear SN both Huawei label or original maker label are needed photos of six faces and close up photo...

Page 12: ...eck whether they are received and intact RP100 46S 55S RP200 46S 55S RP100 46A 55A RP200 46A 55A Packing Rack Rack box big Single screen bracket X X Dual screen bracket X X X TE30 videoconferencing endpoint X X TP device box small VPC600 HD camera X X VPM220 microphone array HD display 2 2 display box Model Part Packing List Unpacking 6 2 RP components boxes are made of cardboard The following pro...

Page 13: ...hen turns steady blue Connect the power cable and press the display power button ON VPC600 It starts up properly Connect the power cable and press the display power button ON Touch panel optional It starts up properly Press the power button 7 Labeling Cables RP cables can be distinguished by their BOM numbers and labels Before installing the RP label its cables for subsequent maintenance and conne...

Page 14: ...r MALL No A02 3 5 mm audio cable 04051087 10 0 m Presentation audio source TE30 LINE IN No N01 4 m network cable 04070008 4 0 m Wall mounted network port TE30 integrated cable converter LAN No P01 Wall mounted power cable 02230ECS 3 0 m Wall mounted power port External power cable Yes P02 External power cable 04050373 1 0 m Wall mounted power cable External port C14 of the switch box No P03 7 outl...

Page 15: ...r Yes LG display SPEAKER OUT L LG display L speaker A04 Extension audio cable LG speaker embedded 1 5 m LG display SPEAKER OUT R Audio cable for the video LG display R speaker Yes LG display SPEAKER OUT L Audio cable for the video LG display L speaker N01 Network cable 04070008 4 0 m Wall mounted network port TE50 LAN1 No P01 Wall mounted power cable 02230ECS 3 0 m Wall mounted power port External...

Page 16: ...he other side DANGER Open the tool box Take out necessary tools M12 open end wrench Remove the four hexagonal socket screws on the left and right sides Secure the rack Adjust the height of the base and use the spirit level to check whether the base is level M12 open end wrench M6 hex socket wrench Move the rack from the rack fixture This task requires at least two people Rack fixture 2 1 3 5 4 8 S...

Page 17: ... the rack embedded cables cut the ties labeled as Remove this tie as shown in the following figure and lay the cables out of the rack The rack embedded cables need to be laid out from the rack for subsequent connections 9 1 9 2 2 1 2 1 9 Installing Components in the Rack Removing the Panel Laying Rack Embedded Cables Out ...

Page 18: ...talled Prepare a pair of speakers and necessary screws as specified in the RP packing list Two pairs of speakers are delivered with the RP200 Install only one pair and keep the other for backup NOTE Power adapter Integrated cable 7 outlet PDU 9 3 For RP S only Installing the Power Adapter and Integrated Cable 9 4 1 2 9 Installing Components in the Rack Installing Speakers For LG 47LS33A and LG 55L...

Page 19: ...f the speakers Install the speakers onto the rack Use the screws removed in step 1 9 4 Use a Phillips screwdriver to remove screws used to affix the speakers to the fixture Keep the screws secure for future use 3 1 2 9 Installing Components in the Rack Installing Speakers For LG 47LS33A and LG 55LS33A only ...

Page 20: ...front panel Lay audio and video cables from the middle part of the upper front panel 3 9 5 Installing the Panel 9 Installing Components in the Rack The yellow cable is indicative Before installing the panel route all cables connected to the display out of the middle part of the upper front panel and route all cables connected to the TE30 VPC600 out of the rear access panel NOTE ...

Page 21: ...dix A Elevating the Rack CAUTION The HD display requires at least two people to lift or move it Exercise caution when lifting or moving it DANGER Remove the crimping cover 2 Remove the camera spacer 3 Phillips screwdriver Keep the camera spacer in a safe place for future use during the TE30 VPC600 installation 4 10 1 Removing the Camera Spacer 10 Installing the RP100 HD Display ...

Page 22: ...wrench from the single screen bracket package 3 Remove the screws from the mounting holes 2 4 Soft cushion Phillips screwdriver 10 2 Installing the HD Display 10 Installing the RP100 HD Display For LG 49SE3KB and LG 55SE3KB only Remove the LG LOGO For LG 49SE3KB and LG 55SE3KB only Tighten the M6 x 15 cross recessed screws to secure the VESA adapting frames onto the back of the display 5 Ensure th...

Page 23: ...ermining the holes for mounting the vertical bars push the bracket upwards and tighten the screws 7 TOP TOP LG 49SE3KB LG 55SE3KB only Secure the bracket by tightening the M6 x 15 cross recessed screws at the bottom For TCL B48F360 only Secure the bracket by tightening the M6 x 20 cross recessed screws at the bottom Place the mounting bracket onto the display gently The display may be damaged by a...

Page 24: ...55LS33A Hole 1 For LG 47LS33A TCL B55F360 LG 55LS33A only Secure the bracket by tightening the M6 x 20 cross recessed screws at the bottom 9 For LH48DCE Samsung LH55DCE display comes with M8 x 20 cross screws 55SE3KB LG 49SE3KB LG display comes with M6 x 15 cross screw only Secure the bracket by tightening the M6 x 20 cross recessed screws on the top 10 To adjust the bracket loosen the M6 x 16 soc...

Page 25: ... to TCL55 For LG 49SE3KB only Adjust the bracket horizontally to 24 For TCL B55F360 only Adjust the bracket horizontally to TCL55 11 3 Samsung LH48DCE adjusted to 30 11 4 Samsung LH55DCE adjusted to 54 For Samsung LH48DCE only Adjust the bracket horizontally to 30 For Samsung LH55DCE only Adjust the bracket horizontally to 54 ...

Page 26: ... 47LS33A LG 55LS33A adjusted to LG 11 6 For LG 47LS33A and LG 55LS33A only Adjust the bracket horizontally to LG TCL B48F360 adjusted to TCL48 For LG 55SE3KB only Adjust the horizontal bars vertically to 50 12 LG 55SE3KB adjusted to 50 below LG 11 7 Adjust the horizontal bars left or right so that the 0 is at the center of the HD display ...

Page 27: ... one hand to hold the horizontal bars of the bracket and the other to hold the bottom of the display DANGER Install the display onto the rack 16 Installation holes Mounting screws Insert four mounting screws into the holes on the rack Connect the necessary HD display cables 1 For 47LS33A and 55LS33A only Connect the power audio and video cables of the HD display to their extension cables 2 For 47L...

Page 28: ...alling the dual screen bracket and connecting plates as specified in the RP packing list Sort the cables 1 Connect one end of the HD display power cable to the 7 outlet PDU in the rack 2 Route the other ends of the power cable and video cable of the HD display out of the middle part of the upper front panel 1 Take out the M6 Allen wrench from the bracket package 2 Camera spacer 11 1 Removing the C...

Page 29: ...to the left and right brackets respectively The TOP arrow should point upward Tighten the screws 16 M6 x 16 socket head cap screws to secure the connecting bars 4 Use the M6 Allen wrench to tighten the screws First place the screws into holes and slightly tighten them using your hands Then use the M6 Allen wrench to fasten them 11 2 Installing the HD Display 11 Installing the RP200 HD Display ...

Page 30: ...other 3 Remove the screws at the back of the HD display as shown in the following figure 5 11 Installing the RP200 HD Display 11 2 Installing the HD Display 55 LG HD display 16 screws at the back TCL HD display 14 screws at the back 47 49 LG HD display 14 screws at the back LH48DCE LH55DCE HD display 12 screws at the back Ensure that the cushion and ground are clean and tidy preventing the display...

Page 31: ...splay 11 2 Installing the HD Display For LG 49SE3KB and LG 55SE3KB only Remove the LG LOGO 6 7 For LG 49SE3KB and LG 55SE3KB only Tighten the M6 x 15 cross recessed screws to secure the VESA adapting frames onto the back of the display ...

Page 32: ...nstall the male female studs onto the holes LG For Samsung LH48DCE and Samsung LH55DCE only Install four male female studs respectively on the top and at the bottom of the joints between the two HD displays 8 1 Eight male female studs required for connecting two Samsung LH48DCE or Samsung LH55DCE HD displays Install one male female stud respectively 3 Install the male female studs onto the holes U...

Page 33: ...g plates required for connecting two 47 49 LG or TCL HD displays Four connecting plates required for connecting two 55 LG HD displays Two connecting plates required for connecting two 48 55 Samsung HD displays Place a connecting plate to two male female studs Tighten the screws of the male female studs Place the mounting bracket onto the display gently The display may be damaged by a heavy press C...

Page 34: ...49SE3KB 55SE3KB adjusted to hole 1 After determining the holes for mounting the vertical bars push the bracket upwards and tighten the screws For LG 49SE3KB LG 55SE3KB only Secure the bracket by tightening the M6 x 15 cross recessed screws at the bottom 12 13 3 47LS33A B55F360 55 LS33A adjusted to hole 1 For LG 47LS33A TCL B55F360 LG 55LS33A only Secure the bracket by tightening the M6 x 20 cross ...

Page 35: ...r LH48DCE Samsung LH55DCE display comes with M8 x 20 cross screws 55SE3KB LG 49SE3KB LG display comes with M6 x 15 cross screw only Secure the bracket by tightening the M6 x 20 cross recessed screws on the top For Samsung LH48DCE only Adjust the bracket horizontally to 30 13 3 LH48DCE LH55DCE adjusted to hole 3 For Samsung LH48DCE and Samsung LH55DCE only Secure the bracket by tightening the M6 x ...

Page 36: ...49SE3KB adjusted to 24 below LG For TCL B48F360 only Adjust the horizontal bars vertically to TCL48 TCL B48F360 adjusted to TCL48 16 3 LG 47LS33A LG 55LS33A adjusted to LG 16 4 For LG 47LS33A and LG 55LS33A only Adjust the horizontal bars vertically to LG 16 2 LH55DCE adjusted to 54 For Samsung LH55DCE only Adjust the bracket horizontally to 54 ...

Page 37: ...he HD Display For LG 55SE3KB Adjust the horizontal bars vertically to 50 16 7 18 LG 55SE3KB adjusted to 50 below LG Adjust the horizontal bars left or right so that the 0 is at the center of the HD display 17 16 6 TCL B55F360 adjusted to TCL55 For TCL B55F360 only Adjust the horizontal bars vertically to TCL55 ...

Page 38: ... necessary cables for the HD displays 1 For 47LS33A and 55LS33A only Connect the audio cable to the extension audio cable of the HD display 2 For 47LS33A and 55LS33A only Connect the power cable infrared control cable and video cable to the HD display 3 For B48F360 and B55F360 only Connect the video cable to the extension video cable of the HD display 4 For B48F360 and B55F360 only Connect the pow...

Page 39: ...he RP packing list The TE30 and VPC600 are installed in the same way but using different connection cables Unless otherwise specified this section uses the TE30 as an example Introduction to the Camera Spacer Location pillar Philips head screw hole Location pillar Philips head screw Mounting peg hole 12 Installing the TE30 VPC600 ...

Page 40: ...g the TE30 VPC600 Mount the TE30 on the top of the display based on the screw hole Tighten the screws to secure the TE30 Adjust the position of the TE30 Bottle gourd shaped mounting peg All cables connected to the TE30 or VPC600 must be sorted into the groove of the cable trough on the camera spacer The outer edge of the TE30 or VPC600 must be level with the surface of the display ...

Page 41: ...hole Install the rear access panel 1 Ensure that all required cables are installed 2 Insert the two dowels on the rear access panel into the dowel holes on the rack and push the panel up until it is secure The following figure shows the appearance of the rear access panel 7 12 Installing the TE30 VPC600 Insert the crimping cover into the bottle gourd shaped mounting pegs Tighten the captive screws...

Page 42: ...alled onsite Pre mounted cables A0X Audio cables V0X Video cables N0X Network cables P0X Power cables Input cables input onsite VPM220 Microphone array Power box embedded PDU embedded Wall mounted power outlet Wall mounted network port Power adapter V05 V04 P04 P01 P07 N01 A01 P06 P03 P02 V04 A02 V01 P05 V03 FHD display on the left for video For RP200 S Only FHD display on the right for presentati...

Page 43: ...ntation audio source Power box embedded PDU embedded Wall mounted power outlet Notes Output cables installed onsite Pre mounted input cables Cables installed onsite Input cables installed onsite Pre mounted cables P01 P02 P03 P04 P05 TE50 A0X Audio cables V0X Video cables N0X Network cables P0X Power cables A04 A03 VPC600 A04 A03 LG provided speaker N01 Wall mounted network port Presentation displ...

Page 44: ...ntation A04 A03 A04 A03 P08 P06 V06 Presentation display or projector Presentation audio source VPM220 microphone array Presentation audio source VPC600 Notes Output cables installed onsite Pre mounted input cables Cables installed onsite Input cables installed onsite Pre mounted cables A0X Audio cables V0X Video cables N0X Network cables P0X Power cables Power box embedded PDU embedded Wall mount...

Page 45: ...tions by referring to Room Presence Hardware and Cable Connections in the RP100 RP200 V500R002C00 Acceptance Test Guide HD display The status indicator is steady red and the display says that the system is being started up After a few seconds the indicator is off A boot animation plays RP A VPC60 0 The status indicator blinks green for several seconds The LCD displays a message indicating that the...

Page 46: ... to remove the two screws To remove the HD display first disconnect all attached cables 6 Lift up the HD display with one hand supporting the bottom and the other hand holding the top of the HD display 7 The HD display requires at least two people to lift or move it Exercise caution when lifting or moving it DANGER Dismount the HD display from the rack and place it onto the soft cushion on the flo...

Page 47: ... 11 Adjust the height of the rear plate as required 12 Use two hexagonal socket screws to secure the rear plate 13 Use the M6 hex socket wrench to remove the screws Use the M6 hex socket wrench to tighten the screws Elevate the rear plate of the rack and stop when you hear a click NOTE Appendix A Elevating the Rack Use the M6 hex socket wrench to remove the screws Hold the middle part of the upper...

Page 48: ...n in the figure under step 1 2 Secure the rack bracket as shown in the figure under step 2 15 Just loosen the screws Do not remove them CAUTION Appendix A Elevating the Rack Upper row screws Lower row screws Move the left and right rack brackets to the level of upper row screws Use the M6 hex socket wrench to tighten the six screws ...

Page 49: ... To obtain this guide visit http www huawei com and search for RP100 RP200 V500R002C00 Configuration Guide Viewing the Open Source Software Notice For a codec log in to its web interface and choose to open the online help Then click OPEN SOURCE SOFTWARE NOTICE to view its details For a touch panel tap and choose Setting Then tap Open Source Licenses to view its details Huawei Technologies Co Ltd H...

Reviews: