background image


3.


Double-click 

Internet Protocol Version 4 (TCP/IPv4)

4.


Select 

Obtain an IP address automatically

 and 

Obtain DNS server address 

automatically

. Click 

OK

On Windows XP 

1.


Click 

  in the lower right corner of your desktop.   

2.


In the displayed dialog box, click 

Properties

3.


Double-click 

Internet Protocol (TCP/IP)

4.


Select 

Obtain an IP address automatically

 and 

Obtain DNS server address 

automatically

. Click 

OK

Logging In to the Web Management Page 

The HG253s V2 provides an intuitive web management page where you can view or set the 
HG253s V2 parameters.   

1.


Open a browser. In the address box, enter 192.168.1.1. Press 

Enter

.   

2.


Enter the login user name (user by default) and password (user by default). Click 

Login

Setting Network Access Parameters 

Configuring a Dial-Up Connection to Access the Internet 

The HG253s V2 works in PPPoE mode by default. Your network service provider will assign an 
account for you automatically. You do not need to configure any dial-up parameter on the 
HG253s V2. 

Configuring a Wireless Account 

If you need to configure the wireless account, you can quickly configure through the web 
management page. 

For security reasons or to make the password easy to remember, you can change the wireless 
network name and password as follows: 

1.


Log in to the web management page. 

2.


In the navigation tree, choose 

Device

 > 

Wireless Settings

.   

3.


In 

SSID

, enter your desired WLAN name. 

4.


In 

Wireless password

, enter your desired key. 

5.


Click 

Apply


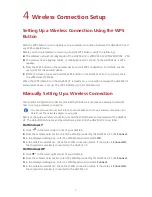
Before you log in to the HG253s V2 web management page, ensure that the computer used for 
the login is connected to the HG253s V2 and has been configured to automatically obtain an IP 
address or assigned with a static IP address. 


To protect against unauthorized access, change the user name and password after the first 
login.   


The default SSID and Wireless password printed on the HG253s V2's rear panel are unique and 
secure. If you do not want to change them, skip this section. 

Summary of Contents for HG253s

Page 1: ...HG253s V2 Home Gateway User Guide ...

Page 2: ...ng the WPS Button 7 Manually Setting Up a Wireless Connection 7 5 USB Device 8 USB Storage Device 8 Connecting a USB Device 8 Connecting to the Internet When Using 3G Service 8 Configuring the DLNA 9 Sharing a USB Printer 9 6 Maintenance Guide 11 Enabling and Disabling the WLAN on the HG253s V2 11 Changing Your WLAN Name and Password 11 Changing the Web Management Page Password 11 Restoring Defaul...

Page 3: ...I Often Need to Restart the HG253s V2 to Display Web Pages What Can I Do 13 8 Appendix 14 Technical Specifications 14 Default Settings 14 9 For More Help 15 10 Legal Notice 15 ...

Page 4: ...more while the HG253s V2 is powered on A reset will result in all custom data and settings being lost Use with caution 6 Phone2 Phone1 Connects to a telephone 7 LAN4 LAN1 Connects to Ethernet devices such as computers set top boxes STBs and switches 8 WAN Connects to an Ethernet device that provides Internet access such as a modem or switch 9 USB Connects to a USB device If you connect a USB devic...

Page 5: ...53s V2 is in router mode but not connected to the Internet The HG253s V2 is in bridge mode WLAN Steady green The HG253s V2 has WLAN enabled but is not transmitting data Blinking green 2Hz The HG253s V2 has WLAN enabled and data is being transmitted Blinking green 1Hz The HG253s V2 is attempting to connect to a wireless client over the WLAN using the WPS function This process lasts for no longer th...

Page 6: ... The LAN port is connected to an Ethernet device with a network cable and data is being transmitted Off The LAN port is not connected to any Ethernet device USB Steady green The HG253s V2 is connected to a USB device but no data is being transmitted Blinking green The HG253s V2 is connected to a USB device and data is being transmitted Off The HG253s V2 is not connected to any USB device ...

Page 7: ... microwave ovens Installing the HG253s V2 on an Ethernet Broadband Network In some communities network service providers use Ethernet interfaces as Internet interfaces On this network your PC is directly connected to the Internet through the Ethernet interface provided by the network service provider If you have subscribed to digital Ethernet broadband you can connect the HG253s V2 to an Ethernet ...

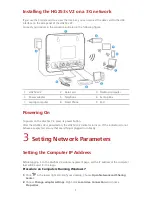
Page 8: ...n the HG253s V2 press its power button After the HG253s V2 is powered on the HG253s V2 indicator turns on If the indicators do not behave as expected ensure that everything is plugged in correctly 3 Setting Network Parameters Setting the Computer IP Address Before logging in to the HG253s V2 web management page set the IP address of the computer that will be used for the login Procedure on Compute...

Page 9: ...e provider will assign an account for you automatically You do not need to configure any dial up parameter on the HG253s V2 Configuring a Wireless Account If you need to configure the wireless account you can quickly configure through the web management page For security reasons or to make the password easy to remember you can change the wireless network name and password as follows 1 Log in to th...

Page 10: ...e provided by Windows is used as an example to describe how to set up a wireless connection Before setting up a wireless connection record the WLAN name and password of the HG253s V2 The default WLAN name and password are printed on the HG253s V2 cover label On Windows 7 1 Click in the lower right corner of your desktop 2 From the wireless network list select the WLAN provided by the HG253s V2 Cli...

Page 11: ...B devices to your HG253s V2 HSPA USB modem USB storage device USB printer Connecting to the Internet When Using 3G Service The HG253s V2 is not set to automatically connect through a supported 3G USB modem when it is inserted A 3G connection must be manually started by the user To connect do as follows 1 Log in to the web management page 2 Verify the PIN code of your USB modem a In the navigation ...

Page 12: ... video photo and enjoy them Sharing a USB Printer HG253s V2 supports USB printers After you connect a USB printer to your HG253s V2 through the USB port you can access the printer from the Internet or internal network 1 Connect the USB cable of the printer to the USB port on the HG253s V2 2 Add a Network Printer On Windows 7 1 Choose Start Devices and Printers 2 Choose Add a printer 3 Choose Add a...

Page 13: ...ed name of the printer to add Click Next 6 Select the model of the printer you want or click Have Disk to manually install the printer drive Click Next 7 Determine whether to set the printer as the default printer Click Next 8 Click Finish After you complete the preceding settings open the files you want to print on your computer Then you can choose the printer just installed to print your files ...

Page 14: ...ed to log in to the web management page Regular changes to the web management page password can effectively prevent unauthorized users from logging in and modifying important parameters 1 Log in to the web management page 2 In the navigation tree choose Maintenance Account 3 In New user name enter your desired user name 4 In Current password enter the currently used password 5 In New password ente...

Page 15: ... the HG253s V2 and that the LAN port s indicator is on 4 Ensure that the user name and password are correct If the problem persists restore the HG253s V2 to its default settings What Can I Do If the HG253s V2 Cannot Access the Internet through a Wireless Network Adapter Sometimes or If the WLAN Connection Is Unsteady This is probably because the HG253s V2 has its cables connected loosely is placed...

Page 16: ...urely connected to HG253s V2 ports Otherwise network stability may suffer 2 Your computer and the HG253s V2 are far from electric appliances that generate strong magnetic or electric fields such as microwave ovens refrigerators and cordless telephones If the problem persists contact your Internet Service Provider ...

Page 17: ...g and 802 11n 2 4 GHz Wireless transmission rate 802 11b Up to 11 Mbit s 802 11g Up to 54 Mbit s 802 11n 2T2R antenna technology Up to 300 Mbit s Default Settings Parameter Default Value LAN port IP address 192 168 1 1 LAN port subnet mask 255 255 255 0 User name to log in to the web configuration page user Password to log in to the web configuration page user WLAN name Labeled on the product cove...

Page 18: ...s and settings of local network and therefore may not be activated or may be limited by local network operators or network service providers Thus the descriptions herein may not exactly match the product or its accessories which you purchase Huawei reserves the right to change or modify any information or specifications contained in this manual without prior notice and without any liability DISCLA...

Page 19: ... http consumer huawei com privacy policy ErP Product Information Hereby Huawei Technologies Co Ltd declares that the product meets the directive 2009 125 EC and its implementation regulation EC NO 1275 2008 amended by EC 278 2009 EC 642 2009 EU 617 2013 EU 801 2013 and its implementation regulation EC NO 278 2009 The power consumption of product in networked standby if all wired network ports are ...

Page 20: ...202664_02 ...
Reviews: