background image

5.

Click 

, and then select 

Settings


Camera

6.

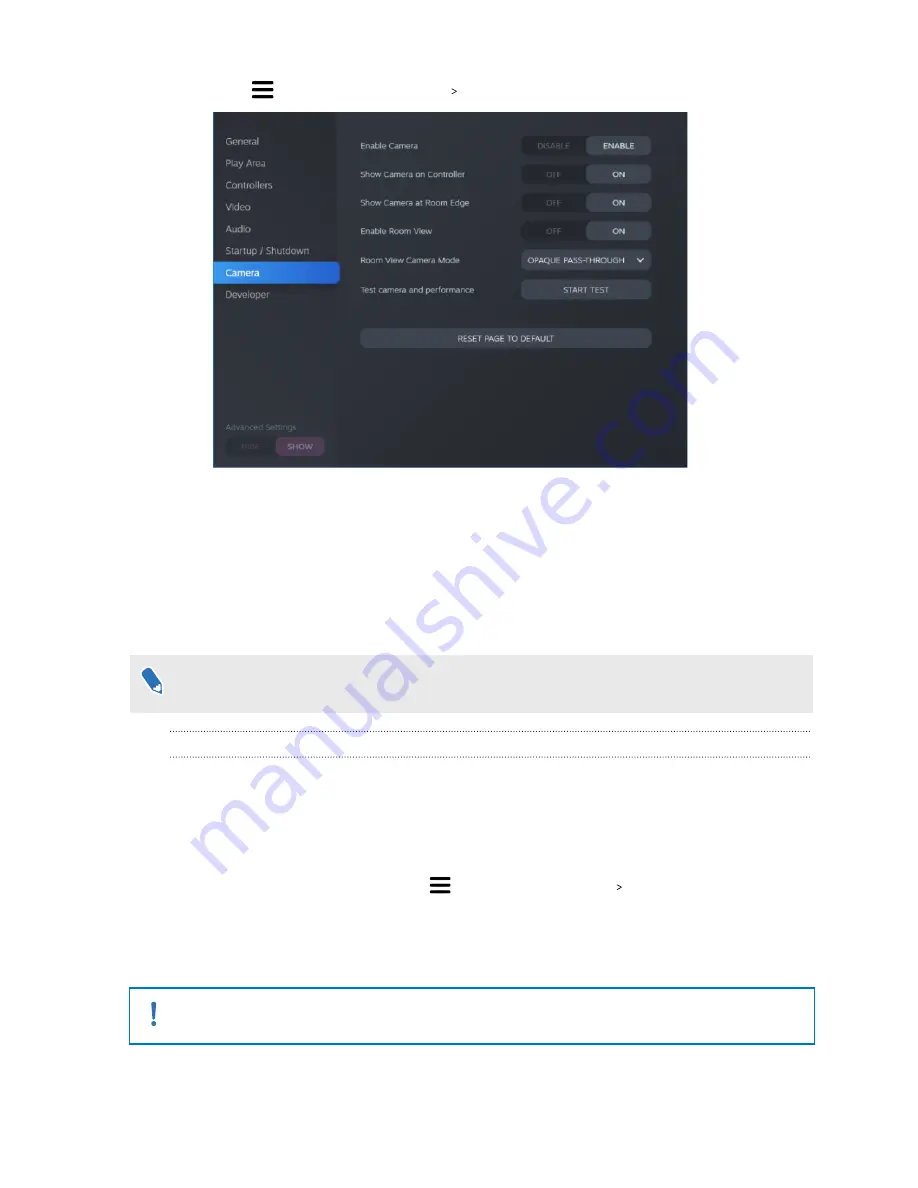
Turn on the options you want.

§

Show Camera on Controller

 A screen appears beside the controller to show your

actual surroundings.

§

Show Camera at Room Edge

 Shows your actual surroundings when you get close

to your play area boundaries.

§

Enable Room View

 Press the System button twice anytime to show your actual

surroundings. Press the System button twice again to go back into VR.

When you turn on 

Show Camera at Room Edge

 or 

Enable Room View

, you can choose

how your actual surroundings will look like in 

Room View Camera Mode

.

Checking for firmware updates

Firmware updates include improved features and bug fixes.

1.

From your computer, do one of the following:

§

On the SteamVR status window, mouse over on any of the hardware icons to check if
the firmware is out of date, and then select to update the firmware.

§

On the SteamVR app, click 

, and then click 

Devices


Update Device

.

2.

Follow the prompts on the screen. 

If the update is for the controllers or base stations, you'll be asked to connect them to your
computer using a micro-USB cable.

While firmware updates are in progress, do not unplug the micro-USB or power cables that
connect your hardware to your computer. Doing so could result in a firmware error.

72

Settings

Summary of Contents for VIVE Pro Eye

Page 1: ...VIVE Pro Eye User guide...

Page 2: ...ing the base station channels 45 How can I check which base stations are currently in use 47 Using the mounting kit 47 Cleaning the base stations 48 Updating base station firmware via Bluetooth 48 Wha...

Page 3: ...y area 62 Verifying your setup 63 After setting up how do I turn the VIVE system on 63 What is the recommended space for the play area 64 Can I include space occupied by furniture for the play area 64...

Page 4: ...do a particular step or procedure that you may find helpful This indicates important information that you need in order to accomplish a certain task or to get a feature to work properly This is a war...

Page 5: ...X 1070 Quadro P5000 equivalent or better AMD Radeon Vega 56 equivalent or better NVIDIA GeForce GTX 970 AMD Radeon R9 290 equivalent or better Memory 4 GB RAM or more 4 GB RAM or more Video output Dis...

Page 6: ...ge 5 What s inside the box Your VIVE Pro Eye comes with the following items which you ll use to experience immersive VR environments Main component Accessories VIVE Pro Eye HMD Headset cable attached...

Page 7: ...has sensors that are tracked by the base stations The sensors on the headset are sensitive Do not cover or scratch the sensor lenses including the proximity sensor Front and side 1 Headset strap 2 Tr...

Page 8: ...le 3 Volume button 4 Adjustment dial 5 Head pad 6 Mic mute button Bottom and inner 1 Nose rest 2 Lens distance button 3 Mic 4 Interpupillary distance IPD knob 5 Face cushion 6 Proximity sensor 7 Eye t...

Page 9: ...lenses Keep it in a safe place so you can protect your headset during storage or shipping 1 Loosen the strap by rotating the adjustment dial counter clockwise and then detach the velcro fastener on th...

Page 10: ...3 Rotate the adjustment dial clockwise until the headset fits snugly and then reattach the velcro fastener on the top band 10 Headset and link box...

Page 11: ...ars until they re properly in place 5 Make sure that the headset cable passes through the cable clip at the back of the headset and is positioned straight down your back When taking the headset off re...

Page 12: ...your brow Use this measurement as a guide to adjust the distance between the lenses of the headset so that you ll have a better viewing experience To increase the distance between the lenses rotate th...

Page 13: ...s or have long eyelashes you may need to increase the lens distance further from your face Only increase this distance as necessary as the closer the lenses are to your eyes the better your field of v...

Page 14: ...the face cushion on page 29 1 To remove the face cushion peel off starting from both ends of the face cushion until it detaches from the headset 2 To replace the face cushion insert the tab on the fa...

Page 15: ...ible third party device to VIVE Pro Eye HMD using a USB cable 1 Peel off the face cushion starting from both ends until it detaches from the headset 2 Carefully pry open the compartment cover from its...

Page 16: ...n and push the tabs of the compartment cover onto their corresponding holes 5 Replace the face cushion by inserting its tab into the slot on the headset and then aligning the hook and loop strips 6 Co...

Page 17: ...arphones If you need to you can remove the headset earphones 1 Peel off the side cushions on the strap near the earphones 2 Use a cross shaped screwdriver PH00 to detach the earphone from the strap 17...

Page 18: ...4 Replace the cap with the screw you removed earlier After detaching the earphones make sure to put it in a safe place Do not squeeze or press down the earphones When storing do not put the earphones...

Page 19: ...use compatible 3 5mm audio earphones you ll need a type C to 3 5mm audio adapter 1 Remove the headset earphones first otherwise audio will still come out from it For details see Removing the headset...

Page 20: ...Carefully pry open the compartment cover from its flap Pull the cover out to access the ports on the headset 4 Insert the cable connector of your earphones on the USB Type C port 20 Headset and link b...

Page 21: ...tab into the slot on the headset and then aligning the hook and loop strips Reattaching the head pad on the headset strap Always make sure that the head pad is attached to the headset 1 Hold the head...

Page 22: ...s left side to align its tabs with the slots on the headset strap 5 Press the tabs on the head pad s left side into the slots on the headset strap to fully attach the head pad Updating the headset fir...

Page 23: ...n when the headset is on standby Red when an error is encountered with cables display or the like What is the dual camera used for The dual camera brings real world into VR Some VR content use the dua...

Page 24: ...n your computer s graphics card where the monitor is also connected Do not connect the DisplayPort cable to ports on the motherboard 5 Insert the headset cable connector side with triangle mark up to...

Page 25: ...turn it back on On your computer you might see a notification that drivers are being installed Wait for the installation to finish 3 To verify that VIVE hardware is detected restart SteamVR on your co...

Page 26: ...e to be able to use eye tracking From now on the eye tracking software will launch automatically What can I do if eye tracking calibration fails Here are some troubleshooting tips for eye tracking cal...

Page 27: ...on on the link box again to your headset back on 4 On your computer restart SR_Runtime If you can t find the eye tracking software make sure it s been installed correctly See Installing the eye tracki...

Page 28: ...g cable tips This will prevent the headset lenses from being scratched When not in use store the headset with the lenses pointed away from direct sunlight Failure to do so may damage the headset displ...

Page 29: ...to clean Air dry at room temperature Don t tumble dry iron or expose it to direct sunlight Don t scrub wring or bleach Don t dip or soak in water Cleaning the headset lenses and eye trackers 1 Use the...

Page 30: ...safekeeping 1 Face cushion 2 Compartment cover 3 Headset cable Follow these steps to properly detach the accessories from the headset Peel off the face cushion starting from both ends until it detach...

Page 31: ...Unplug the headset cable After removing the accessories the headset you ll send for return should look like the following 31 Headset and link box...

Page 32: ...asier access to the connector slots pull up the headset strap L L 2 Align and reinsert the headset cable connector side with round mark up to the port with the corresponding round mark You ll hear a c...

Page 33: ...sses through the ridge and the cable clip at the back of the headset L Replace the compartment cover Align the tabs on the cover with the holes on the compartment and then push the cover until it snap...

Page 34: ...om your computer open the SteamVR app 2 Right click and then click Restart headset 3 Wait for the headset to finish restarting Check the cable connections Make sure that your cable connections are sec...

Page 35: ...puter s graphic card Restart the SteamVR app If you still get an error reboot your computer and reopen the SteamVR app For more information you may refer to the SteamVR Troubleshooting page My headset...

Page 36: ...pp and then click Create System Report 3 Make sure that VIVE Pro Eye devices connect via a USB xHCI port rather than to a port from a specific manufacturer which might have a compatibility issue with...

Page 37: ...re having CPU performance issues On the SteamVR app click Display Performance Graph If you see spikes in the graph it means that the issue is with the CPU Can I use the USB Type C earphones that came...

Page 38: ...specific function such as for USB BIOS Flashback by its manufacturer When the issue happens try connecting to another USB 3 0 port on your computer The headset display suddenly turns blank What can I...

Page 39: ...d controllers Do not cover the front panel with any material When the base stations are turned on they may affect some nearby infrared sensors such as those used by an IR TV remote control 1 Status li...

Page 40: ...fter you ve mounted the base stations 1 Mount the base stations diagonally at opposite corners of your space and near power outlets For details on how to use the mounting kit see Using the mounting ki...

Page 41: ...Once turned on do not move or adjust the angles of the base stations as it could disrupt the tracking process Otherwise you will need to set up the play area again 41 Base stations...

Page 42: ...2 m or 6 5 ft from the floor with the angle of each base station adjusted between 25 and 35 degrees If your space doesn t allow for this kind of setup you can also mount the base stations on tripods a...

Page 43: ...o a different channel This will be handled by the SteamVR software automatically Each base station has a 150 degree horizontal field of view Rotate the angle of the base stations left or right to fine...

Page 44: ...VR Base Stations 2 0 to the standard setup Follow these procedures in the order below to complete the process Installing SteamVR Base Station 2 0 on page 40 Configuring the base station channels on pa...

Page 45: ...p multiple base stations to cover most asymmetric and irregular spaces within the range of SteamVR Base Station 2 0 Here are some examples Can I use an odd number of SteamVR Base Stations 2 0 Yes Each...

Page 46: ...tions that have not been detected click Scan For More 4 To change its channel click on a base station link Select an unused channel and then click Apply You can also click Automatic Configuration to l...

Page 47: ...ing a mounting kit which is provided as an in box item in VIVE Pro Eye full kit If you bought more SteamVR Base Station 2 0 units you can separately purchase a similar mounting kit from a third party...

Page 48: ...quids to avoid shock hazard 1 Unplug and unmount the base stations 2 Use a lightly moistened non abrasive cloth to clean the base stations Do not use cleaning chemicals 3 While cleaning the base stati...

Page 49: ...s If you see the icon mouse over it to check if the firmware is out of date If so click Update Device 4 Follow the onscreen instructions to complete the process Do not unplug the power cable before th...

Page 50: ...ase contact customer care for concerns Try the following methods to troubleshoot the issue Turn the base station off and on again Make sure that you ve installed your base stations correctly For detai...

Page 51: ...VE Pro headset VIVE Pro Eye headset VIVE controllers 2018 VIVE Tracker 2018 Are the base stations covered by warranty if accidentally damaged To purchase additional or replacement hardware click the A...

Page 52: ...ary please contact customer care for concerns Use the controllers to interact with objects in the VR world The controllers have sensors that are tracked by the base stations The sensors on the control...

Page 53: ...ch controller using the provided power adapters and USB cables When the controller is plugged in and fully charged its status light shows green if the controller is on or white if the controller is of...

Page 54: ...vive com product Product availability may vary please contact customer care for concerns Using the lanyards may help prevent the controllers from accidentally being dropped however please do not fling...

Page 55: ...con mouse over it to check if the firmware is out of date If so click Update Device 3 Using a micro USB cable connect the controllers to one of your computer s USB ports one at time Once the controlle...

Page 56: ...eshoot the issue Make sure that the controller is placed inside the play area Turn the controller off and on again to reactivate the tracking Restart the SteamVR app If you still get an error reboot y...

Page 57: ...troubleshooting suggestions Press and hold the System button for at least 5 seconds and see if the controller turns on Charge the controller using the other cable and adapter and plug the adapter to a...

Page 58: ...ware update What should I do To purchase additional or replacement hardware click the Accessories tab on www vive com product Product availability may vary please contact customer care for concerns Do...

Page 59: ...setup but you can also use it for standing and seated experiences Planning your play area Before choosing your setup make sure that you have enough space Room scale setup needs a minimum play area of...

Page 60: ...as it may damage your headset display Setting up VIVE Pro Eye for the first time Before you can use VIVE Pro Eye you ll need to complete the setup process which includes installing VIVE and SteamVR so...

Page 61: ...if you only want to experience VR in a seated or standing position 1 From your computer open the SteamVR app 2 Click and then select Room Setup Standing only 3 Review the prompts and follow the on sc...

Page 62: ...screen instructions to complete the process When tracing the boundaries of the play area make sure that the floor is cleared Do not trace across space occupied by things such as a table or a chair sin...

Page 63: ...dically updated for accuracy and completeness For the latest version check www vive com After setting up how do I turn the VIVE system on 1 From your computer open the SteamVR app 2 Make sure your bas...

Page 64: ...n the play area To set or reset the seated position while in VR do the following 1 Press the System button to bring up the System Dashboard 2 Select General 3 Select Reset seated position and then fol...

Page 65: ...rn on Sound Boost to enhance the sound quality if you re going to use your own headphones with the headset Changing the audio mode Choose a predefined audio mode to change how you hear sounds from the...

Page 66: ...elect VIVE to go to the VIVE Dashboard 3 On the right most panel select 4 Select Headphone output Sound Boost 5 To preview the changes select the speaker icon Listening at a high volume for an extende...

Page 67: ...lect Play Area 3 In Chaperone style choose the collision bound style you want 4 Click colored box to the right of Chaperone Color to set the color and transparency of the bounds 5 To show a constant v...

Page 68: ...Dashboard select 2 Select Play Area 3 Click the image to the right of Background 4 Select the image you want to use as the background For some images you have the option to turn on Use Dome Projectio...

Page 69: ...st time that you open the VIVE app review the prompts and tap Allow 3 On both your computer and phone click Get started Make sure that Bluetooth is turned on and that your phone is discoverable 4 From...

Page 70: ...fications on page 70 Checking your notifications Conveniently review notifications from your phone without leaving VR To receive notifications while in VR you need to pair your phone with VIVE Pro Eye...

Page 71: ...h the VIVE Pro Eye system You can choose which notifications you want to get on your phone s VIVE app settings Can I receive notifications from more than one phone on VIVE Pro Eye Currently only one p...

Page 72: ...ill look like in Room View Camera Mode Checking for firmware updates Firmware updates include improved features and bug fixes 1 From your computer do one of the following On the SteamVR status window...

Page 73: ...amVR app Make sure that your installation is intact 1 From your computer close the SteamVR app 2 Open the Steam app and then click Library Tools 3 Right click SteamVR and then and select Properties 4...

Page 74: ...Steam app 2 On the left panel click the drop down menu and select Tools 3 Right click SteamVR and then and select Properties 4 Go to the Betas tab 5 In the Select the beta you would like to opt into...

Page 75: ...n with association with or endorsement of or by HTC Corporation Not all marks listed necessarily appear in this User Guide Screen images contained herein are simulated HTC shall not be liable for tech...

Page 76: ...ance 13 connecting a USB device 15 product care 28 putting on 9 replacing the face cushion 14 L Link box about 23 connecting the headset 24 P Phone notifications checking 70 choosing 69 editing replie...

Page 77: ...Vive system turning on 63 77 Index...

Reviews: