background image


English

57

3   How to Install Accessories Inside Your PC

Installing Accessory Boards

Installing the Board

1

Before installing the board, turn to page 54 for important Plug and 
Play configuration information.

NOTE

PCI boards are configured automatically when installed in the PC.

2

Disconnect the computer’s power cord and any telecommunications 
cable.

3

Remove the computer’s cover and power supply (see pages 44 and 
49).

4

Find a free slot. ISA boards should be installed in the lowest available 
slot and PCI boards in the highest available slot to ease cable routing.

Some boards may have preferred locations and special installation 
instructions detailed in their manuals.

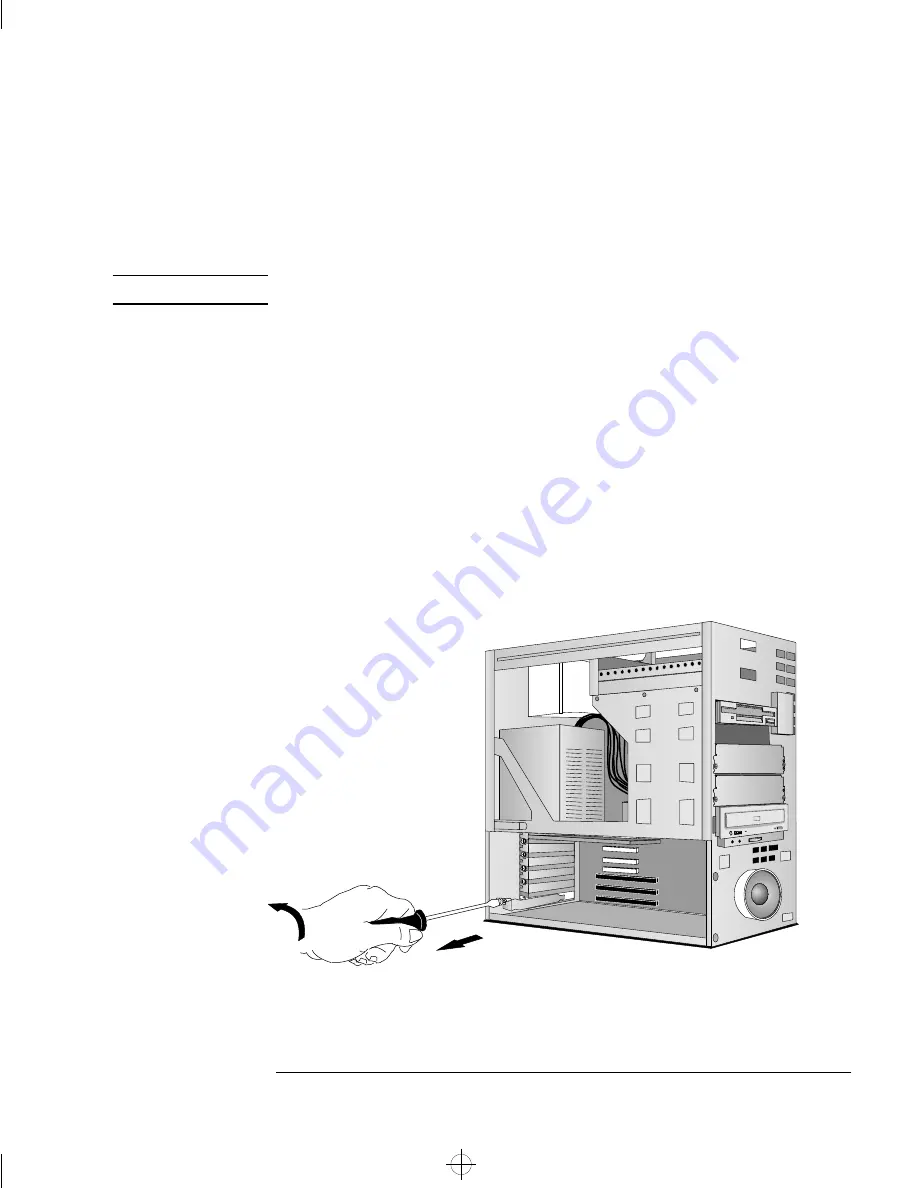
5

Unscrew and remove the slot cover. Store it in a safe place. 
If the slot cover is tight, loosen the screws on the adjacent slots.

Unscrew and remove 
the slot cover

margeaux.bk : marg-ue3.fb4  Page 57  Monday, July 21, 1997  4:28 PM

Summary of Contents for Vectra VT 6/xxx

Page 1: ...User s Guide HP Vectra VT 6 xxx margeaux bk 1bookf fb4 Page 1 Monday July 21 1997 4 28 PM ...

Page 2: ...ved No part of this document may be photocopied reproduced or translated to another language without the prior written consent of Hewlett Packard Company Centronics is a registered trademark of Centronics Data Computer Corporation CompuServe is a registered trademark of CompuServe Incorporated LogitechTM is a trademark of Logitech Inc Microsoft MS and MS DOS are U S registered trademarks of Micros...

Page 3: ...User s Guide margeaux bk title fb4 Page iii Monday July 21 1997 4 28 PM ...

Page 4: ...Ultra VGA PCI Peripheral Component Interconnect video controller with 2 MB of video memory upgradeable to 4 MB an integrated Enhanced IDE Integrated Drive Electronics controller on the PCI bus supporting Fast IDE and Standard IDE seven mass storage shelves five front access shelves two internal shelves six slots for accessory boards three 32 bit PCI Peripheral Component Interconnect slots two 16 b...

Page 5: ...onnector on the system board one parallel port and two serial ports on the rear panel System BIOS and Video BIOS stored in Flash ROM for easy upgradeability BIOS support for ISA Plug and Play accessory board configuration Optimized for 32 bit operating systems NOTE The advanced processor installed in your HP Vectra PC provides the best performance when used with 32 bit operating systems and applic...

Page 6: ...vi Francais margeaux bk title fb4 Page vi Monday July 21 1997 4 28 PM ...

Page 7: ...2 Installing the Windows NT Workstation Operating System 12 Installing the OS 2 Operating System 16 Installing Windows 95 18 2 Using Your PC Working in Comfort 22 Repetitive Strain Injury 22 Installing Your Display 24 What is Displayed on the Screen 25 Using a Document Holder 25 Your HP Keyboard 26 Your Desk 27 Your Chair 27 Your Posture 29 Your Workspace and Work Environment 29 Lighting 30 margea...

Page 8: ... Install Accessories Inside Your PC Supported HP Accessories 42 Removing and Replacing the Cover 44 Replacing the Cover after Installing Accessories 46 Moving the Power Supply 48 Replacing the Power Supply after Installing Accessories 49 Installing Memory 50 Main Memory Modules 50 Installing More Memory on the MGA Video Adapter 52 Installing Accessory Boards 54 Configuring Accessory Boards with Pl...

Page 9: ...t 82 If Your Display is Blank and There Are No Error Messages 82 If an Error Message Appears 83 If Your PC Has a Hardware Problem 88 If Your Display Does Not Work 88 If Your Keyboard or Mouse Does Not Work 90 If Your Printer Does Not Work 91 If the Flexible Disk Drive Does Not Work 92 If the Hard Disk Does Not Work 92 If an Accessory Board Does Not Work 93 If Your PC Has a Software Problem 94 If Y...

Page 10: ...s 110 Audio Features 112 Power Consumption Information 114 Available Video Resolutions 115 IRQs DMAs and I O Addresses Used by Your PC 116 The PC s Memory Map 118 The PC s Rear Connectors 119 System Connectors and Switches 120 System Board Connectors 120 Video Adapter Switches 121 System Board Switches 122 Recycling Your PC 124 6 Hewlett Packard Support and Information Services Introduction 126 ma...

Page 11: ...1 Access HP World Wide Web Site 131 HP FAXback on Demand HP FIRST 132 HP Audio Tips USA only HP Automated Support Directory 132 Ordering Drivers and BIOS on Diskette 133 HP Support Services 134 Hewlett Packard Telephone Support 135 Lifeline Telephone Support 136 HP Network Phone in Support Service NPS 137 Summary 138 Hewlett Packard Marketing Headquarters 139 Glossary 141 Index 145 margeaux bk mar...

Page 12: ...xii English margeaux bk margeaux toc Page xii Monday July 21 1997 4 28 PM ...

Page 13: ...1 Setting Up Your PC This chapter leads you through the first time installation of your HP Vectra PC margeaux bk marg ue1 fb4 Page 1 Monday July 21 1997 4 28 PM ...

Page 14: ...ponents the computer and power cords the display and its video cable the keyboard and mouse the manuals and disk kit NOTE Device drivers and HP utilities are provided in a disk kit Power Cords Computer Display Keyboard Video Cable This Manual Disk Kit Mouse margeaux bk marg ue1 fb4 Page 2 Monday July 21 1997 4 28 PM ...

Page 15: ... next to the computer Installation Tools No tools are required to install your PC However if you plan to install a disk drive or an accessory board inside your PC you will need a flat blade screwdriver See chapter 3 How to Install Accessories Inside Your PC for more information on installing accessories WARNING If you are in any doubt that you can lift the PC and the display safely do not try to m...

Page 16: ...y Mouse and Keyboard 1 Connect the display mouse and keyboard to the back of the computer The connectors are shaped to go in one way only 2 Tighten the display cable attachment screws Display Connector Mouse Connector Keyboard Connector margeaux bk marg ue1 fb4 Page 4 Monday July 21 1997 4 28 PM ...

Page 17: ... of the computer and tighten the attachment screws Use these connectors Parallel 25 pin parallel connector for a parallel device Serial A 9 pin serial connector for a serial device Serial B 9 pin serial connector for a second serial device Serial A Parallel Serial B margeaux bk marg ue1 fb4 Page 5 Monday July 21 1997 4 28 PM ...

Page 18: ...tage selection switch has been correctly configured for your country NOTE You should not have to change the voltage selection switch setting if the computer was ordered from HP with the correct localisation option for your country Voltage Selection Switch If the voltage selection is incorrect for your country select the correct voltage 110 V or 230 V margeaux bk marg ue1 fb4 Page 6 Monday July 21 ...

Page 19: ... the equipment to a grounded wall outlet Always use a power cord with a properly grounded plug such as the one provided with this equipment or one in compliance with your national regulations This PC is disconnected from the power by removing the power cord from the power outlet This means the PC must be located close to a power outlet that is easily accessible Display Power Connector Computer Pow...

Page 20: ...ng on headphones place them around your neck and turn the volume down When you put on the headphones slowly increase the volume until you find a comfortable listening level and leave the volume control in that position MIDI connector Stereo In jack Stereo Out jack NOTE The internal speaker and the Stereo Out jack on the rear of your PC are deactivated when you use the Headphones jack The internal ...

Page 21: ...s displayed Follow the instructions provided to correct the error NOTE If the space bar on your keyboard has a power on icon you can start the PC by pressing the space bar This feature can be enabled or disabled with the Setup program see chapter 4 for more information about the Setup program Note that you cannot stop your PC by pressing the space bar Switch on the Display Then switch on the PC ma...

Page 22: ...When your PC has started Adjust the display screen s brightness and contrast to your needs If the picture does not fill the screen or is not centered refer to the display s manual for instructions Set the keyboard to a comfortable position Correct password Restart the PC then enter your password again Wrong password Adjust brightness your display may be different from the display shown here margea...

Page 23: ...s the power button to stop your PC NOTE If Windows 95 is installed select Shutdown from the Start menu and the PC will power off It is not necessary to press the power button Resetting Your PC The Reset button lets you restart the PC without switching the PC off and then on again Make sure that you have exited all programs then shutdown your operating system before you press the reset button You m...

Page 24: ...rt your PC and press to enter the Setup program 2 Highlight Operating System and select Windows NT Press the key to save the setting and exit the Setup program Installation Procedure Before installing Windows NT make sure you have these disks Windows NT Setup disks Setup Boot disk Setup disk 2 and Setup disk 3 Windows NT CD ROM XU VT Drivers and Documentation CD ROM 1 Insert the Windows NT Setup B...

Page 25: ...g box proposes the type of display connected to your computer 12 Click OK to select the VGA Compatible Display then click OK to save the configuration 13 When the installation of Windows NT is complete click Restart Computer to restart your computer Installing the HP IDE Driver To ensure a stable system you should now install the HP IDE driver 1 Click the Windows NT Setup icon 2 In the Options men...

Page 26: ...Drivers and Documentation CD ROM and specify the location of the drivers with D VIDEO DISK4 c Choose your desired resolution from the list of Matrox MGA Millenium drivers and click Install d When asked to confirm the location of the drivers verify that D VIDEO DISK4 is displayed then click Continue e When the files have been copied from the XU VT Drivers and Documentation CD ROM follow the display...

Page 27: ...he proposed settings will correspond by default with the Audio Interface settings in the HP Setup program If an error message appears check that the proposed settings are the same as those configured in the Setup program Refer to chapter 4 for more information about the Setup program margeaux bk marg ue1 fb4 Page 15 Monday July 21 1997 4 28 PM ...

Page 28: ...g and exit the Setup program Installation Procedure Consult the manual that came with your OS 2 Warp Connect installation disks for a detailed explanation of the installation procedure Installing the HP IDE Driver After installing OS 2 Warp Connect you should install the HP IDE driver 1 Insert the XU VT Drivers and Documentation CD ROM in the CD ROM drive 2 In the OS 2 System folder open the Comma...

Page 29: ...4 When the installation of the drivers has completed exit from the command prompt shutdown the operating system then restart the system Selecting a Display 1 In the OS 2 System folder open the Command Prompts folder and click on the OS 2 Full Screen icon 2 At the command prompt type the following CD MGA OS2 MGAMON This will start the MGA Display selection program Choose your display monitor from t...

Page 30: ...the instructions in the manual supplied with the Windows 95 diskettes Installing the MGA Video Driver 1 Insert the XU VT Drivers and Documentation CD ROM in the CD ROM drive 2 Double click on the My Computer icon on the Windows 95 desktop 3 Double click on the CD ROM drive icon then on the Video folder then on the folder named Disk 6 4 Execute the file named Setup to start the MGA Millennium Power...

Page 31: ... Click Finish on the MGA Change Display Wizard 19 Click Yes to restart in the MGA Exit Wizard dialog box Windows 95 will restart with the new video drivers Configuring the Display 1 Click on the Start button then point to Programs click on MGA Millenium Power Desk and double click on MGA Monitor Program 2 Click on the Selection button select your display then confirm your selection with OK 3 Click...

Page 32: ...1 Setting Up Your PC Installing an Operating System 20 English margeaux bk marg ue1 fb4 Page 20 Monday July 21 1997 4 28 PM ...

Page 33: ...2 Using Your PC This chapter gives important ergonomic advice explains how to set a password and shows how to use your CD ROM drive margeaux bk marg ue2 fb4 Page 21 Monday July 21 1997 4 28 PM ...

Page 34: ...ange listed Prior to using any Hewlett Packard equipment study these instructions and suggestions and consult the bibliography at the end of this section If during use of this or any other equipment you experience pain or discomfort stop work and review this section of the User s Guide Should the discomfort return discontinue use of the equipment and consult a doctor as soon as possible Repetitive...

Page 35: ...minimize this discomfort Use your equipment in an appropriate way Well designed and adjusted equipment may not be sufficient to eliminate all potential problems How you perform your VDT activities is also important What causes RSI RSI is caused by any demanding activity that exceeds the ability of the body to do work Common factors that are associated with RSI include too many uninterrupted repeti...

Page 36: ...display screen should be at or slightly below eye level This will keep you from looking down more than 15 to 20 degrees to see the center of the screen You should not have to look down more than 60 degrees for normal work tasks such as typing or reading Ideally the screen should be positioned perpendicular to your line of sight In case of undesirable reflections tilting the screen forward slightly...

Page 37: ...r interface Also screen information should be displayed in a structured and well organized way Using a Document Holder A document holder may make it easier to transfer information from a document to the screen or if you need to read while using your system If using a document holder it should be at the same distance from your eyes as the screen next to the screen and at the same height as the scre...

Page 38: ...d to raise or lower the keyboard angle If your elbows are at about the same level as the work surface then you may choose not to use the kickstand If your elbows are below the work surface you may wish to raise the back of the keyboard by using the kickstand The point is to make sure that your hands are in a neutral or flat position when you use the keyboard This means that your forearms wrists an...

Page 39: ... work you may need a smaller or larger work surface To minimize reflections and glare and thus eye discomfort the surface of the desk should be non reflective matt Ideally the work top height should be adjustable Recommended range is 66 to 77 cm 26 to 30 inches If the desk top height is fixed it should be between 72 and 75 cm 28 5 to 29 5 inches There should be at least 6 cm 2 inches of space betw...

Page 40: ... adjusting the chair or moving it close to the desk Adjust the chair so that the work surface is at elbow height If the chair has an adjustable seat pan inclining the seat slightly forward will transfer some of the pressure from the spine to the thighs and feet This will relieve spine fatigue Use a chair with an adjustable lumbar back support which can be moved up and down Adjust the back of the c...

Page 41: ...a footrest to get into a comfortable position Your head should be upright or tilted slightly forward but not more than 15 degrees Avoid working with your head or trunk twisted in an unnatural position Change your position frequently to avoid fatigue Your Workspace and Work Environment To prevent muscle stiffness you must have enough space to move around and vary your position Do not remain in one ...

Page 42: ...k on the screen 300 lux 30 foot candles is enough for most work When documents are to be read 500 lux 50 foot candles is recommended If more light is needed for a particular task use an individual lamp task lighting rather than increasing the general lighting Incoming light should be shielded or diffused to prevent glare and distracting reflection In cases where strong sunlight is a problem curtai...

Page 43: ...cial than longer less frequent breaks Data shows that people who work for long lengths of time without a break are more prone to injury Occasionally stretch the muscles in your hands arms shoulders neck and back You should stretch at least as often as you take your breaks that is at least once per hour Discomfort if any may be alleviated by use of alternative ergonomic designs and accessories such...

Page 44: ...trest preferably adjustable in height and angle Adjust your seat height work surface or both to position the surface at approximately elbow height Make sure frequently used equipment is within easy reaching distance from your body For example if you are primarily using the keyboard place it directly in front of you not to the side If you are primarily using the mouse place it in front of your hand...

Page 45: ...ows bent between 70 and 115 degrees Make sure your arms and elbows are relaxed and loose with your upper arm perpendicular to the floor or slightly forward no more than 30 degrees Keep your elbows close to your sides less than 20 degrees away from your body margeaux bk marg ue2 fb4 Page 33 Monday July 21 1997 4 28 PM ...

Page 46: ...Ergonomic requirements for office work with visual display terminals VDTs Geneva 1992 5 Eric Granjean Ergonomics in Computerized Offices Taylor Francis London 1987 6 European Community Council directive of 29 May 1990 on the minimum safety and health requirements for the work with display screen equipment Directive 90 270 EEC Brussels 1990 7 U S Department of Labor Occupational Safety and Health A...

Page 47: ... your absence a keyboard lock timer which you can use to lock your PC after a specified number of minutes of keyboard inactivity screen blanking to conceal confidential data when the PC is locked System Administrator Password Set the System Administrator Password to protect the PC s configuration in Setup The PC can be started but the System Administrator Password must be entered before any Setup ...

Page 48: ...When Setup F2 appears on the screen press 3 The PC s Setup program will appear 4 Use the or key to move the highlight to the User Password line Delete Setup F2 Date Year Month Day 1995 01 01 Time Hour Minute Second 09 35 53 Windows 95 Not Installed User Preferences User Password Not Set Keyboard Lock Timer Disabled Screen Blanking Disabled margeaux bk marg ue2 fb4 Page 36 Monday July 21 1997 4 28 ...

Page 49: ...k Timer and Screen Blanking options may not be available if Windows 95 is installed on your computer Setting the Keyboard Lock Timer 7 Press the key until the Keyboard Lock Timer line is highlighted 8 Press or to select a value between 1 and 75 minutes If you wish to save this setting and leave SETUP press the key now Setting Screen Blanking 9 Press the key until the Screen Blanking line is highli...

Page 50: ...dy and when the drive is busy 5 Volume Control Adjusts the volume of music played through headphones connected to the CD ROM drive 6 Headphones Socket Lets you listen to music CDs by connecting headphones directly to the CD ROM drive using a stereo mini jack This does not cut out the speakers Adjust the volume using the Volume Control and not using the audio software WARNING To avoid electrical sh...

Page 51: ...move the CD Press the Open Close button to close the drawer Ejecting a CD When the Open Close Button is Disabled If the Open Close button is disabled by software or a power failure use this procedure to remove a CD 1 Turn off the PC 2 Insert a straight rod for example a straightened paper clip into the emergency eject hole next to the Open Close button The drawer should eject by about 15mm 3 Pull ...

Page 52: ...ation Read the manuals supplied with the application software 4 Make more disk space available Delete unnecessary files and increase disk space by using a disk compression program Install a larger disk drive 5 Make more memory available Install more main memory Refer to chapter 3 6 Display more colors Install more video memory Refer to chapter 3 7 Stop anyone from starting the PC in your absence R...

Page 53: ...ll Accessories Inside Your PC This chapter explains how to install accessories such as extra memory accessory boards and additional disk drives in your PC margeaux bk marg ue3 fb4 Page 41 Monday July 21 1997 4 28 PM ...

Page 54: ...e disk drive one third height order D2035B 5 25 inch 1 2 MB flexible disk drive half height order D2881B Internal Mass Storage Devices Main Memory Upgrades 16 MB 2 8 MB order D3553A 32 MB 2 16 MB order D3555A 64 MB 2 32 MB order D3554A Mounting Trays 3 5 inch disk drive trays 5 pack order D2037A Rails for Front Access Devices 5 25 inch disk drive rails order D2880A 3 5 inch disk drive rails order ...

Page 55: ...ety never remove the computer s cover without first removing the power cord and any connection to a telecommunications network Always replace the cover before switching on the computer Up to six accessory boards can be installed three 32 bit PCI slots two 16 bit ISA slots one combination ISA or PCI slot margeaux bk marg ue3 fb4 Page 43 Monday July 21 1997 4 28 PM ...

Page 56: ... and computer 2 Disconnect the power cords from the power outlets computer and display Disconnect any telecommunication cables from the computer 3 If necessary unlock the cover using the key provided with the computer the lock is on the back of the computer Disconnect the power cables margeaux bk marg ue3 fb4 Page 44 Monday July 21 1997 4 28 PM ...

Page 57: ...f the computer 5 Slide the cover forward until it is clear of the computer Lift the securing latches Slide the cover clear of the computer If you have difficulty removing the cover try pushing gently against the CD ROM drive with your thumbs as you pull the cover towards you margeaux bk marg ue3 fb4 Page 45 Monday July 21 1997 4 28 PM ...

Page 58: ...shelf 2 Check that all internal cables are safely routed 3 Check that the cover is unlocked and the latches are outwards 4 Place the cover in front of the computer and ensure that the two lips at the bottom of the case slide onto the two rails at the base of the computer 5 Slide the cover into position Slide the cover into position Check that the lips at the bottom of the case slide onto the rails...

Page 59: ... latches at the front of the cover downwards until they click into position 7 If required lock the cover using the key 8 Reconnect all cables and power cables Pushthe latches down to secure the cover Lock the cover at the back of the computer margeaux bk marg ue3 fb4 Page 47 Monday July 21 1997 4 28 PM ...

Page 60: ... to improve access to the system board and the cables at the rear of the disk drives 1 Disconnect the computer s power cord and any telecommunications cable 2 Remove the computer s cover see 44 3 Unscrew the two self retaining screws at the back of the power supply Unscrew the self retaining screws margeaux bk marg ue3 fb4 Page 48 Monday July 21 1997 4 28 PM ...

Page 61: ...til it stops the power supply unit remains connected to the computer Replacing the Power Supply after Installing Accessories 1 Check that all internal cables are safely routed 2 Slide the power supply back into the computer 3 Tighten the two self retaining screws Power Supply Slide the power supply unit clear of the computer margeaux bk marg ue3 fb4 Page 49 Monday July 21 1997 4 28 PM ...

Page 62: ...memory modules refer to the beginning of this chapter WARNING Static electricity can damage electronic components Turn all equipment OFF Don t let your clothes touch the accessory To equalize the static electricity rest the accessory bag on top of the power supply while you are removing the accessory from the bag Handle the accessory as little as possible and with care To install a pair of main me...

Page 63: ...h on the PC When Error 0250 appears indicating that the Power On Self Test has detected a change in your memory configuration follow the displayed instructions to run the Setup program 2 Check that Setup has automatically detected and configured the Memory Size fields Ensure the TOTAL memory is correct If it is incorrect check that you have correctly installed the memory modules 3 Set the extended...

Page 64: ...ctronic components Turn all equipment OFF Don t let your clothes touch the accessory Handle the accessory as little as possible and with care To install a video memory module 1 Disconnect the computer s power cord and any telecommunications cable 2 Remove the computer s cover see page 44 3 Remove the MGA video adapter from the accessory slot and place it on a static free flat surface Resolution Vi...

Page 65: ...2 Check that the Setup program has detected and configured the Video memory NOTE If you need to use a special video driver for your application you may be asked to insert the CD ROM or diskette containing the driver Video Adapter accessories available from other sources Additional accessories including memory upgrades and a video MPEG module are available for your video adapter However these acces...

Page 66: ... Accessory boards which support the Plug and Play standard can be detected and configured automatically by your PC Your PC has configurable support for Plug and Play in the system BIOS When you start your PC the Plug and Play system BIOS can detect automatically which hardware resources IRQs DMAs memory ranges and I O addresses are used by the system based components Operating System Support for P...

Page 67: ...ll be configured automatically However if you install a non Plug and Play accessory board you must use the Add New Hardware wizard to determine a conflict free setting for the board 3 Press to save your selection and exit from the Setup program Configuring Setup for Other OS 1 Turn on the PC and press when Setup F2 appears 2 Highlight the Plug and Play Device Management line and use or to select F...

Page 68: ... accessory board you can manually select the accessory board from a list of supported products Windows 95 is preloaded with configuration details for many non Plug and Play accessory boards Windows 95 will determine the recommended settings for each ISA non Plug and Play board you want to install These settings may be different from those recommended by the accessory board s manufacturer In this c...

Page 69: ...ble 3 Remove the computer s cover and power supply see pages 44 and 49 4 Find a free slot ISA boards should be installed in the lowest available slot and PCI boards in the highest available slot to ease cable routing Some boards may have preferred locations and special installation instructions detailed in their manuals 5 Unscrew and remove the slot cover Store it in a safe place If the slot cover...

Page 70: ...connector with the slot s socket Firmly press the board into the socket Ensure the board s connector engages completely with the socket and does not touch components on other boards 8 Secure the board by replacing the slot cover screw If you loosened the screws on adjacent slots tighten them Slide the accessory board into position Secure the board in position margeaux bk marg ue3 fb4 Page 58 Monda...

Page 71: ... the VESA pass through connector on the MGA adapter board 10 If you install a Creative Labs wavetable accessory board that operates with the integrated SoundBlasterTM audio interface connect the board s interface cable to the wavetable interface connector on the system board VESA Pass Through Connector 1 2 3 4 5 6 7 8 Wavetable interface connector margeaux bk marg ue3 fb4 Page 59 Monday July 21 19...

Page 72: ...am and reserve the IRQ for the accessory board This allows PCI devices to be automatically configured 1 Turn on the PC and press when Setup F2 appears 2 Highlight the IRQ field you want to change for example IRQ 11 3 Press or to make the IRQ available for PCI Available for PCI or make it unavailable for PCI Used by an ISA Board 4 Press to save any changes you made and exit the SETUP program NOTE Y...

Page 73: ...sk drives and five front access drive shelves for front access disk drives and hard disk drives Your computer is supplied with one 3 5 inch flexible disk drive and a CD ROM drive If your computer is supplied with a hard disk the hard disk will be installed in the first internal shelf two internal shelves for 3 5 inch hard disks two shelves for 3 5 inch disk drives three shelves for 5 25 inch disk ...

Page 74: ... can be connected to the Primary Channel cable connected to the grey connector on the system board two IDE devices can be connected to the Secondary Channel cable connected to the red connector on the system board Before Installing an IDE Hard Disk Refer to the drive s installation guide to see if you must set jumpers or if there is a special installation procedure to follow margeaux bk marg ue3 f...

Page 75: ...sconnect the computer s power cord and any telecommunications cable 2 Remove the computer s cover see page 44 3 Slide the power supply out to improve access to the drive see page 48 4 Install the drive in the first or second internal shelf If you install the drive in the first uppermost shelf Align the drive upside down with the hinges on the shelf then insert it into the hinges If you install the...

Page 76: ...isk Drives 64 English 5 If the drive is being installed in the first shelf rotate the drive into position 6 Secure the drive using the screw provided Rotate the drive into position Secure the drive margeaux bk marg ue3 fb4 Page 64 Monday July 21 1997 4 28 PM ...

Page 77: ...ear of the drive The connectors are shaped to go in one way only 9 Install any other accessories before completing the installation 10 Turn to page 69 to complete the installation IDE drives should be connected to the Primary IDE Channel cable this cable is connected to the grey connector on the system board Power Cable Data Cable margeaux bk marg ue3 fb4 Page 65 Monday July 21 1997 4 28 PM ...

Page 78: ...telecommunications cable 2 Remove the computer s cover see page 44 3 Slide out the power supply to provide better access to the disk drive cables see page 48 4 Unscrew and remove an unused drive tray 5 Mount the drive on the tray as shown below Remove the drive tray Set the drive on the tray Fix the drive to the tray margeaux bk marg ue3 fb4 Page 66 Monday July 21 1997 4 28 PM ...

Page 79: ...rive shelf and secure it 7 Locate the appropriate data cable for the disk drive Slide the drive tray into the drive shelf IDE drives should be connected to the Primary IDE Channel cable this cable is connected to the grey connector on the system board margeaux bk marg ue3 fb4 Page 67 Monday July 21 1997 4 28 PM ...

Page 80: ...rs are shaped to go in one way only 9 Slide the power supply back into position and tighten its self retaining screws see page 49 10 Install any other accessories before replacing the cover and completing the installation 11 Turn to page 69 to complete the installation Power Cable Data Cable margeaux bk marg ue3 fb4 Page 68 Monday July 21 1997 4 28 PM ...

Page 81: ...E Primary Channel or IDE Secondary Channel section check that the details for Device 1 or Device 2 have been correctly detected by the Setup program 4 Press to save and exit Setup Refer to the operating system documentation for information on formatting a drive NOTE If an IDE drive is removed switch on the computer and follow the instructions displayed by the Error Message Utility When prompted pr...

Page 82: ...tional installation instructions Before Installing an IDE Device Refer to the drive s installation guide to see if you must set jumpers or if there is a special installation procedure to follow NOTE Drives ordered from HP are supplied with mounting rails If you order your drive from another supplier you may need to order drive mounting rails from HP You should order product number D2880A for 5 25 ...

Page 83: ...r access to the disk drive cables see page 48 4 If installing a drive in a 5 25 inch wide shelf remove the drive tray and put it in a safe place 5 Slide the drive into the shelf 6 Secure the drive in position using the screws provided with the drive Slide the drive into position Secure the drive in position Mounting Rails Remove the drive tray if installing a 5 25 inch drive margeaux bk marg ue3 f...

Page 84: ...ice The connectors are shaped to go in one way only 9 Slide the power supply back into position and tighten its self retaining screws see page 49 Flexible Disk Drive Cable IDE CD ROM drives should be connected to the Secondary IDE Channel cable this cable is connected to the red connector on the system board Power Cable Data Cable margeaux bk marg ue3 fb4 Page 72 Monday July 21 1997 4 28 PM ...

Page 85: ...DE CD ROM drive 1 Turn on the computer and press when Setup F2 appears 2 In the IDE Secondary Channel section of the Setup program make sure that the CD ROM drive has been detected 3 Press to save and exit the program Completing the Installation of a Flexible disk drive 1 Turn on the computer and press when Setup F2 appears 2 Check that the Setup program has detected the drive in the Flexible Disk...

Page 86: ...ed reseller for up to date information on upgrade processors 1 Disconnect the computer s power cord and any telecommunications cable 2 Remove the computer s cover see page 44 3 Remove the airflow guide from above the processor socket 4 Move the power supply to improve access to the processor socket see page 48 then carefully set the PC on its side Remove the Airflow Guide margeaux bk marg ue3 fb4 ...

Page 87: ...e heatsink from the processor socket 6 Unlock the processor socket and remove the existing processor 7 Remove the VRM module beside the processor Unclip the heatsink Remove the old processor Remove the VRM Voltage Regulator Module margeaux bk marg ue3 fb4 Page 75 Monday July 21 1997 4 28 PM ...

Page 88: ...rocessor 76 English 8 Install the VRM module supplied with the processor 9 Insert the new processor into the socket and lock the processor into place Install the VRM module Install the new processor margeaux bk marg ue3 fb4 Page 76 Monday July 21 1997 4 28 PM ...

Page 89: ...tach the retaining clips to the processor socket 11 Carefully set the PC in the upright position 12 Slide the power supply back into the computer and tighten the two self retaining screws 13 Replace the airflow guide above the processor socket Replace the heatsink margeaux bk marg ue3 fb4 Page 77 Monday July 21 1997 4 28 PM ...

Page 90: ...orted 2 Install any other accessories before completing the installation of the processor 3 Replace the cover see page 46 4 Turn on the computer and check that the new processor is recognized by the power on system test Switch 4 Switch 5 Switch 6 Switch 7 Switch 8 Bus Speed Processor Speed ON OFF ON OFF OFF 60 MHz 150 MHz OFF OFF ON OFF OFF 66 MHz 166 MHz ON OFF OFF ON OFF 60 MHz 180 MHz OFF OFF O...

Page 91: ...r PC and Using the Setup Program This chapter can help you solve problems that you may encounter when using your PC and describes how to use the HP Setup program margeaux bk marg ue4 fb4 Page 79 Monday July 21 1997 4 28 PM ...

Page 92: ...e 84 If a BIOS message prevents your PC from starting turn to page 86 If an Operating System message prevents your PC from starting turn to page 87 If Your PC Has a Hardware Problem If your display does not work turn to page 88 If your display is blurred or unreadable turn to page 88 If you cannot set any video resolution higher than 640 480 turn to page 89 If your keyboard or mouse does not work ...

Page 93: ... to page 95 If the date and time are incorrect turn to page 95 If You Cannot Solve the Problem If you are unable to solve your problem after following the troubleshooting advice in this chapter refer to chapter 6 HP Support and Information Services for information on getting help from your HP Reseller or from your nearest HP Customer Support Center margeaux bk marg ue4 fb4 Page 81 Monday July 21 1...

Page 94: ...hat the processor is correctly installed refer to page 74 e Check that the memory modules are correctly installed refer to page 50 f Check that accessory boards are firmly seated in their slots refer to page 54 g Verify that any switches and jumpers on the accessory boards are properly set refer to the manuals that came with each board h Check that the switches on the system board are properly set...

Page 95: ...BIOS If you have access to a PC with a modem or network connection which functions correctly you can retrieve the latest system BIOS from one of the HP Information Services described in chapter 6 HP Support and Information Services To update the system BIOS 1 Insert the HPInit utility diskette in drive A 2 Switch the computer OFF and then ON and follow the instructions until the procedure finishes...

Page 96: ... From Starting 0130 0241 0280 What you should do 1 Ensure the configuration stored in CMOS memory has not been cleared by the system board switch refer to chapter 5 2 Run Setup to correct the configuration information 3 If all the above fail to correct the problem the system board may need to be replaced Contact your service representative 0250 What you should do 1 Run Setup and correct the errors...

Page 97: ...tive 65xx 66xx What you should do 1 Disable all shadowing with the Setup program 2 If this fails to correct the problem the system board may need to be replaced Contact your service representative 8060 What you should do 1 Check that the hard disk drive has not been disabled with the Setup program 2 Check that the disk power and data cables are correctly connected refer to chapter 3 910B Explanati...

Page 98: ...stem diskette in drive Press any key to continue Explanation there is no operating system installed on your hard disk there is no operating system on the diskette in drive A the hard disk drive is disabled or not present What you should do Install an operating system on the hard disk or insert a diskette with an operating system and press any alphanumeric key to continue Refer to chapter 1 of this...

Page 99: ...d disk contains the operating system ensure start from the flexible disk or start from the hard disk is enabled in Setup for a network ensure remote start is enabled in Setup Non system disk or disk error What you should do Remove the diskette or replace it with the proper operating system diskette and press any alphanumeric key to continue Not ready error reading or writing drive x Explanation Th...

Page 100: ... is not aligned with the screen usually when you change resolutions use the display s controls to center the image Refer to the display manual for instructions If the screens generated by your software applications do not appear correct check the application s manual to find out which video standard is required Also check your display manual to find out which refresh rate is required Use the HP Us...

Page 101: ...N to clear the configuration from the CMOS memory refer to page 120 for the switch location 3 Switch on the PC to erase the CMOS memory 4 Check that error codes 0240 and 0130 are displayed by the Error Message Utility and wait until the PC has started 5 Switch off the PC 6 Set the system board switch 1 CONFG on the switch block to OFF to re enable the configuration 7 Replace the cover refer to cha...

Page 102: ...ly connected 2 Ensure that the mouse driver supplied with the preloaded software is installed correctly Choose a Logitech mouse driver for your operating system 3 Clean the mouse ball and rollers as shown in the figure below use a non residual contact cleaner Clean the mouse ball Clean the mouse rollers Remove the mouse ball margeaux bk marg ue4 fb4 Page 90 Monday July 21 1997 4 28 PM ...

Page 103: ...to the correct connector port on the PC and printer 6 Make sure that the printer is configured correctly for the PC and for the application a Ensure that the PC s port has been correctly configured with the Setup program b Make sure the printer is correctly set up for your operating system c Ensure the software application s print menu has been correctly set up Refer to the manual supplied with th...

Page 104: ...isks b There is one option in the Start Up Center which may be used to disable or enable start boot from flexible disks 4 Check that the disk power and data cables are correctly connected refer to chapter 3 5 Clean the flexible disk drive using a wet cleaning diskette kit this kit may be purchased from most resellers If the Hard Disk Does Not Work 1 Check that the hard disk drive has not been disa...

Page 105: ...e disk power and data cables are correctly connected refer to chapter 3 If an Accessory Board Does Not Work Perform the following checks 1 Ensure the board has been firmly installed in the accessory board slot refer to chapter 3 2 Ensure the board is not using memory I O addresses an IRQ or DMA also used by the PC Refer to the board s manual for details 3 Check that the PC has been configured corr...

Page 106: ...s to save the new User Password and exit Setup If you forget both the User Password and the System Administrator Password 1 Switch off the PC 2 Remove the computer s cover refer to chapter 3 3 Set switch 2 PSWRD on the system board switch block to ON refer to chapter 5 for the switch location 4 Switch on the PC and allow it to complete its startup routine 5 Switch off the computer 6 Reset switch 2...

Page 107: ...40 and 0130 are displayed and wait until the PC has started 5 Switch off the PC 6 Set the system board switch 1 CONFG on the switch block to OFF to re enable the configuration 7 Replace the cover refer to chapter 3 8 Switch on the PC and run Setup by pressing when Setup F2 appears Error code 0130 will appear when the PC starts 9 Press to save the configuration and exit from Setup If the Date and T...

Page 108: ...e for the same signal lines or channels Conflicts between your audio interface and another peripheral device might be due to the settings of the I O addresses IRQ channel or DMA channel To resolve the conflict change the settings either of the audio interface or of any other ISA accessory in your system No Output from the 8 bit or 16 bit Digitized Sounds This might be due to the DMA channel select...

Page 109: ...ng and playing back at 22 kHz is less demanding upon system resources than recording audio at 44 kHz The PC Hangs While Recording Uncompressed digital audio can eventually fill your hard disk For example one minute of stereo sound recorded at a resolution of 44 kHz will occupy about 10 5 MB Before recording check that there is enough free space on your hard disk Data compression can reduce the spa...

Page 110: ...the minimum Ensure that the disk in the CD ROM drive is an audio disk and not a Photo CD or data CD If using headphones or external speakers check that they are properly connected see chapter 1 Check that the CD audio cable is correctly installed and is connected to the system board CD ROM Drive is Idle If the CD ROM drive does not appear to be working try accessing the disk by clicking on the CD ...

Page 111: ...me after you install remove or upgrade accessories NOTE If you are unable to change the PC s configuration check that you entered the correct password when you started Setup Starting the Setup Program 1 Turn on the PC and the display If the PC is already turned on save your data and exit all programs then press and to restart the PC 2 Press while Setup F2 is displayed on the screen Setup F2 appear...

Page 112: ...or control or numerics Use the key to display the first Setup screen Use the key to display help press it again to turn the help off Use the key to save your settings and exit Setup Use the key to print the Setup configuration Use the key to exit Setup without saving any changes Setup Version xx xx xx F1 Help On Off System BIOS Version x xx xx Video Adapter MGA Millenium 2 MB Video BIOS version xx...

Page 113: ...described here Viewing the Configuration Screen This screen provides information about your computer s configuration These items are for information only and cannot be changed Optimizing the System BIOS Highlight the Operating System option and select the name of the operating system installed on your computer The system BIOS will be optimized for your operating system Setup Version xx xx xx F1 He...

Page 114: ...f test highlight Memory Test and select Disabled Viewing Processor Information These lines provide information about the processor installed in your computer and cannot be changed User Preferences User Password Not Set Set Keyboard Lock Timer Disabled Enabled Screen Blanking Enabled Disabled Key Autorepeat Speed 2 to 30 per second Delay before Autorepeat 0 25 to 1 second Power on Numlock State Not...

Page 115: ...IX or Banyan Vines If no devices are installed on the second IDE channel you should highlight Secondary Integrated Channel and select Disabled This will make more system resources available for other system components Memory Size 1 MB 1024 KB Base on System Board 640 KB Base on Accessory Board 0 KB Base TOTAL 640 KB Reserved 384 KB Extended 13312 KB 13 0 MB TOTAL 14336 KB 14 0 MB Memory Hole Below...

Page 116: ... controller board highlight the Interface option and select Controller Board Configure the controller as described in its manual Security Features Some of the Security Features options will not be available if you have selected Operating System Windows 95 Flexible Disk Drives Drive 1 3 5 inch 1 44 MB Drive 2 None Bootable Drive Drive 1 Interface Integrated Controller Board Security Features System...

Page 117: ...the parallel port and for the serial ports To configure a parallel port mode highlight Parallel Port Mode and select Centronics EPP or ECP NOTE These options may not be available if Windows 95 is installed on your computer Start Up Center Control Start from Flexible Disk Enabled Disabled Start from Hard Disk Enabled Disabled Bootable HDD Interface IDE Start from Network Enabled Disabled Priority S...

Page 118: ...ideo performance If your display is Plug and Play supports Display Data Channel highlight Plug and Play Display and select Enabled If you install more video memory ensure that the Setup program detects it and configures the Video Memory size correctly If it is wrong check that the memory module is installed correctly Audio Audio Interface Enabled Disabled Base I O Address 220 240 260 280 IRQ Chann...

Page 119: ... should always leave at least one IRQ free for use by the installed PCI devices IRQ 12 is used by the mouse If you do not use a mouse IRQ 12 can be used by accessory boards Viewing the PC Serial Number If your computer supports a Serial Number it can viewed here IRQ Map for Accessory Boards IRQ 9 Used by an ISA Board IRQ 10 Available for PCI IRQ 11 Available for PCI IRQ 15 Available for PCI IRQ 12...

Page 120: ...4 Troubleshooting Your PC and Using the Setup Program Using the HP Setup Program 108 English margeaux bk marg ue4 fb4 Page 108 Monday July 21 1997 4 28 PM ...

Page 121: ...5 Technical Information This chapter provides technical information about your PC margeaux bk marg ue5 fb4 Page 109 Monday July 21 1997 4 28 PM ...

Page 122: ...s Master Rear connectors mini DIN mouse mini DIN keyboard 25 pin parallel 9 pin serial two buffered Joystick MIDI Stereo In jack 3 5 mm Stereo Out jack 3 5 mm 25 pin parallel connector Mode Centronics or bidirectional modes ECP EPP Parallel port 1 378h IRQ 7 2 278h IRQ 5 or Off 9 pin serial connectors Standard Two UART 16550 buffered serial ports both RS 232 C Serial port Serial Port A 3F8h IRQ 4 ...

Page 123: ...ion Weight excluding keyboard and display 15 kilograms 33 pounds Dimensions 40 5 cm D by 21 cm W by 41 5 cm H 15 95 inches by 8 27 inches by 16 34 inches Footprint 0 085 m2 0 91 sq ft Storage temperature 40 C to 70 C 40 F to 158 F Storage humidity 8 to 80 relative Operating temperature 5 C to 40 C 40 F to 104 F Operating humidity 15 to 80 relative Acoustic noise emission 40 db in the workplace und...

Page 124: ...l audio recording and playback Music Synthesizer 20 voice enhanced OPL3 FM music synthesis using four operators 4 operator mode with 6 melodies and 5 percussions or 2 operator mode with 15 melodies and 5 percussions Wavetable upgrade option for orchestral 32 voice polyphony 16 bit wave sample synthesis Mixer Output mixing of all audio sources digitized sounds FM music microphone line in CD audio a...

Page 125: ...tamp for multimedia extension Input buffer 64 byte FIFO Microphone Input Automatic Gain Control AGC amplifier or fixed gain amplifier Input impedance 600 ohms Sensitivity 30 mVpp to 200 mVpp Headphones Jack Stereo Out Jack Impedance 32 ohms Sound Codec High performance 16 bit stereo ADC DAC 64 times over sampling Delta Sigma technology 85 dB dynamic range On chip digital anti aliasing and interpol...

Page 126: ... a few days Typical Power Consumption Availability for ISA Accessory Slots Typical Power Consumption Availability for PCI Accessory Slots There is a maximum per slot limit of 15 W between all supply rails Full Power mode 280 W Off 3 W1 1 The power supply in your Vectra PC continues to supply power to the CMOS memory even when switched off 5 V 1 A limit per slot limited by system board 12 V 0 2 A l...

Page 127: ...port the maximum refresh rates shown here Refer to the User s Guide supplied with your display for details of the refresh rates supported by your display Resolution Minimum video memory required for these color scales Maximum refresh rates1 256 colors 8 bits per pixel 64 K colors hi color 16 bits per pixel 16 7 M colors true color 24 bits per pixel 16 7 M colors true color 32 bits per pixel 640 48...

Page 128: ...ive controller IRQ7 free if not used for parallel port or audio IRQ8 real time clock IRQ9 available for PCI if not used by ISA board IRQ10 available for PCI if not used by ISA board or audio IRQ11 available for PCI if not used by ISA board IRQ12 free if the mouse is disabled in SETUP IRQ13 processor IRQ14 integrated IDE controller IRQ15 available for PCI if not used by ISA board DMAs used by PC DM...

Page 129: ...h 2FFh serial port 2 300h 301h MPU 401 MIDI interface 330h 331h MPU 401 MIDI interface 376h integrated IDE controller secondary channel 377h integrated flexible disk controller 378h 37Fh parallel port 1 388h 38Bh music controller 3E8h 3EFh serial port 3 3F0h 3F5h integrated flexible disk controller 3F6h integrated IDE controller primary channel 3F7h integrated flexible disk controller 3F8h 3FFh se...

Page 130: ...00 64 KB BIOS area 896 KB to 960 KB 0E0000 to 0F0000 64 KB available 800 KB to 896 KB 0C8000 to 0E0000 96 KB available for accessory boards 768 KB to 800 KB 0C0000 to 0C8000 32 KB Video BIOS Area 640 KB to 768 KB 0A0000 to 0C0000 128 KB Video Memory Area 640 KB Base Memory Area 0 KB to 640 KB 09F000 to 0A0000 Extended BIOS Data Area User Application Area MS DOS Operating System 0500 to 0700 MS DOS...

Page 131: ...Red 1 5V MIDI IN 15 2 A 1 B 2 14 3 A X B Y 13 4 GND MIDI OUT 12 5 GND B X 11 6 A Y B 1 10 7 A 2 5V 9 8 5V 9 pin Serial Port Connector 25 pin Parallel Port Connector Keyboard Connector Mouse Connector MIDI Connector 3 5 mm Audio Jacks Keyboard Mouse connector Serial Port B Serial Port A margeaux bk marg ue5 fb4 Page 119 Monday July 21 1997 4 28 PM ...

Page 132: ...ctors Fan Connector Status Panel Connector Microphone CD ROM Audio Audio Control Panel Wavetable Connector Loudspeaker External Start Connector System Board Switches Primary IDE Connector Secondary IDE Connector Flexible Drive Connector PCI Slots ISA Slots margeaux bk marg ue5 fb4 Page 120 Monday July 21 1997 4 28 PM ...

Page 133: ...atrox Switch Use Switch Block to 1 Flash EEPROM Switch for VGA BIOS OFF to prevent Video BIOS upgrades DEFAULT ON to allow Video BIOS upgrades 2 Enable or disable VGA for single screen or dual screen operation with a second VGA controller OFF for single screen operation DEFAULT ON for dual screen operation with a second VGA controller 1 O N 2 Video Adapter Switches margeaux bk marg ue5 fb4 Page 12...

Page 134: ...WRD Enable or clear and disable User and System Administrator Passwords stored in EEPROM OFF to enable passwords DEFAULT ON to clear passwords 3 SECURE Disable or enable security mode security mode prevents changes to the PC s configuration with the Setup program OFF to disable security mode DEFAULT ON to enable security mode 1 2 3 4 5 6 7 8 1 2 3 4 5 6 7 8 System Board Switches margeaux bk marg u...

Page 135: ...r Refer to the manual supplied with the replacement processor to verify which bus and processor speeds are supported Switch 4 Switch 5 Switch 6 Switch 7 Switch 8 Bus Speed Processor Speed ON OFF ON OFF OFF 60 MHz 150 MHz OFF OFF ON OFF OFF 66 MHz 166 MHz ON OFF OFF ON OFF 60 MHz 180 MHz OFF OFF OFF ON OFF 66 MHz 200 MHz margeaux bk marg ue5 fb4 Page 123 Monday July 21 1997 4 28 PM ...

Page 136: ...ake back program in several countries The collected equipment is sent to one of HP s recycling facilities in Europe or the USA As many parts as possible are reused The remainder is recycled Special care is taken for batteries and other potentially toxic substances which are reduced into non harmful components through a special chemical process If you require more details about HP s product take ba...

Page 137: ...6 Hewlett Packard Support and Information Services margeaux bk marg ue6 fb4 Page 125 Monday July 21 1997 4 28 PM ...

Page 138: ...ler HP SupportPack HP Support Assistant CD ROM HP Information Services HP Support Services Technical phone support Lifeline phone support Network phone in support NOTE When calling any of the international telephone numbers listed in this chapter replace the with your international telephone access code Service Means of access HP Forum on Compuserve Modem HP Forum on America Online US Only Modem H...

Page 139: ...red to your specific needs regarding product development or custom installations as will third party support services or the HP Customer Support organization in your country HP SupportPack HP s three year SupportPack is available from your local reseller It must be purchased within 30 days of purchasing your HP Vectra The concept of SupportPack is simple It allows you to extend your one year on si...

Page 140: ...nfiguration information Troubleshooting information Drivers and utilities Technical reference manuals Subscriptions to HP Support Assistant can be obtained with an order form which is available from the HP FIRST Faxback system Request document number 9025 US and Asia Pacific or 19025 Europe Subscriptions can also be obtained by contacting the following numbers Region Phone Number Fax Number Asia P...

Page 141: ...a PC and HP products You can also download the latest versions of drivers BIOS and software utilities for HP Vectra PCs As a preferred Hewlett Packard customer you are invited to join CompuServe at no initial charge For the United States and the United Kingdom call the number shown below and ask for representative 51 For all other locations first call the worldwide number to obtain the number of y...

Page 142: ...s the HP Forum select Keyword Search from the menu type HP press Enter This will load the HP Home Page directly onto your screen In the HP Forum you can ask and answer questions about HP products and you can also download drivers software application notes or utilities for HP products Membership information can be obtained by calling 1 800 827 6364 giving the preferred customer number 1118 margeau...

Page 143: ...FTP access to the Internet whatever your location Access HP World Wide Web Site Access HP HP s World Wide Web site gives you access to information about HP its products including product data sheets service and support information electronic newsletters and technical tips You can also download the latest versions of drivers BIOS and software utilities The Access Guide Directory guides you through ...

Page 144: ...ard electronic services is provided in document 9020 HP Audio Tips USA only HP Automated Support Directory HP Audio Tips is an automated system containing recordings which can direct you to Hewlett Packard support services Live support is not available through this service Dial 1 800 333 1917 and press 3 to access HP Audio Tips Country Region Number Access Method United States 1 800 333 1917 Phone...

Page 145: ...p to date list of drivers North and Latin America Europe Phone 1 970 339 7009 Monday Saturday 24 hours per day Phone 44 1429 865511 Monday Friday 8 30 a m 6 00 p m Central European Time Fax 1 970 330 7655 Fax 44 1429 866000 Mail US Driver Fulfillment for Hewlett Packard PO Box 1754 Greeley Colorado 80632 USA Mail European Fulfillment for Hewlett Packard c o StarPak International Ltd Hartlepool Cle...

Page 146: ...ears of hardware warranty via the Lifeline program which is a fee based service The HP telephone support service does NOT provide free telephone support for PCs configured as network servers If you do configure your PC as a network server you are advised to contact your HP reseller to purchase a network phone in support contract which will provide you with a fee based telephone support service NOT...

Page 147: ...an Customer Support Center is available in English Monday to Friday 8 30 am to 6 00 pm Central European time except Wednesday when the hours are 8 30 am to 4 00 pm The number is 31 20 581 3330 Other Regions Contact your reseller who will be able to help you or direct you to the appropriate HP telephone support service Please have the following information ready when you call so that your enquiry c...

Page 148: ...lat fee The charge begins AFTER you have been put in contact with a support technician If your problem is found to be covered by the HP Hardware Warranty no charge will be applied In the US please call the appropriate number listed below Free access to HP information services is not affected by this service You are encouraged to access HP Information Services throughout the life of your PC whether...

Page 149: ...eading Network Operating Systems and Network manufacturers support your HP and non HP products with a single telephone call increase network uptime You can purchase the HP NPS service as an annual contract billable in advance annually bi annually or quarterly or at an hourly rate This contract service provides unlimited toll free access to HP Response Center engineers RCEs To obtain an HP NPS cont...

Page 150: ... A Annual subscription Anytime HP Electronic services Technicalinformation drivers utilities tools and diagnostics Anytime 24 hour access No charge Anytime HP BBS Internet FTP WWW CompuServe Technical Phone support Basic assistance for PC setup configuration start up and hardware diagnosis First year Business hours No charge At time of purchase HP Lifeline phone support Basic assistance for PC set...

Page 151: ...a Ltd 22 F Peregrine Tower Lipp Centre 89 Queensway Central Hong Kong LATIN AMERICA Hewlett Packard Latin Am Hdqtrs Monte Pelvoux 111 Lomas de Chapultepec 11000 Mexico D F EUROPE European Operations Hdqtrs Hewlett Packard S A 150 route du Nant d Avril P O Box 1217 Meyrin 2 Geneva Switzerland USA Intercon Operations Hdqtrs Hewlett Packard Company 3495 Deer Creek Road P O Box 10495 Palo Alto CA 9430...

Page 152: ...6 Hewlett Packard Support and Information Services Hewlett Packard Marketing Headquarters 140 English margeaux bk marg ue6 fb4 Page 140 Monday July 21 1997 4 28 PM ...

Page 153: ...y used for the temporary storage of data and processor instructions CD ROM Compact Disc Read Only Memory A mass storage device that uses compact disc technology CDs can store data but most cannot be written to CMF Filename extension for sound files saved in the Creative Labs Inc music data file format CMOS Complementary Metal Oxide Semiconductor memory requires very little power to operate The con...

Page 154: ... in the computer MID files Standard file format used to store MIDI sequence information MIDI Musical Instrument Digital Interface An international hardware software standard that specifies the cable and hardware interface that allows several devices instruments and computers to interchange music codes and events multimedia Combining static media such as text and pictures with dynamic data such as ...

Page 155: ...ystem and or video BIOS from slower ROM chips to faster RAM to improve system performance SIMM Single In line Memory Module These memory modules can provide a 32 bit data path Sound files Files containing sound data Sound files are usually stored in one of four formats with the extension WAV MID VOC or CMF video controller A chip or expansion card which converts signals in the computer into displa...

Page 156: ...144 English margeaux bk glossary fb4 Page 144 Monday July 21 1997 4 28 PM ...

Page 157: ... drive cables 72 installing 70 mounting rails 70 problems 92 G glossary 141 H hard disk drive cables 65 67 completing installation 69 installing 62 mounting tray 63 problems 92 headphones jack impedance 113 location of connector 8 Hewlett Packard information services 129 marketing headquarters 139 product take back program 124 HP Forum on America Online 130 HP Setup program starting 99 understandi...

Page 158: ...onnector 5 problems 91 problems starting the Setup program 95 with accessory board 93 with software 94 with the audio interface 96 with the CD ROM drive 98 with the display 88 with the flexible disk drive 92 with the hard disk drive 92 with the keyboard or mouse 90 with the printer 91 processor installing 74 product take back program 124 R recycling your PC 124 removing cover 44 replacing cover 46...

Page 159: ...of connector 59 video board flash BIOS 121 location of switches 121 video memory checking 53 installing 52 W wavetable accessory location of connector 59 weight of PC 111 World Wide Web 131 margeaux bk margeaux ix Page 147 Monday July 21 1997 4 28 PM ...

Page 160: ...148 Index margeaux bk margeaux ix Page 148 Monday July 21 1997 4 28 PM ...

Page 161: ...Regulatory Information and Warranty margeaux bk bckmttr fb4 Page 149 Monday July 21 1997 4 28 PM ...

Page 162: ...ernational IEC 950 1991 A1 A2 A3 Europe EN 60950 1992 A1 A2 EMC International CISPR 22 1985 Class B Europe EN 55022 1988 Class B EN 50082 1 1992 prEN 55024 2 1992 IEC 801 2 1992 3 kV CD 8 kV AD prEN 55024 3 1991 IEC 801 3 1984 3 V m prEN 55024 4 1992 IEC 801 4 1988 0 5 kV Signal Lines 1 kV Power Lines Supplementary information The product complies with the requirements of the Low Voltage Directive...

Page 163: ...ould void the user s authority to operate the equipment Notice for Canada This Class B digital apparatus meets all requirements of the Canadian Interference Causing Equipment Regulations Cet appareil numérique de la Class B respecte toutes les exigences du Règlement sur le matériel brouilleur du Canada Notice for Japan Notice for Korea Safety Warning for the USA and Canada If the power cord is not...

Page 164: ...e or province to province Limitation of Liability and Remedies The remedies provided above are the customer s sole and exclusive remedies In no event shall HP be liable for any direct indirect special incidental or consequential damages whether based on warranty contract tort or any other legal theory The foregoing limitation of liability shall not apply in the event that any HP product sold hereu...

Page 165: ...rage faster response time or service in an Excluded Travel Area are often available from HP an authorized dealer or authorized distributor at additional charge Customer Responsibilities The customer may be required to run HP supplied diagnostic programs before an on site visit or replacement part will be dispatched The customer is responsible for the security of its proprietary and confidential in...

Page 166: ...cted under the copyright laws Customer acknowledges and agrees that the software may have been developed by a third party software supplier named in the copyright notices included with the software who shall be authorized to hold the Customer responsible for any copyright infringement or violation of this Agreement 4 TRANSFER OF RIGHTS IN SOFTWARE Customer may transfer rights in the software to a ...

Page 167: ...uct Notice of Warranty Claims Customer must notify HP in writing of any warranty claim not later than thirty 30 days after the expiration of the warranty period Limitation of Warranty HP makes no other express warranty whether written or oral with respect to this product Any implied warranty of merchantability or fitness for a particular purpose is limited to the 90 day duration of this written wa...

Page 168: ...français 156 français margeaux bk bckmttr fb4 Page 156 Monday July 21 1997 4 28 PM ...

Reviews: