background image


EL-MF877-00                                                                                                Page  8 
Template Revision B  


PSG instructions for this template are available at 

EL-MF877-01


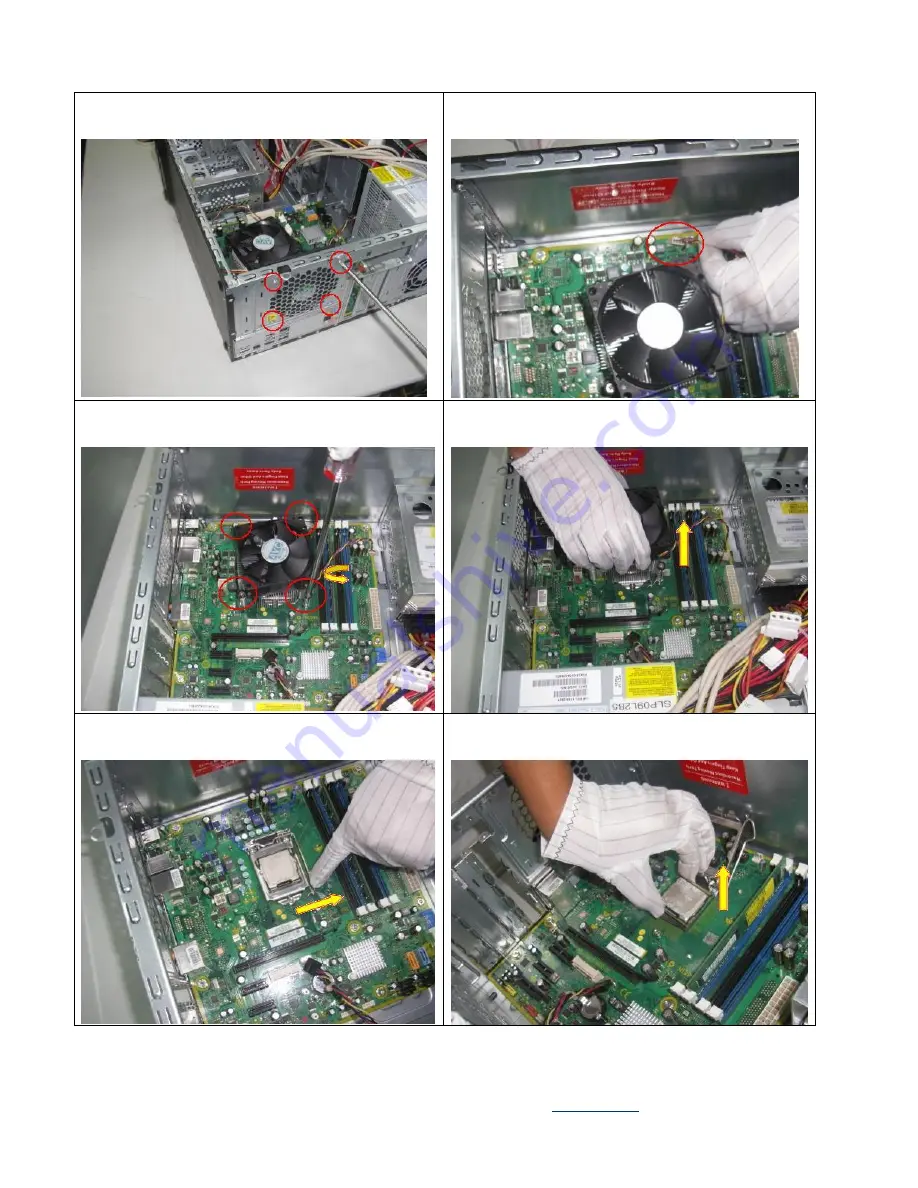
Figure 13 Loose the four screws and  remove the fan  


Figure 14 Remove the CPU fan cable from the board  


Figure 15 Loose the four screws of the fan    


Figure 16 Remove the CPU fan  


Figure 17 Rotate the handle and open it up 


Figure 18 Remove the processor from the socket. 


Summary of Contents for Elite 7000 Microtower

Page 1: ...right column as applicable Item Description Notes Quantity of items included in product Printed Circuit Boards PCB or Printed Circuit Assemblies PCA With a surface greater than 10 sq cm 3 Batteries All types including standard alkaline and lithium coin or button style batteries Inside mainboard 1 Mercury containing components For example mercury in lamps display backlights scanner lamps switches b...

Page 2: ...2 0 Tools Required List the type and size of the tools that would typically be used to disassemble the product to a point where components and materials requiring selective treatment can be removed Tool Description Tool Size if applicable Screwdriver T 15 Micro shear 170II Screwdriver PH1 Description 4 Description 5 3 0 Product Disassembly Process 3 1 List the basic steps that should typically be ...

Page 3: ...e board b Loosen the screws that secures the CPU fan to the system board c Lift the heat sink from atop the processor and set it on its side to keep from contaminating the work area with thermal grease d Rotate the handle and lift the processor from the socket 1 6 Remove the Memery see Figure 19 20 below a push the two handles of the DIMM slot b Lift the memery from the DIMM slot 1 7 Remove the sy...

Page 4: ...igure 35 37 below a Loose the screw that secure the front I O to chassis b Cut the plastic cable clamp that secures the cables to the cover c Lift the Front I O and pull it out of the chassis 3 4 Remove the power on off switch see Figure 38 39 below a Extrusion the bottom of the switch b Pull the switch out of the chassis 4 POWER SUPPLY 4 1 Take off the power supply see Figure 40 43 below a Remove...

Page 5: ...a Remove the screw that secure the ground to the cage b Remove the screw that secure the switch to the chassis c Push the switch and light out of the cage d Remove the four screws that secure the power supply PCA to the chassis e Remove the power supply PCA from the power supply chassis 4 4 Remove the Electrolytic Capacitors see Figure 56 57 below a Using Soldering Iron heat the solder of Electrol...

Page 6: ...available at EL MF877 01 Figure 1 Remove the screw on the cover Figure 2 pull out the blade card Figure 3 Disconnect the cables from the board Figure 4 Disconnect the cables from the board Figure 5 Disconnect the cables from the board Figure 6 Disconnect the cables from the board ...

Page 7: ...vailable at EL MF877 01 Figure 7 Disconnect the cables from the board Figure 8 Loose the screw of PCI shielding Figure 9 Remove the PCI shield Figure 10 Push the switch of PCI_E slot Figure 11 Remove the Graphic card from the board Figure12 Disconnect the system fan from the board ...

Page 8: ...lable at EL MF877 01 Figure 13 Loose the four screws and remove the fan Figure 14 Remove the CPU fan cable from the board Figure 15 Loose the four screws of the fan Figure 16 Remove the CPU fan Figure 17 Rotate the handle and open it up Figure 18 Remove the processor from the socket ...

Page 9: ...t EL MF877 01 Figure 19 Push the two handles of the DIMM slot Figure 20 Lift the memory from the DIMM slot Figure 21 Loose the four screws on the PCA Figure 22 Lift the mainboard from the chassis Figure Remove the battery from the system board Figure 24 Remove the cables connect to the HDD ...

Page 10: ... at EL MF877 01 Figure 25 Loose the screws on the HDD cage Figure 26 Push the handle of the HDD cage Figure 27 Pull the HDD cage off the chassis Figure 28 Loose the screws on the side of HDD cage Figure 29 Loose the screws on other side of HDD cage Figure 30 Pull the HDD from the HDD cage ...

Page 11: ... at EL MF877 01 Figure 31 Remove the cables connect to the ODD Figure 32 Pull the switch tabs on the front bezel Figure 33 Loose the screws on the ODD cage Figure 34 pull the ODD out of the ODD cage Figure 35 Loose the screw of the front I O to chassis Figure 36 Cut the plastic cable clamp ...

Page 12: ...ift the Front I O and pull it out Figure 38 Remove the switch cable out of the slot Figure 39 Extrusion the bottom of the power on off switch and Pull it out of the chassis Figure 40 Remove four screws on the power supply Figure 41 Press the baffle and slide the PSU Figure 42 Lift the power supply out of the chassis ...

Page 13: ...L MF877 01 Figure 43 Remove six screws on the power supply Figure 44 Cut the outside plastic cable clamp Figure 45 Lift the cover off the power supply Figure 46 Cut the inside plastic cable clamp Figure 47 Remove four screws of the PFC module Figure 48 Lift the PFC out of the power supply cage ...

Page 14: ... 01 Figure 49 Remove the four screws on the PSU Figure 50 Lift the power supply fan from the cage Figure 51 Remove the screw on the ground cable Figure 52 Remove the screw on the connecter and switch Figure 53 Push the switch and light out of the cage Figure 54 Remove the four screws on the PCA board ...

Page 15: ...Template Revision B PSG instructions for this template are available at EL MF877 01 Figure 55 Remove the PCA out of the cage Figure 56 Heat the solder of Electrolytic Capacitors Figure 57 Remove the Electrolytic Capacitors ...

Reviews: