background image

Adjusting y

our ne

w bik

e

9

HP

Velotechnik

Caution!

The minimum insertion depth of

the front boom into the main frame is 8 cm
(3 1/5"). In no case may the end of the front
boom be visible in the clamping slot when
you look at the main frame from below,
since it may result in a damage of the frame.

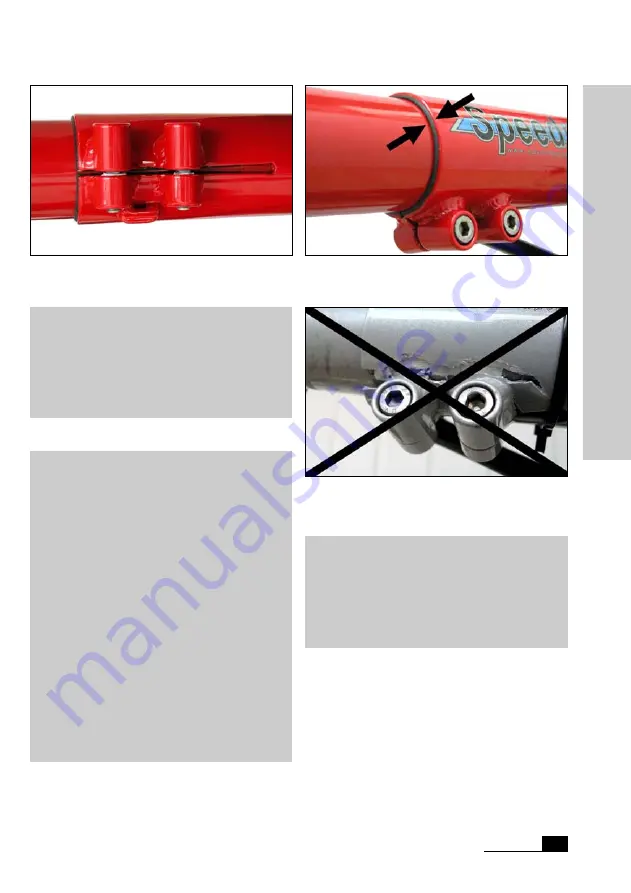
The rear end of the front boon must never be visible in the
clamping slot.

Danger! 

In the opening of the main frame

there must be a spacer (a slotted tube of
black plastic with edges to the front and the
clamping slot) that is glued into the frame.
This spacer ensures safe clamping of the
front boom and protects the paint. It is im-
portant that you take care that this spacer is
always visible at the front end of the main
frame.The lower slot has to be aligned in
accordance with the slot in the main frame.
If this spacer is missing or is moved to the
back of the tube while inserting the front
boom, secure clamping is no longer guaran-
teed, even if it seems to be the case at first
glance. If the front boom is not clamped
properly it may turn and lead to a fall.A
missing or misaligned spacer will lead to a
frame damage.

The plastic spacer between front boom and main frame must be
visible at all time.

Danger! 

If the screws are tightened too

much or bent, the screw or the frame can
break! If the clamping is insufficient the front
boom can turn during a ride which may
cause your feet to slip from the pedals and
lead to a dangerous fall.

If the spacer is missing or not alligned properly or the screws are
tightened too much, the frame can break.!

Summary of Contents for Street Machine Gte 2008

Page 1: ...Operating Manual and Service Instructions Suspension Technology NEW recumbent technology 2008 HP Velotechnik January 2008 ...

Page 2: ...nd safely 26 Quick release levers 27 Brakes 28 Gear system 30 Light system 31 Prop stand 32 Table of Contents HP Velotechnik Maintenance and care Wear and Tear 33 Brakes 33 Gear system 35 Chain 36 Chain tubes 38 Chain roller 40 Suspension fork 41 Rear suspension element 45 Swing arm pivot 47 Head set bearing removing the stem 48 Seat cushion 49 Water bottle cage 50 Mudguards 50 Wheels 51 Cleaning ...

Page 3: ... first ride Your recumbent bike is designed with the latest bicycle technology by HP VELOTECHNIK that partly needs special treat ment and care In this manual you will find detailed instructions on how to optimize your Street Machine Gte to meet your demands and riding style as well as your size and weight In addition to this we have put together a collection of infor mation on care and maintenance...

Page 4: ...instructions in this manual apply only to a completely assembled Street Machine Gte with standard parts from the series production of HP VELOTECHNIK On special demand HP VELOTECHNIK delivers frame kits with which a specialist dealer can assemble a bicycle individually In this case the manuals on the operation and maintenance of the parts only represent a guideline please do read every manual of ev...

Page 5: ...ined in propper condition General Safety Instructions Intended use Your Street Machine Gte is a bicycle for the use on streets and surfaced roads This bicycle is not designed for the use in ra cing and off road riding for jumping or acroba tics and you must not ride across curbs stairs etc Damage through inappropriate use assembly errors accidents or similar activities and willful damage results i...

Page 6: ...plan on riding with heavy luggage we advise you to make a test ride on a street with no traffic to adjust to the new situation The load should be placed as close to the bo dy of the rider as possible since this leads to a more stable performance You can also impro ve the handling of the bike by positioning the center of gravity of the luggage as low as pos sible so pack heavy items in the bottom o...

Page 7: ...ial parts or accessories to your bicy cle Take care that the handlebar and the suspen sion always stay mobile You may not add any parts to the handlebar or the seat that might endanger the rider through sharp edged or pointed shapes while steering getting on and off the bike or bumping against something Before you purchase a bell or a lighting system make sure that these accessories conform to you...

Page 8: ...d bolts General Safety Instructions Danger If any part is deformed e g due to an accident or overload especially frame fork handlebar seat mounts pedals cranks and brakes it is not allowed to use it any further or repair it Do not try to straighten bent parts You must replace them for your own safety If you do not replace a damaged part it can result in a total failure of the part and you may be s...

Page 9: ...ere the cranks are mounted within the main frame Unscrew the screw M8x35 un der the main tube with a 6 mm Allen key Take a grip on the front changer tube or both cranks and move the front boom into the fra me or pull it out while cautiously turning it When you pull out the front boom shift the chain on the smallest chain ring and sprocket and turn the cranks a little bit backwards whi le pulling T...

Page 10: ...tick or wax spray Adjust the front boom so that the bottom bracket axle is horizontal when you look at it from the front For that purpose look beyond the bottom bracket shell at the rear wheel axle and align the front boom parallel to it Align your eyes with the bottom bracket axle and not the front changer tube above Then sit on your bicycle and check the position Hint When you have the impressio...

Page 11: ... always visible at the front end of the main frame The lower slot has to be aligned in accordance with the slot in the main frame If this spacer is missing or is moved to the back of the tube while inserting the front boom secure clamping is no longer guaran teed even if it seems to be the case at first glance If the front boom is not clamped properly it may turn and lead to a fall A missing or mi...

Page 12: ...be used differently and you might find a more comfortable and more effi cient riding position A wrong adjustment may lead to pain in your knees and inefficient pedalling In addition we recommend to ride with a high pedalling ca dence which means to pedal fast and with lit tle pressure Pedalling with too much pressure may also lead to pain in the knees You will find more information about this on p...

Page 13: ...th inner tension Loosen the 4 screws at the in ner side of the seat back with an allen key SW4 a few turns Step behind your bike and hold the seat back with both hands Pull or push the seat back to achieve the preferred seat length To achieve the smallest possible seat length move the 2 upper screws from the top to the middle holes Tighten all 4 screws with 5 6 Nm Move the seat back rest to the pr...

Page 14: ...the quick release lever pressure is to loose when closed open the lever and turn the screw on the end of the quick release axle clockwise The low profile design of the screw head gives more clearance for the drive train Adjusting the lumbar support The BodyLink seat is ergonomically shaped and supports the natural S curve of your spine Forces from pedalling are supported in the area of your lower ...

Page 15: ...is alignment loosen both clamp ingscrews of the stem fork steerer tube con nection Do not loosen the screw in the head set cap Sit on the bike hold the front wheel with your feet and turn the stem so that it is aligned to the front wheel Then tighten both clamping screws alternately with 8 10 Nm Check the clamping by trying to turn the stem against the front wheel Check the play of the steering he...

Page 16: ...d further back turning the bolt out stops the handlebars from going as far back Danger The stem extension must not be positioned higher than the max mark on the lower stem part In no case may the end of the lower stem half become visible in the slot of the stem extension The clamp must be positioned tightly to the lower end of the stem extension The clamping slot of the clamp must be aligned to th...

Page 17: ...it touches your legs earlier In order to change the angle loosen the screws of the handlebar clamping Turn the handlebars until they are in your favourite po sition Check that the stem clamps the handle bars exactly in the middle Tighten the clamp ing screws with 8 10 Nm Check the correct clamping of the handlebars by mounting your bike and pulling the handlebars In doing so the handlebar grips mu...

Page 18: ...parately Often the terms suspension and damping are used inappropriately in everyday language The spring is the elastic element that com presses and decompresses through the load which occurs on bumpy roads While decom pressing the spring releases the same energy it has saved during compression The front fork of your SMGT is fitted with steel coil springs and springs made of micro cellular foam el...

Page 19: ...ride without luggage The optional air shock DT SWISS XM180 can be easily pumped up to compensate load incre ases Adjusting your new bike 17 HP Velotechnik You should always set the damping as low as possible to give the bicycle the possibility to quickly react even to several bumps in a row You can ride the Street Machine Gte with a considerably lower damping than for example a MTB due to the rela...

Page 20: ...he suspension travel of the SPINNER fork is 45 mm of the MEKS fork approx 50 mm 2 The suspension fork should compress by 30 while mounting the bike which corresponds to 12 15 mm 1 2 You set this value by adjusting the pre load of the spring provided you chose the correct spring stiffness page 19 Every model has a turning knob on the fork legs that allows a simple adjustment of the pre load The sus...

Page 21: ... depending on the road situa tion While riding you should only seldom feel the suspension bottoming out However in case this never occurs the spring might be to hard which means you don t use the total suspen sion travel The suspension fork MEKS Carbon AC is fitted with a hydraulic damping unit On the right fork leg is a turning knob to adjust the dam ping You increase the damping by turning the k...

Page 22: ...ke into account possible luggage Find out the to tal suspension travel possible for your bicycle with the method described above depending on the mounted add on parts and clips on the piston rod The static compression should amount to about one third of the overall su spension travel You can affect this negative suspension travel depending on how much you weigh and how much you load your bike eith...

Page 23: ...ng retention disc on the thread of the spring element as far as it will go before this push the possibly existing sa fety spring ring from its slot in the threaded section as far as it will go Have a second person mount the bicycle and make the su spension bottom out by leaning on the seat or the rear rack If the distance between the wheel or mud guard and the frame seat rear rack or Speedbag is s...

Page 24: ... a special air pump designed for bicycle air shocks It should have a fitting schrader valve adaptor and a pressure indicator When attaching or removing the pump to from the valve you will loose some air about 0 5 1 bar at the positive chamber Try to take off the pump quickly Recommended pressure settings load positiv chamber 80 kg 6 5 bar 183 lbs 100 kg 7 5 bar 230 lbs 130 kg 9 0 bar 286 lbs Maxim...

Page 25: ...vents an eventual jumping of the rear wheel and provides a good traction By improving the road surface contact the suspension of the Street Machine Gte also increases your riding safety A higher damping value prolongs the time until the decompression movement is finished Only then can the suspension compensate the next shock with the full suspension travel Therefore when you ride on very bumpy str...

Page 26: ... the other pedal Do not care on which side of pedal you are currently pedaling in the beginning Hold the handlebar loose but steady and accelerate with a few pedal strokes Your bicycle needs speed to stabilize Look ahead in the direction where you want to ride not on the handlebar at your feet or the front wheel In order to stop brake carefully with both bra kes until the bicycle has come to a com...

Page 27: ...y come off suddenly which may result in a fall Modern system pe dals with binding therefore contribute to safe riding At first you will have to practice with these pedals to make sure that you can get off quik kly in a dangerous situation Please read the manual of the pedal manufacturer that comes with this manual and have your dealer explain the use of the pedals to you In the beginning set the r...

Page 28: ...nees often results from an overuse of the muscles in the knee that can al so be strengthened through exercise Also a wrong adjustment of the front boom to the leg length in most cases too short can le ad to pain in the knees Your pedaling cadence should stay between 80 100 revolutions per minute and not fall be low 60 revolutions when going uphill If neces sary have your specialist dealer adjust t...

Page 29: ...new Finally check that the part being secured is firmly fixed Lift each wheel several inches off the ground and give it a slap onto the tire from above A properly fixed wheel will remain secure in the frame s dropouts The dropouts of the fork of your Street Machine Gte are designed as safety dropouts Therefore you always have to loosen the clam ping nut of the quick release when you take off the f...

Page 30: ...an be more powerful than what you have been used to until now Do brake carefully When you brake too much with the front brake the rear wheel may lift off the street and the bike may tumble over Do not brake in a bend always brake before a bend Braking increases the risk of slipping Especially when it is wet the rear wheel imme diately slides out of the bend while braking and this can result in a s...

Page 31: ...it feels firm check the hydraulic brake system for the correct pressure by pulling the lever holding the pressure and checking the hose connec tions bleeding screw and compensating tank for possible leaks Danger Disc brakes can overheat on long down hill rides fade and fail On down hill rides do not brake constantly but in several intervall with higher pressure If you notice that the brake power s...

Page 32: ...he gears while you keep pedaling smoothly and without applying great force all the time that the chain is moving bet ween the sprockets Due to the long cables that expand under pressure and the housing that compresses under pressure it may be hel pful for changing gears quickly to turn the bar end shifter a little bit farther than necessary to select a gear and turn it back to the indexed position...

Page 33: ...amo For this purpose you press the red button at the dynamo until it moves to wards the rear wheel To turn the light off you turn the dynamo by hand back to its initial po sition You can adjust the pressure of the dynamo against the wheel with the turning knob at the side The pressure is right when the dynamo wheel just does not slip at the wheel if the light flickers the pressure is too low and y...

Page 34: ... lowrider It supports the bicycle in the middle of the bike between the wheels In case no lowrider is mounted to your bicycle you can support it with a special rear prop stand The left rear dropout has mounting holes for a PLETSCHER prop stand The screws are put through the dropout and secured with was hers and self securing nuts Ttightening torque is 8 10 Nm If you do not aply the correct tighten...

Page 35: ...s suffer from we ar When the rims are too worn the tire pres sure can tear up the rim and damage the wheel Please have your bicycle mechanic check your rims at the latest after the second brake pad change and exchange them if necessary cable operated mechanical brakes The brake pads of your brakes are worn when you can pull the lever further and further to the handlebar before the pads touch the r...

Page 36: ...s with the bike You will find more detailed maintenance instruc tions in the manual Workshop that is availa ble for download from MAGURA at www magu ra com In case of a damaged hose or any lea kage of oil always consult a qualified technician in a bike shop Brakes Caution Never activate the lever blade wi thout the brake pads in place and with the wheel dismounted When you transport the bicycle wi...

Page 37: ...lf a turn Check after each adjustment whether the chain moves smoothly up to the next larger sprocket To do this either turn the cranks by hand or ride the bike When the chain climbs up easily you need to check that it still goes down easily onto the smallest sprocket If necessary turn the barrel adjuster a little more and then try shifting ge ars again Gear system Danger If the chain shifts over ...

Page 38: ...gaps and the bushings where the dirt cau ses heavy wear Do not use any solvents to clean the chain The solvent washes the oil off the bearing parts stays there and dilutes the fresh oil so that a sufficient lubrication is not guaranteed If you have treated the chain with a solvent you will have to heat it up with a hot air torch or boil it in chain grease An effective protection against corrosion ...

Page 39: ... to be fitted so that the arm of the derailleur is not fully stretched when you shift onto the big chain ring in the front and the big rear sprocket The derailleur must be able to compensate a tightening of the chain by 4 cm Please see also the manual of the derailleur manufacturer on the choice of the correct chain length See that the joining link is not bigger in size than the other chain links ...

Page 40: ...t you can renew them through expansion Remove the chain by opening the power link or open it with a spe cial chain riveting tool Cut the worn part of the tube exactly perpendicular with a sharp knife Heat the last 5 10 mm at the end of the tube with a gas burner or a candle and turn it per manently until the color of the utmost edge turns from a dull black to a shiny black Now you expand the end w...

Page 41: ...ler the big washer and the chain retention hook The end of the threaded tube in the frame is protected with a clear plastic tube Take the retention spring off this plastic tube and put on the new retention spring Turn the spring so that the retention springs run under the spacer to the tubes and the wires lie bet ween frame and chain tube that way the spi rals face outwards Push the bolt back thro...

Page 42: ...u will notice that the chain makes more noise while running and you should change the roller You can pur chase the plastic part without the bearing or the complete roller through your dealer The chain roller is not symetrically shaped the recessed side of the chain roller has to face to the frame the flat side outwards The bearings must not be treated with a jet of water from a high pressure clean...

Page 43: ...ructions refer to MEKS Carbon suspension forks For SPINNER Grind2 forks or other brands please see the instruc tion manual that comes with the forks Suspension Fork Always check the correct position of brakes and wheels after you have worked on the su spension fork as described in the respective chapters Check that the quick releases are tightly closed The inner fork steerer tube is tightly fitted...

Page 44: ...but springs on both sides No Part 1 Crown Stanchion tube and Steerer tube fixed unit can t be dissasembled 2 One piece lower leg 3 Oil damper cartridge 4 Adjuster cap 5 Damper Adjuster 6 Screw M8 7 Washer 8 Damper cap 9 Preload adjuster 10 MCU Elastomer 11 upper plastic bush 12 Spring 13 lower plastic bush 14 aluminum push rod 15 Negative spring 16 Rebound Elastomer PU 17 Dust seal 18 Screw M6 19 ...

Page 45: ...springs If your spring has an adjustable damping MEKS Carbon AC turn the knob clockwise as far as it will go so that the fork does not decom presses again Undo and remove the screw M6 on the lower part of the leg 18 To prevent the push rod 14 from turning too press the fork together entirely and hold the push rod with a long Allen key SW5 At the suspension fork MEKS Carbon All per form the same wo...

Page 46: ...ar and tear through normal use It depends on the usage of the bike the amount of dirt on it and the maintenance and lubrication how long it lasts After 3000 km the damper must receive an inspection by a trained mechanic worn out parts or the hydraulic cartridge can be repla ced then Due to wear of the seals oil can leak drom the damper or the internal oil can beco me foamy This may lead to some no...

Page 47: ...ment eye Move the rear swing arm down carefully In doing this take care that you don t bend or stretch any cables Remove the spring from the suspension ele ment and put in the exchange spring Make su re that the new spring has the same diameter and length as the old spring and that it lies sa fely on the adjustment ring Put back the slotted rear spring retention disc on the piston rod If necessary...

Page 48: ...m with the bolt Lubricate the bolt thoroughly Secure the screws of the suspension element with LOCTITE and tighten the screw with 6 8 Nm After having exchanged the spring you have to readjust the spring pre load as described in the chapter on Adjusting your new bicycle on page 18 Cleaning and lubricating Do clean the suspension element especially the polished piston rod if it is dirty Remaining di...

Page 49: ...nance free bushings They have a self lubricating system with Teflon particles The bushings su stain a very high load and they show almost no wear In case you notice play or a creaking noise at the rear swing arm please check the two screws that keep the axle in the frame They will have to be secured with LOCTITE Tightening torques Mushroom head screw M8x25 without rear rack 17 19 Nm Screw M8x45 17...

Page 50: ...10 Nm Check the clamping by trying to turn the stem against the front wheel Check whether the handlebars move freely wi thout touching the frame or the seat Removing the stem Remove the lower quick release of the seat mount and lift the seat Take off the cap of the steerer tube and remo ve the hex headed screw in the cap completely Undo both clamping screws at the side of the stem Now you can remo...

Page 51: ...rough constant use At the parts that are under punc tual strain the mesh can be pressed together permanently In order to provide a good riding comfort in that situation the airflow cushion has additional rigid mesh padding Caution The seat cushion is fastened with Velcro and you can take it off For this pur pose it is important not to simply grab the foam and take it off since the Velcro could com...

Page 52: ...udguard and wheel has to be a distance of at least 7 mm Caution You must not mount additional parts like rear lights or reflectors to the mudguards since those may break then Danger If branches or other obstacles get caught in the wheels while riding and are moved around they may drag the mudguards along The mudguard can possibly fold up be tween frame and tire and hence block the wheel which may ...

Page 53: ...nce the tubes in the tires gradually loose air you should check the air pressure before eve ry ride The tubes come with Presta valves also called french valves They are very airtight and easy to pump up For that purpose first undo the valve cap Now you see a small threaded rod with a knurled nut that comes out of the valve Undo the knurled nut by loosening it as far as it goes To pump up the tire ...

Page 54: ... surfaces of the aluminum parts are either polished or anodized To keep the surfaces brilliant over many years and to protect them effectively against corro sion the bicycle has to be cleaned from dirt and then conserved Dried sweat but also environmental influences such as air pollution dirt on the roads and especially grit affect the parts and not only may this cause flaws but also serious struc...

Page 55: ...l shiny Do not only wax the frame but also the spo kes hubs screws and nuts etc You can also conserve the chain with wax spray after lubri cating it see also the chapter on Chain page 36 The frame has small holes for ventilation that prevent condensation in the frame These dril ling holes must not be sealed However moi sture may enter the frame through the drilling holes Therefore protect the insi...

Page 56: ...will find the prescri bed tightening torques they refer to greased screws The grease also prevents your screws from seizing in their threads so that they won t un screw anymore In particular screws made of stainless steel are susceptible to this and the refore have always to be put in with grease Do use high quality acid free grease if possible a lubricant with added solid particles like Teflon or...

Page 57: ...brake lever SW8 4 Nm dynamo dynamo adaptor M6 SW5 6 8 Nm adaptor frame M5 SW4 4 6 Nm suspension element element frame M6 6 8 Nm rear rack at the seat tube M6 SW5 8 10 Nm rear swing arm axle frame M8 17 19 Nm b b set cartridge frame 50 60 Nm chain roller roller frame M8 SW 6 17 19 Nm crank crank axle 35 Nm chain ring screws 8 11 Nm hub cassette ring 38 42 Nm quick release wheel frame 9 12 Nm pedal ...

Page 58: ...ssed via the bike dealer who ordered the bicycle from us In case of damage the dealer has to send the damaged frame to us so that we can check it if asked to do so by us In case of warranty we will replace or repair the damaged part with a part of our choice or a new part equal to the old one warranty ob ligation We do not cover any transport labour or any secondary costs In the event of any actio...

Page 59: ...sh you can set an upper price limit for the service with your bicycle mechanic If the necessary works exceed this limit you will be informed in advance You can avoid seasonal waiting periods in spring and summer when you have your annual inspection done in the quiet months from October to January Many bike shops then ha ve special winter check offers At any rate do make an appointment Clean your b...

Page 60: ...ace worn out parts hydraulic cartridge suspension fork check dust boot and correct position lubricate check fork play adjust if necessary replace worn out parts hydraulic cartridge rear swing arm check function and bearing play tighten axle screws bottom bracket bearings check bearing play rims check wall thickness wear condition chain grease and check for wear chain tubes check for wear expand en...

Page 61: ...Warranty Pass 59 HP Velotechnik see page before every ride monthly annually note 31 51 29 33 45 41 every 6 months 47 51 36 38 40 52 51 13 replace aluminium bars every 2 years 14 ...

Page 62: ...ervice plan is intended to give you a rough overview over the required maintenan ce and service works In no case it can replace the detailed instructions in this manual You can perform service works marked with a if you have the required skills and tools as for example a torque wrench If you discover any defects while checking your bicycle they have to be repaired immediately If you are in doubt p...

Page 63: ...e rain grit or other dirty factors it is necessary to have shorter maintenance intervals In order to measure your riding performance we recommend you to use a bicycle computer The regular service maintains the safe opera tion and the value of your bicycle Not only does the completed Warranty Pass record the maintenance works for the validation of your warranty but also does it proove the care and ...

Page 64: ... personal Warranty Pass name adress telephone frame no stamped into gusset of the main frame I have received the bicycle in good condition ad justed to my size and performed a test ride I have been informed about the correct use of the recumbent the components like derailleur and especially steering and brakes as well as the necessity of regular service and maintenance I will read the manuals prio...

Page 65: ... ter the purchase Order No milage approx km Date Dealer s Stamp and Signature Exchanged or additionally mounted parts 1st service No later than 300 kilometers or 2 months after the purchase Order No milage approx km Date Dealer s Stamp and Signature Exchanged or additionally mounted parts ...

Page 66: ...fter the purchase Order No milage approx km Date Dealer s Stamp and Signature Exchanged or additionally mounted parts 3rd service No later than 6000 kilometers or two years af ter the purchase Order No milage approx km Date Dealer s Stamp and Signature Exchanged or additionally mounted parts ...

Page 67: ...ter the purchase Order No milage approx km Date Dealer s Stamp and Signature Exchanged or additionally mounted parts 5th service No later than 12000 kilometers or four years after the purchase Order No milage approx km Date Dealer s Stamp and Signature Exchanged or additionally mounted parts ...

Page 68: ...ter the purchase Order No milage approx km Date Dealer s Stamp and Signature Exchanged or additionally mounted parts 8th service No later than 21000 kilometers or seven years after the purchase Order No milage approx km Date Dealer s Stamp and Signature Exchanged or additionally mounted parts ...

Page 69: ...ter the purchase Order No milage approx km Date Dealer s Stamp and Signature Exchanged or additionally mounted parts 10th service No later than 27000 kilometers or nine years after the purchase Order No milage approx km Date Dealer s Stamp and Signature Exchanged or additionally mounted parts ...

Page 70: ...er the purchase Order No milage approx km Date Dealer s Stamp and Signature Exchanged or additionally mounted parts 12th service No later than 33000 kilometers or eleven years after the purchase Order No milage approx km Date Dealer s Stamp and Signature Exchanged or additionally mounted parts ...

Page 71: ...er the purchase Order No milage approx km Date Dealer s Stamp and Signature Exchanged or additionally mounted parts 14th service No later than 39000 kilometers or thirteen years after the purchase Order No milage approx km Date Dealer s Stamp and Signature Exchanged or additionally mounted parts ...

Page 72: ... Velotechnik Paul J W Hollants und Dipl Ing Daniel Pulvermüller GbR Elisabethenstr 1 D 65830 Kriftel Tel 49 61 92 97 99 2 0 Fax 91 02 18 www hpvelotechnik com NEW recumbent technology 2008 HP Velotechnik ...

Reviews: