32
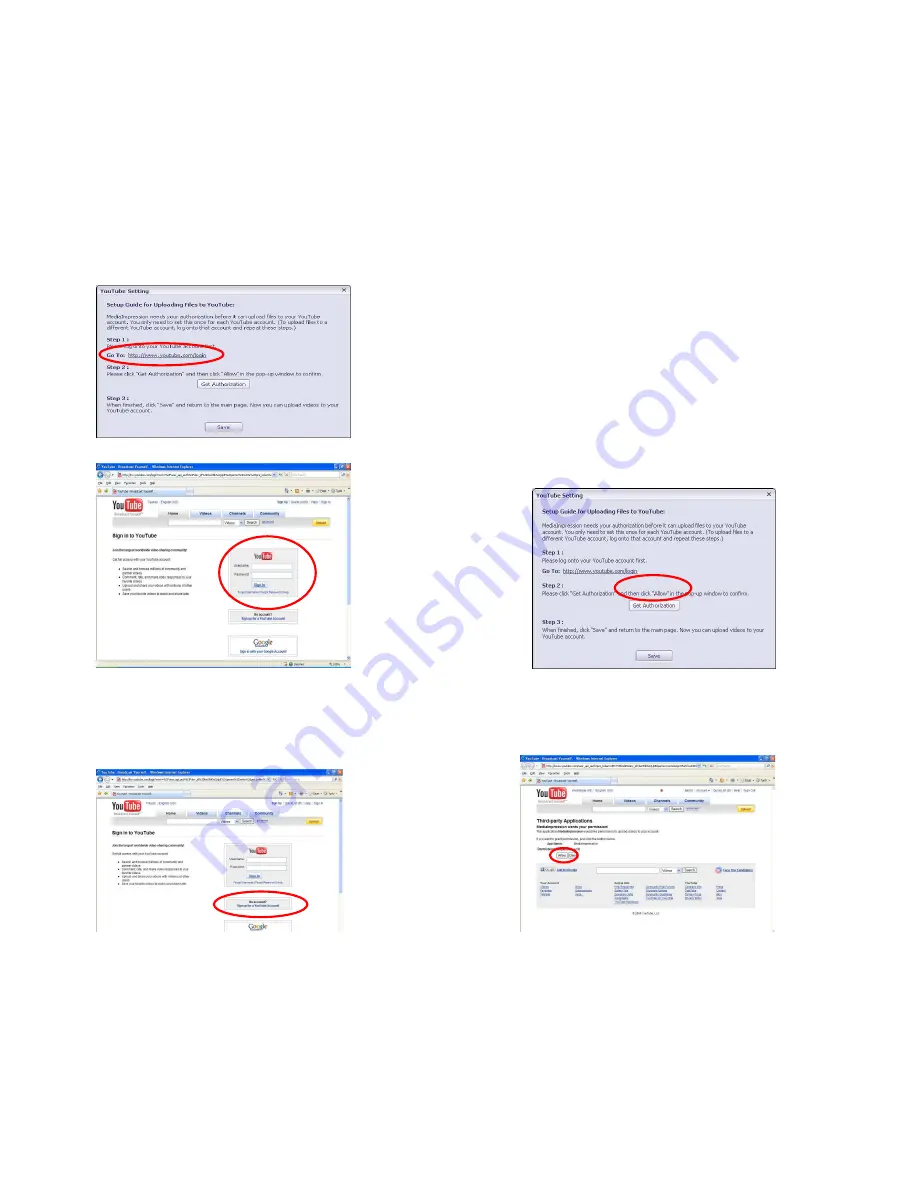
(b) Sign up for your YouTube account first if you do not
have one.
33
3. Click “Get Authorization”
4. Click “Allow” in the pop-up window to confirm.
Page 1: ...cautions described below Always ensure that the camera is operated correctly Never operate the camera inside of an aircraft or anywhere else where operation of such devices is restricted Improper use...
Page 2: ...ds cleaning wipe it with a soft dry cloth If there is leaking discoloration change of shape rise in temperature damaged exterior strange odor or any other abnormal condition immediately discontinue us...
Page 3: ...PC NB and Install MediaImpression 27 Download Movies and Photos 29 How to share and upload your movies to YouTube 31 Connecting to TV or HD TV 36 7 Appendix 37 Specification 37 Computer System Require...
Page 4: ...6 Front View Back View 7 Installing the Battery Pack...
Page 5: ...herefore needs to be charged before use If the battery charge becomes low while you are using the camera it is recommended to recharge it as soon as possible 1 Insert the battery pack into the battery...
Page 6: ...lease charge the battery at least 3 5 hours prior to your first use 3 Quick Start Power ON 11 1 Press the POWER button to turn on the camera A green LED lights up on the left top when the power is on...
Page 7: ...ored in the built in memory remove the SD card Recording Video Clips There are 2 ways to record video clips with the MSR 200 13 a Press the CAMCORDER button to start recording Press the CAMCORDER butt...
Page 8: ...mcorder mode or Camera mode 2 Press to enter Exposure Compensation mode 15 3 Press the and to adjust the exposure compensation Note If using the MSR 200 inside a dark vehicle and exterior scenes are o...
Page 9: ...st mounting surface and rotate lever downward 4 Menus and Setup Press MENU button to access setup menus in Camcorder or Camera mode To exit menus press MENU button 17 Camcorder Camera Mode White Balan...
Page 10: ...to set Effect 1 Press MENU button in Camcorder mode or Camera mode 2 Press to select Effect mode and press OK button 19 3 Press to select Normal Black White Sepia Press OK button again to set Night M...
Page 11: ...andard and press OK button 21 3 Press to select NTSC PAL Press OK button again to set Format 1 Press MENU button twice in Camcorder mode or Camera mode 2 Press to select Format and press OK button 3 P...
Page 12: ...Frequency 1 Press MENU button twice in Camcorder mode or Camera mode 2 Press to select Frequency and press OK button 23 3 Press to select 50Hz 60Hz Press OK button again to set Date Time 1 Press MENU...
Page 13: ...return to playback mode Viewing your Photos 1 Press PLAYBACK button 2 Press to select the photo you want to view 25 Deleting and Protecting Photos 1 Press PLAYBACK button and then press MENU button 2...
Page 14: ...ase remove SD card from the Video Camera before connecting to the computer notebook 1 Open the battery compartment cover by lightly pressing and sliding it Take the built in USB cable out of compartme...
Page 15: ...r on the computer If you are not sure if you have administrator access contact the computer owner or your system administrator Download Movies and Photos 1 Power on the video camera 2 Plug the USB cab...
Page 16: ...ies to YouTube For users without YouTube Account sign up for an account first For users with YouTube Account already log in when 31 using for the first time 1 Click Extras and choose YouTube Account S...
Page 17: ...32 b Sign up for your YouTube account first if you do not have one 33 3 Click Get Authorization 4 Click Allow in the pop up window to confirm...
Page 18: ...Upload your videos to YouTube 6 Select the video you want to upload on YouTube 35 7 Click Upload to YouTube Connecting to TV or HDTV 1 Before connecting the video camera to TV please make sure to set...
Page 19: ...o Mode 1280x720 HD 30fps 854x480 WVGA 60fps 320x240 QVGA 30fps Still Image Res 3M 2048x1536 pixels 5M 2592x1944 pixels 8M 3200x2400 pixels by interpolation Compression Movie H 264 MOV Still JPEG PC In...
Page 20: ...an Hoyt Technologies without the written permission of Hoyt Technologies will void this limited warranty Software purchases are covered by the GPV Systems License agreement and are not covered under t...