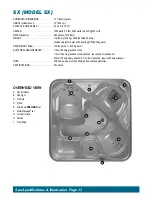
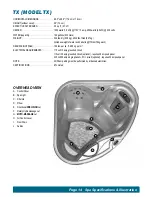


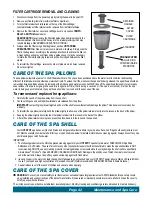

Page 27
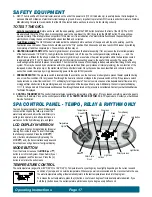
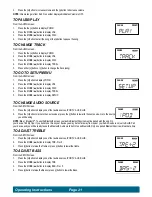
TO ADJUST TREBLE
From the SETUP menu:
1. Press the
TEMP
▲ to display one of four audio sources, IPOD,TV, AUX, BLUE.
2. Press the SET button
TEMP
▲ button to display TRE -5 to +5.
3. Press the
TEMP
▲ button to raise the Treble or press
TEMP
▼ button to lower the Treble.
TO ADJUST BASS
From the SETUP menu:
1. Press the
TEMP
▲ button to display one of four audio sources, IPOD,TV, AUX, BLUE.
2. Press the SET button to display TRE.
3. Press the SET button to display BAS -5 to +5.
4. Press the
TEMP
▲ button to raise the Bass or press
TEMP
▼ button to lower the Bass.
TO ADJUST BALANCE
From the SETUP menu:
1. Press the
TEMP
▲button to display one of four audio sources, IPOD,TV, AUX, BLUE.
2. Press the SET button to display TRE.
3. Press the SET button to display BAS.
4. Press the SET button to display BAL -5 to +5.
5. Press the
TEMP
▲ button to raise the Balance # or press
TEMP
▼ button to lower the Balance #.
TO ADJUST SUBWOOFER
From the SETUP menu:
1. Press the
TEMP
▲ button to display one of four audio sources, IPOD,TV, AUX, BLUE.
2. Press the SET button to display TRE.
3. Press the SET button to display BAS.
4. Press the SET button to display BAL.
5. Press the SET button to display SUB 0 to 11.
6. Press the
TEMP
▲ button to raise the subwoofer # or press
TEMP
▼ button to lower the Subwoofer #.
TO CHANGE AMPLIFIER CHANNEL
(TO MATCH WIRELESS DOCK TRANSMITTER INSIDE
HOUSE IF INSTALLED)
From the SETUP menu:
1. Press the
TEMP
▲ button to display one of four audio sources, IPOD,TV, AUX, BLUE.
2. Press the SET button to display TRE.
3. Press the SET button to display BAS.
4. Press the SET button to display BAL.
5. Press the SET button to display SUB.
6. Press the SET button to display CHAN 1-5.
7. Press the
TEMP
▲ button to raise the channel # or press
TEMP
▼ button to lower the Channel #.
NOTE:
Channel number must match Transmitter number inside house to work properly.
Operating Instructions
Page 27


