background image


FEATURES OF YOUR OVEN CONTROL

1. 

 E; 

 Press 


2. 


 STATUS. 


 up in 


 is in 


   displayed   

 by 


 current


 white 


 is 


 by


 1) 


 the 


  b r o i l  


5. 


 oven is in 


 01” the 


7. 


 this 


 tinier 

 tinier 


 up     


To set the timer, 


 TIMER 


 INCREASE 

 DECREASE 


 the timer, 


 TIMER 


“TIMER” is 


 set 


 Cl 

 Then press the 

   I) 


 Press 


9. STOP’ 


 the 

 or 


 to 


 to 

 stop 


 you 

s e l e c t .


 TIM 


 this 


 Tithed 


11. 

 Press this 


 the 

 the 

 section.

12. 


 this 

   select the 


 and   number flash 


and the control” 


 indicates 


 the (“f 


 Al 


 Put 


 f   


 oven 


 t 


8

Summary of Contents for RS734GP

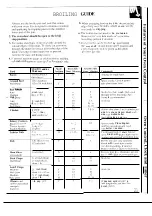
Page 1: ... l v e s C Irc IIICI lcilning 5 Thernlos it AdlLlstl len 13 C li ck Tinlcr Tinlec B lkin 14 15 COIISIII1lCI Scrviccs 31 Problclll S o l v e r 30 IJcil llrcs 7 S ll ety Inslrllctions 3 5 Mocicl IIICI Scri ll Nlinlbcrs Surface Cooking 10 I 1 oten I 2 24 Control Setlin s 10 Use and Care of Models RS734GP RS744GP light Bllll Rcpl lccnlerl I 2 2X E Answer Center OY eIl Vcll 4 20 800 626 2000 ...

Page 2: ... icc calfs concerning yt ur range If you received a damaged range Illlmcdi rtcly ct ntact the deater or 10U i Idcr hat sold jou the range Save time and money Before you request service Check the Problcrn Solver in the hack ot this h ok f fists caLises of mirl r oper ting probfems that you can correct yourset 1 IF YOU NEED SERVICE Tc obtain service see he Consuincr Services page in the hack t tlis ...

Page 3: ... the device is properly engaged before you push the range back Ptease refer to the Anti Tip dekice information in the back of this book Failure to take this precaution could result in tipping of the liltl t and injury Do not leave children alone children should not be left alone or unattended in an area where an appliance is in use They should never be allowed to sit or stand on any part of the ap...

Page 4: ...ven control to OFF or by using a dry cheln ical or lll typ c x ingu isher 1 JIOi t ltch heating elements or interior sarface of oven I hcse surfaces nlay be hoi i ugh burn even though they arc dark in col r I uring Ind lfter use do not touch or let clo hin or other nlnlable lnd eri lIs Cont lct surf Lce units 21reLls ne irhy surface units or ny i nteri r ilrr i of the oven lltow sufficient tinle f...

Page 5: ...le of a container should be turned toward the center of the range without extending over nearby surface units To avoid the possibility of a burn or electric shock always be certain that the controls for all surface units are at OFF position and all coils are cool before attempting to lift or remove the unit Never clean the cooktop surface when it is hot Some cleaners produce noxious fumes and wet ...

Page 6: ...FEATURES OF YOUR RANGE RS734GP no window in door RS744GP window in door 6 ...

Page 7: ...ions 7 I lectronic Oven Control 8 25 8 Surface ON Indicator Light I 9 Surface Unit Control Knobs 10 25 I oven Shelf Supports 12 or ro lsting b lking ilnd hroiling positions 01 shelves see sllggestions in the cooki ng sect ions 11 Oven Shelves with stop locks 4 I 16 22 27 12 Bake Unit 27 13 Removable oven Door 22 27 E lsily rcnlt ved tt r cicaning 14 Broiler Pan and Rack 4 18 22 28 15 Storage Drawe...

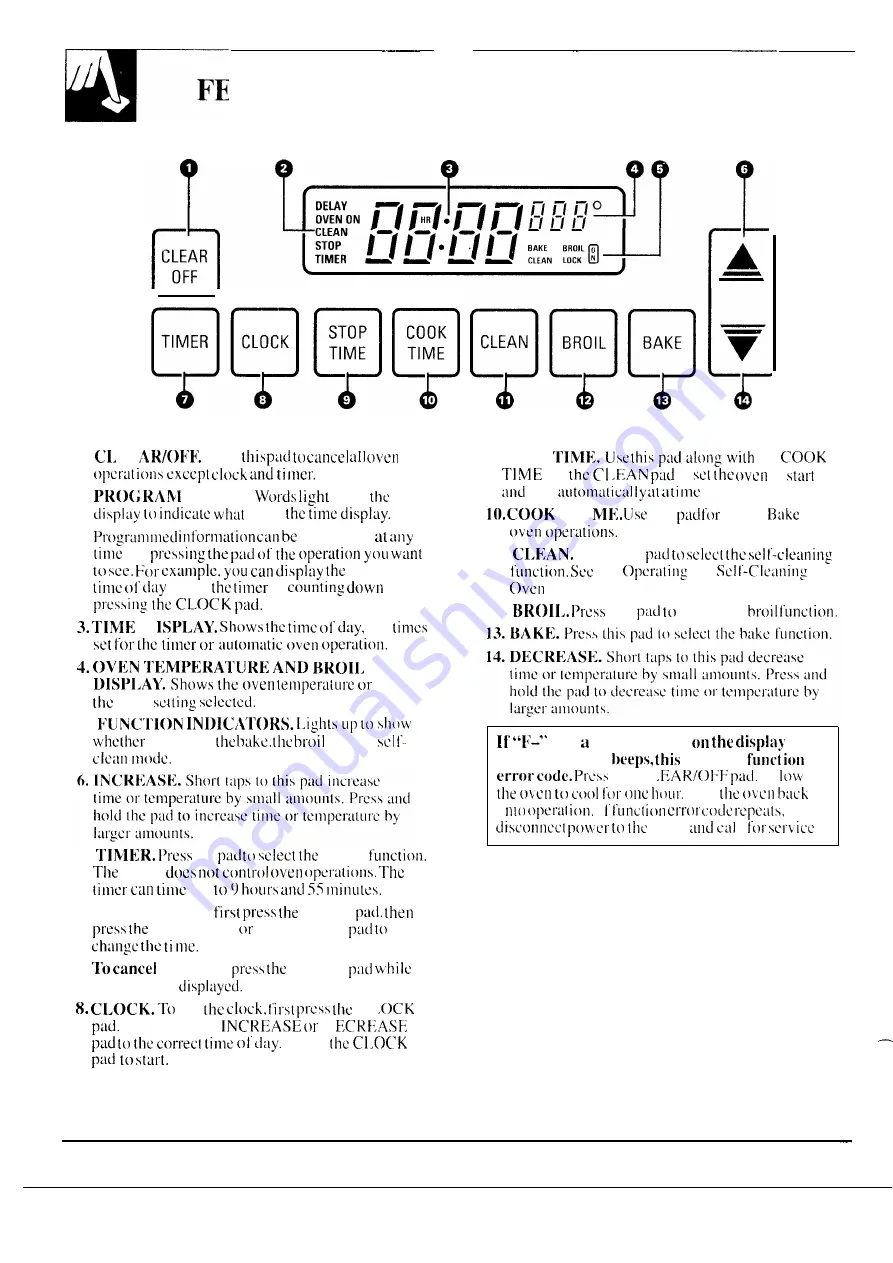
Page 8: ...s The tinlcr c Ln tinle up tt hours Ind 55 tninutcs To set the timer first press the TIMER p ict then press the INCREASE t r DECREASE p l t to ch lnge the ti nlc T cancel the timer press the TIMER p l t while TIMER is dispt lycd 8 CI OCK T set the clock first press the Cl OCK piid Then press the INCRF3ASE or I I CR ZASFZ p ld to the cort ect tinlc 01 t ly Press the C1 OCK P ld to St2U t k 9 STOP 1...

Page 9: ...he display During the countdown when the timer reaches the last minute the display will change to seconds only and a single beep will sound To Reset the Timer To Cancel the Timer If TIMER is showing press the INCREASE or Press the TIMER pad while the word TIMER DECREASE pad until the desired time is reached is displayed If TIMER is not showing press the TIMER pad first then follow the instructions...

Page 10: ... haltw y between HI and tood unattended Bt i tcrs caLIsc slnoking greasy M13D Maintains a i ast boil on lal ge amounts JI I d spi 1 lovers llay catch l irc Nlh SJule and brown keCpS food at a medium At M F III U M 1 OW and sctt i rigs mcll chc colatc boil or simmer and huttcr on small surl ace uni MEJI IUM I OW Settitlg hallway between MED nd 1 0 Cook titter starting at H 1 cooks with I it le wtit...

Page 11: ...p or sauce mixturcs and all types OF frying cook at temperatures much higher than boiling waler Such temperatures could cvcntuuliy harm cooktop surfaces surrounding surface Llnits Observe the Following Points in Canning 1 Bc sure the canner tits over the center of the surface unit If your range or its location does not allow the canner to be centered on the surface unit use smaller diameter pots f...

Page 12: ...ly from the oven and will not tilt when removing fi od from or placing food on them 1 0 remove the shelf t r nl the en pLIll i t oru u ci to the stop locks InLl I i t the i rent 01 be shel t Be cert lin tl it IIC she 1 is cool bcl ore touching i 1 rephlce tile Shelf in the oven tilt the shelf LIp t he I rent Inci slide the cur cd extension u1 the shell under slop lock on shell LIpport Then slicte ...

Page 13: ... A up to 35 F hotter or 35 F cooler Use the INCREASE or DECREASE pad to select the desired change in the red display n 5 When you have made the adjustment CLEAR press the CLEAR OFF pad to go back OFF to the time of day display Use your oven as you would normally NOTE This adjustment will not affect Broil or Clean temperatures It will be retained in memory after a power failure BAKING Your oven tem...

Page 14: ...c cook l ot 1 4 Press the INC REASE or E C R1 ASIZ p id until sclcctc t length ot Ii nlc At the end of C k Tilllc the Icsirc i length of baking t itlle is tisplil e l en wil I luril 1 lul lnltiticillly The w cIs TIMED BAKE lllLf C K TIM E 110 avoid possible burns pl lcc the shelves in the wit I he displ iycd llong with I1c vcrl tcrllper lture c t r cct sition before YOU turn the t ven on th it vou...

Page 15: ... STOP J TIME appear on the display The control automatically sets Stop Time by adding the Cook Time to the time of day In this example the time of day is 2 00 and the Cook Time is 3 hours Adding 3 hours to the time of day equals 5 00 6 Change Stop Time from 5 00 to 7 00 by pressing the INCREASE pad until 7 00 and Stop Time appear in the display The words DELAY TIMED BAKE appear on the display At 4...

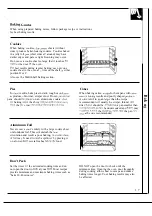
Page 16: ...t indicator light or tone preheat I higher temperature does not shorten preheat time m inutcs A I cr the f vcn is preheated place the food in the vcn as quickly as pt ssible to prevent heat from cscdping Baking Pans Use the proper baking pan The type of finish on the pan determines the amount of browning that will occur Dark rough or dul I pans absorb he t resulting i n a browner crisper crust Use...

Page 17: ...ee A cake baked in a pan argcr than the recipe or baking since the shiny toil pan retlects heat aw y recommended will usually he crisper thinner and from the pie crust he cookie sheet helps re tiin it drier than it should be If baked in a pan smaller than rccolnnlended it maj be undercooked and batter may crtlow Check the recipe to make sure the pan size LIsed is the one recommended Aluminum Foil ...

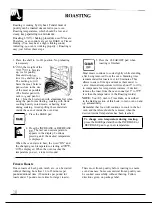
Page 18: ...ord ON and the changing oven temperature starting at 100 F will be displayed When the oven reaches the temperature you set a tone will sound n5 Press the CLEAR OFF pad when CLEAR roasting is finished Most meats continue to cook slightly while standing after being removed from the oven Standing time recommended for roasts is 10 to 20 minutes This allows roasts to firm up and makes them easier to ca...

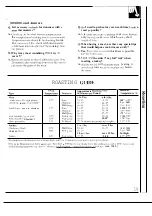
Page 19: ...ok it more evenlytz 4 Yes Buy 1 r ost is even in thickness as possible 01 bLly I otl CCt l otiSt Q C an 1 seal the sides of my foil tent when roasting a turkey A Se ltin he toit will sle lnl the lllcat caving it unse lted It tows the ilir circut lte lnd brown ltlc 11 leilt ROASTING GU E I ouencss I iu c Mcdiu l Well I ollc I iil c Mcdiunl Welt I nc well I OIIC well 1 OIIC I W u lll Well DOIIC Wctt...

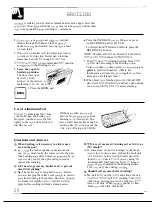
Page 20: ... can LISC aluminum foil 10 line Without the slits the foil will your broiler pan and broiler rack prevent fat and meat juices from However you must mold the foil draining to the broiler pan The tightly to the r lck and cut slits in it juices could become hot enough to just like the rtick catch on fire If jou do not cut the s its yoLI are frying not broiling Questions and Answers Q When broiling is...

Page 21: ...rough bci orc browning P ln I rying is recotnnlendcd St lsh tat 5 1 II 7 X I 4 t 2 25 1 t 5 t educc tinle tibt ut S to 10 nlinLltes per side Ii r cut up chicken Brush c lch side wi h melted butter Broit skin side d wn Iirst Chicken 1 wh le 2 tbs split Icngthwisc 1 13akerv Produ ts Sp lcc evenly Place English nut t ins cLlt side Up ind brLlsh with butter i desired ut hrollgtl b lck of shell Sprc ld...

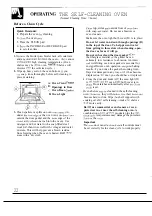
Page 22: ...not use abrasives or oven cleaners Make sure the oven light bulb cover D is in place Do not let water run down through openings B in the top of the door To help prevent water from getting in these slots when cleaning open the door as far as it will go Do not rub or clean the door gasket C the fiberglass material of the gasket has an extremely low resistance to abrasion An intact ind well fitting o...

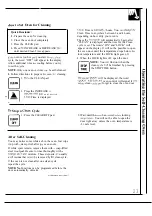
Page 23: ...he oven door until the temperature drops below the lock temperature and the LOCK light goes oft 4 When the LOCK light is off open the door NOTE You can find out when the II STOP clean cycle wi II be finished by pressing TIME the STOP TIME button The word bDOOr will be displayed the word LOCK will Ilash and oven control will signal if you set the clean cycle and forget to close the oven door 1 0 St...

Page 24: ... of day you will not be able to set a delay clean to end at a specific time Q Can I use commercial oven cleaners on any part of my self cleaning oven A No cleaners or coatings should be used around any part of this oven It you do use them and do not thoroughly rinse the oven with water wiping it absolutc y clean afterwards the residue can scar the oven surface and damage metal parts the next time ...

Page 25: ...wi h sL Ip itl d his Iinish is i i t tt sis lt ow ct or cltlth i pc i llp ri tlt ill l 01 lllSi ng p JWLtdrs iLt t t J vever ilny ilci t l ts spillc l LW 1 W i 1 11 ttl Ll i t icc lil the slIrlLIce h is c olect Rinse wctt SLICtl 1S t 1 llit jLliCCS toll l lto 01 C lC t Wilitl W 1 tl Lll LlllLl i illCl P JI ish with ctry cloth vineg l Sht Ll Ici 11 he pcrtllit e t Rins ivell to r lllilirl on the ti...

Page 26: ...enly Drip Pans Remove the surface units Then lift out the drip pans The drip pans can be cleaned by hand Place them in a covered container or a plastic bag with 1 4 cup ammonia to loosen the soil Then scrub with a soap filled scouring pad if necessary Rinse with clean water and polish with a clean soft cloth The drip pans may also be cleaned in the dishwasher Clean the area under the drip pans oft...

Page 27: ... I I lge 01 nl u itl idcs frLl i t ill i tS olllil t S U lllLt b is illg IIl ltcri its contili n i ng IL ids nl i L LUSC ctis lol lti ll ind sholil l hc wi pcd Lip i n nlcdi ltcly Whc 11 Sil l lL C is cool rle ill illld ri IlsC 1 0 not use o c In elean rs clcatlsin powders or harsh abrasi es on the outside of the door NOTE I not CIC U the b ihe unit 01 hc broi I LIn it An soi I w i I I Ilut oft tl...

Page 28: ...afety do not touch a hot bulb househotd bulb L with o damp cloth If you do the bulb will break glass cover Instatl and tighten the cover Reconnect etectricat power to the range Removable Storage Drawer The storage drawer is a good place to store cookware and bakeware Do not store ptastics and flummable material in the drawer R A Do not overload the storuge drawer If the drawer is w w too heavy it ...

Page 29: ... __ _ chai Lor g s re wasl i w 1 Wal Plate 7 L J I 1101 1 1 1 Tape 29 _ _ I 1 ...

Page 30: ...lf position being used See the Broiling Guide Necess iry prehe iting wits not done Food is being cooked on ii hot p ln Cookwtire is not suited t or broiling Aluminllm f t i I used on the broi I ptin and r lck has not been ti ted properly and slit s recomrnendcd O en not se on BAKE Oven temperature not set correctly Shcl f position is incorrect Scc the Roasting or B tlking sect ion Incorrect cookw ...

Page 31: ...structions contai led in this booklet l i c net dc l ir s ot Iccc ssol it s st llt Iir 1 lheil cover procedures intended to be performed by any user i olllt 0111 11 11 1 S s stc t f lo iclcs IC CSS 10 t t 47 Other servicing genera y should be referred to qualified elltlillt f t llew ll f ilts lll f 111 rt Iilfly fti rti tl tt l service personnel Caution must be exercised since t fS hi slc r l il f...

Page 32: ...oduct Read your Use and Care material If you then have any questions about operating the product please contact your dealer or cur Consumer Affairs office at the address below or call toll free GE Answer Center 800 626 2000 consumer information service Improper installation if you have an installation problem contact your dealer or installer You are responsible for providing adequate electrical ga...

Reviews: