background image

ENGLISH

4

[2] Scoop and Bin Door Grip Cleaning/Sanitisation (Daily)

) Either mix 3 litres of water with  ml of 5.25% sodium hypochlorite 

solution  in  a  suitable  container,  or  the  recommended  Hoshizaki 

sanitiser as directed.

2)  Soak  the  Scoop  in  the  solution  for  more  than  3  minutes.    Rinse 

thoroughly, and shake to remove surplus liquid.

Note: Using a cloth to dry may re-contaminate.

3) Use a neutral cleaner to wash the Bin Door Grip.  Rinse thoroughly.

4) Soak a clean cloth with the sanitising solution, and wipe the Grip.  

Use fresh water and a clean cloth to rinse/dry.

[3] Storage Bin Interior Cleaning/Sanitisation (Weekly)

) Open the Storage Bin Door, and remove all ice.

2)  Wash  the  Bin  liner  with  a  neutral  non-abrasive  cleaner.    Rinse 

thoroughly.

3) Soak a clean cloth with the neutral cleaner, and wipe the Door inner 

surface.  Wipe off the cleaner with a clean damp cloth.

4) Either mix 3 litres of water with  ml of 5.25% sodium hypochlorite 

solution  in  a  suitable  container  or  the  recommended  Hoshizaki 

sanitiser as directed.

5) Soak a clean sponge or cloth with the solution, and wipe the Bin 

liner and Bin Door.

6) Rinse thoroughly with fresh water and a clean cloth to wipe off the 

solution.  Close the Bin Door.

Note:  Some solutions may cause damage to the Bin liner surfaces 

or  corrosion  on  the  metal  parts.   Always  rinse  the  sanitiser 

unless directed otherwise by Hoshizaki guidelines.

[4] Air Filter

A plastic mesh Air Filter removes dirt or dust from the air, and keeps 

the Condenser from getting clogged.  As the Filter gets clogged, the 

icemaker’s performance will be reduced.

Remove and clean the Air Filter at least twice per month:

) Tilt the Louver forward, and remove the Air Filter.

2) Clean  the Air  Filter  by  using  a  vacuum  cleaner.    When  severely 

clogged,  use  warm  water  and  a  neutral  cleaner  to  wash  the Air 

Filter.

3) Rinse and dry the Air Filter thoroughly, and place it in position.

[5] Icemaking Water System

To  keep  the  icemaker  hygienic,  periodic  cleaning  of  the  icemaking 

water system is recommended.

Cleaning Procedure

) Dilute  48  ml  of  the  recommended  Hoshizaki  cleaner  with  3.8 

litres of water.

2) Remove the Louver.  Open the Door and remove all ice from the 

Evaporator and the Storage Bin.

Note: To  remove  cubes  on  the  Evaporator,  move  the  Control 

Switch on the Control Box to the “OFF” position and move it 

back to the “ICE” position after 3 minutes.  The defrost cycle 

starts and the cubes will be removed from the Evaporator.

3) Move the Control Switch to the “OFF” position.

4) Move  the  Control  Switch  to  the  “SERVICE”  position  and  the 

Service Switch to the “DRAIN” position.

5) After 2 minutes, move the Control Switch to the “OFF” position.

6) Pour the cleaning solution into the Water Tank.  Move the Control 

Switch to the “SERVICE” position and the Service Switch to the 

“WASH” position.  Close the Door.

7) After 30 minutes, move the Control Switch to the “OFF” position.

8) Same as step 4.

9) Move the Control Switch to the “ICE” position to fill the Water Tank 

with water.

0) After  3  minutes,  move  the  Control  Switch  to  the  “SERVICE” 

position and the Service Switch to the “WASH” position.

) After 5 minutes, move the Control Switch to the “OFF” position.

2) Same as step 4.

3) Repeat steps 9 through 2 three more times to rinse thoroughly.

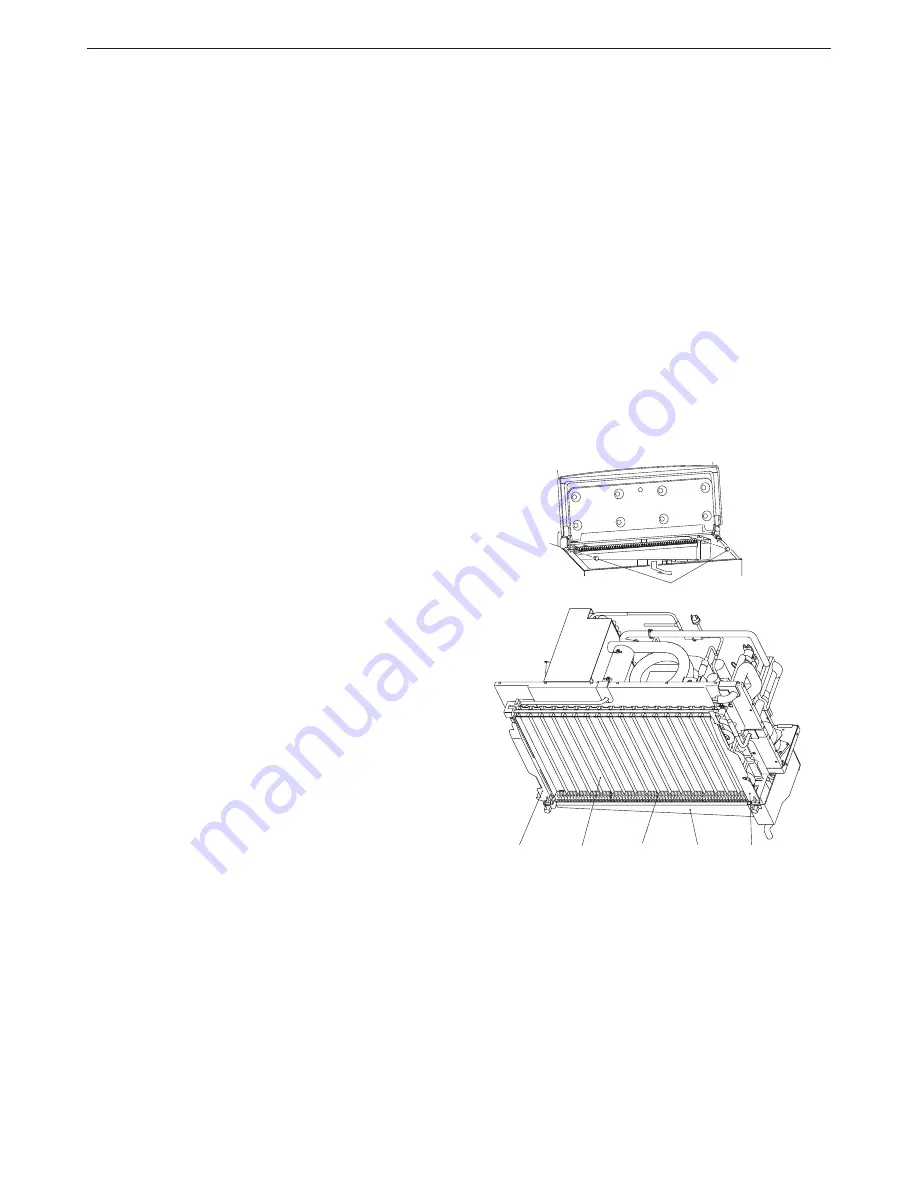
14) Disconnect the Overflow Pipe.  Next, remove the Water Tank by 

removing the two Thumbscrews and pulling the tank towards you 

slightly and pushing it down.  Be careful to avoid breakage when 

handling the parts.  See Fig. 6.

5) Pull  the  Cube  Guides  (quantity  varies  depending  on  model) 

upward to remove them from the Water Tank.  They are snapped 

in place.  See Fig. 7.

6) Same as step .

7) Wash  the  Bin  Control  Switch,  Water Tank,  Float  Switch,  Cube 

Guide and Overflow Pipe by using a nylon scouring pad, brushes 

and the cleaning solution.  In addition to the removed parts, also 

wash the bin liner and Bracket (L) (R) with the solution.

8) Discard the cleaning solution and rinse the parts thoroughly with 

water.

Bracket (L)    Evaporator    Cube Guide    Water Tank    Bracket (R)

Thumbscrew

Fig. 6

Summary of Contents for KM-100A

Page 1: ...ALE D ISTRUZIONI SELF CONTAINED CRESCENT CUBER MACHINE A GLACONS CROISSANT AUTONOME STECKERFERTIGER CRESCENTEISBEREITER INGEBOUWDE MACHINE VOOR HALVEMAANVORMIGE IJSBLOKJES MÁQUINA AUTOCONTENIDA DE CUBITOS EN FORMA DE MEDIA LUNA FABBRICATORE DI GHIACCIO IN CUBETTI A FORMA DI MEZZALUNA CON RISERVA INCORPORATA L1F003201 020609 ...

Page 2: ... provided See Fig 1 2 LOCATION IMPORTANT 1 This icemaker is not intended for outdoor use Normal operating ambient temperature should be within 7 C to 43 C Normal operating water temperature should be within 7 C to 35 C Operation of the icemaker for extended periods outside of these normal temperature ranges may affect production capacity 2 The icemaker should not be located next to ovens grills or...

Page 3: ...cal shock The non rewirable plug must never be used without a fuse cover being fitted The correct replacement for the detachable fuse cover is identifiable from the manufacturer s reference number stamped on the plug Supply of replacement fuse covers can be obtained from Hoshizaki Parts Service Centres Fuses should be rated at 10A and approved to BS 1362 5 WATER SUPPLY AND DRAIN CONNECTIONS For th...

Page 4: ... icemaker for an extended time drain out all water from the water lines and remove the ice from the Storage Bin The Storage Bin should be cleaned and dried Drain the icemaker using air or carbon dioxide to prevent damage to the water supply lines at sub freezing temperatures Shut off the icemaker until the proper ambient temperature is resumed When the icemaker is not used for two or three days it...

Page 5: ...ing Water System To keep the icemaker hygienic periodic cleaning of the icemaking water system is recommended Cleaning Procedure 1 Dilute 148 ml of the recommended Hoshizaki cleaner with 3 8 litres of water 2 Remove the Louver Open the Door and remove all ice from the Evaporator and the Storage Bin Note To remove cubes on the Evaporator move the Control Switch on the Control Box to the OFF positio...

Page 6: ...on The Air Filter is clean For further assistance or advice contact your local Hoshizaki service agent 3 WARRANTY Hoshizaki provides warranty in accordance with the legislation of the customer s own country of residence for two years starting from the date on which the appliance is sold to the end user The warranty only covers defects in material or workmanship The repairs under warranty may only ...

Page 7: ...le harm to the environment or human health from uncontrolled waste disposal recycle it responsibly to promote the sustainable reuse of material resources To return your used device use the return and collection systems or contact the retailer where the product was purchased They can take this product for environmental safe recycling V NAMEPLATE RATING This product includes a hermetically sealed re...

Page 8: ... 108 EC Low Voltage Directive 2006 95 EC Harmonised European Standards applied EN 55014 1 EMC EN 55014 2 EMC EN 61000 3 2 EMC EN 61000 3 3 EMC EN 61000 4 2 EMC EN 61000 4 3 EMC EN 61000 4 4 EMC EN 61000 4 5 EMC EN 61000 4 6 EMC EN 61000 4 11 EMC EN 60335 1 LVD EN 60335 2 24 LVD EN 62233 EMF CE Marking first affixed 2008 Product Description Hoshizaki Ice Maker Model s KM 100A KM 125A Name Teruaki Y...

Page 9: ...Tuyau de vidange 1 b Pelle à glaçons 1 c Adaptateur pour tuyau 1 d Conduit 1 e Vis 3 f Pied 4 5 Fixer le conduit au panneau arrière à l aide des trois vis fournies Voir fig 1 2 EMPLACEMENT IMPORTANT 1 Cette machine à glace n est pas conçue pour être utilisée à l extérieur La température ambiante normale de service doit être comprise entre 7 C et 43 C La température normale de service de l eau doit...

Page 10: ...ais être utilisée sans un protège fusible Le numéro de référence du protège fusible amovible est imprimé sur la fiche Utiliser cette référence pour toute commande de pièce Il est possible de se procurer des protège fusibles de remplacement auprès des centres de pièces détachées et d entretien Hoshizaki Les fusibles doivent être étalonnés à 10 A et agréés selon la norme BS 1362 5 RACCORDEMENTS D AR...

Page 11: ...pour éviter d endommager le compresseur 1 UTILISATION L installateur mettra normalement en service la machine à glace pour démarrer la fabrication de la glace Afin de garantir un fonctionnement en continu s assurer que Le robinet d arrivée d eau est ouvert La machine à glaçons est branchée à l alimentation électrique et Le commutateur de commande se trouve sur la position ICE retirer le volet d aé...

Page 12: ...désinfectant recommandé par Hoshizaki 5 Imbiber une éponge ou un chiffon de solution et nettoyer le revêtement et la porte du bac 6 Rincer abondamment avec de l eau propre et utiliser un chiffon propre pour essuyer la solution Fermer la porte du bac Remarque Certaines solutions risquent d endommager les surfaces du revêtement du bac ou de rouiller les pièces métalliques Toujours rincer le produit ...

Page 13: ...nt 12 Nettoyer le bac de stockage à l eau 13 Régler le commutateur de commande de bac sur ICE et démarrer la production automatique de glace 14 Fermer la porte Remettre le volet d aération dans sa position correcte 2 AVANT DE FAIRE APPEL AU SERVICE D ENTRETIEN Si la machine à glace ne fonctionne pas correctement ou pas du tout effectuer les contrôles suivants avant de faire appel au service d assi...

Page 14: ...oidissement à cause d un environnement très poussiéreux Pour tout renseignement sur votre garantie et les agents de service agréés veuillez prendre contact avec votre distributeur fournisseur ou le centre de services Hoshizaki le plus proche Europe Royaume Uni Irlande Hoshizaki UK TEL 44 0 845 456 0585 FAX 44 0 1462 499080 Pays Bas Hoshizaki Europe TEL 31 0 20 6918499 FAX 31 0 20 6918768 Belgique ...

Page 15: ...e EMC 2004 108 CE Directive basse tension 2006 95 CE Normes européennes harmonisées appliquées EN 55014 1 EMC EN 55014 2 EMC EN 61000 3 2 EMC EN 61000 3 3 EMC EN 61000 4 2 EMC EN 61000 4 3 EMC EN 61000 4 4 EMC EN 61000 4 5 EMC EN 61000 4 6 EMC EN 61000 4 11 EMC EN 60335 1 LVD EN 60335 2 24 LVD EN 62233 EMF Date initiale du marquage CE 2008 Description du produit machine à glace Hoshizaki Modèle s ...

Page 16: ...rüfen a Ablaufschlauch 1 b Schaufel 1 c Schlauchadapter 1 d Kanal 1 e Schraube 3 f Gerätefuß 4 5 Den Kanal mit den drei mitgelieferten Schrauben an der Rückwand befestigen Siehe Abb 1 2 AUFSTELLEN WICHTIG 1 Dieser Eisbereiter eignet sich nicht für den Gebrauch im Freien Für Normalbetrieb muss die Raumtemperatur zwischen 7 C und 43 C und die Wassertemperatur zwischen 7 C und 35 C liegen Längerer Ge...

Page 17: ... die Gefahr eines elektrischen Schlages D e r v e r k a p s e l t e S t e c k e r i s t n i e o h n e a n g e b r a c h t e Sicherungsabdeckung zu verwenden Der richtige Ersatz für die abnehmbare Sicherungsabdeckung lässt sich anhand der Hersteller Referenznummer ermitteln die auf den Stecker gestanzt ist Ersatzabdeckungen für Sicherungen sind von Hoshizaki Ersatzteil Service Zentren erhältlich Si...

Page 18: ...ens 3 Minuten warten bevor das Gerät wieder eingeschaltet wird 1 BETRIEB In der Regel nimmt der Aufsteller den Eisbereiter in Betrieb und startet die automatische Eisproduktion Für den störungsfreien Dauerbetrieb darauf achten der Wasserzulaufhahn ist geöffnet der Eisbereiter ist mit der Stromversorgung verbunden und der Steuerschalter befindet sich in Stellung ICE zur Überprüfung das Luftgitter e...

Page 19: ...Behälter entweder 3 l Wasser mit 11 ml einer 5 25 igen Natriumhypochloritlösung mischen oder den empfohlenen Hoshizaki Desinfizierer nach Gebrauchsanleitung verwenden 5 Einen sauberen Schwamm oder ein sauberes Tuch mit der Lösung anfeuchten und Trennwand und Innenwände des Vorratsbehälters und die Vorratsbehältertür abwischen 6 Die Lösung mit frischem Wasser gründlich abspülen und danach die Fläch...

Page 20: ...7 Den Steuerschalter in die Position SERVICE und den Serviceschalter in die Position WASH stellen 8 Nach 15 Minuten den Steuerschalter in die Position OFF stellen 9 Den Steuerschalter in die Position SERVICE und den Serviceschalter in die Position DRAIN stellen 10 Nach 2 Minuten den Steuerschalter in die Position OFF stellen 11 Die Schritte 5 bis 10 einmal wiederholen Für eine gründliche Spülung d...

Page 21: ...3 0 1 48639380 FAX 33 0 1 48639388 Spanien Portugal Hoshizaki Iberia TEL 34 0 93 4780952 FAX 34 0 93 4780900 Andere Länder Hoshizaki Europe TEL 31 0 20 6918499 oder 44 0 845 456 0585 FAX 31 0 20 6918768 oder 44 0 1462 499080 Außerhalb Europas Hoshizaki Singapore TEL 65 6225 2612 FAX 65 6225 3219 Hoshizaki Lancer Pacific TEL 61 8 8268 1388 FAX 61 8 8268 1978 Hoshizaki Suzhou TEL 86 512 62807850 FAX...

Page 22: ...08 EG Niederspannungsrichtlinie 2006 95 EG Angewandte harmonisierte europäische Normen EN 55014 1 EMV EN 55014 2 EMV EN 61000 3 2 EMV EN 61000 3 3 EMV EN 61000 4 2 EMV EN 61000 4 3 EMV EN 61000 4 4 EMV EN 61000 4 5 EMV EN 61000 4 6 EMV EN 61000 4 11 EMV EN 60335 1 LVD EN 60335 2 24 LVD EN 62233 EMV CE Kennzeichnung zum ersten Mal angewendet 2008 Produktbeschreibung Hoshizaki Eisbereiter Modell e K...

Page 23: ...on of aan hitte verwijdert u de folie nadat de ijsmachine is afgekoeld 4 Verwijder het pakket met toebehoren en controleer de inhoud a Afvoerslang 1 b IJsschep 1 c Slangadapter 1 d Koker 1 e Schroef 3 f Poot 4 5 Bevestig de koker aan het achterpaneel met de drie meegeleverde schroeven Zie afb 1 2 PLAATSING BELANGRIJK 1 Deze ijsmachine is niet bestemd voor gebruik buitenshuis De omgevingstemperatuu...

Page 24: ...en zorgt dit voor een groot risico van elektrische schokken De gegoten stekker mag uitsluitend in combinatie met een zekeringhouder worden gebruikt Het referentienummer van de fabrikant is in de stekker ingeslagen In geval u de zekeringhouder vervangt dient een vervangend exemplaar van hetzelfde type te worden gebruikt Zekeringhouders zijn te verkrijgen via de onderdelen en servicecentra van Hoshi...

Page 25: ...w inschakelen van de ijsmachine nadat deze is uitgeschakeld 1 BEDIENING De installateur is gewoonlijk degene die de ijsmachine inschakelt zodat deze het automatische ijsbereidingsproces start Controleer het volgende om een continue werking te waarborgen De watertoevoerkraan moet openstaan De ijsmachine moet zijn aangesloten op de voeding en De bedieningsschakelaar moet in de stand ICE staan verwij...

Page 26: ...schoon te maken 6 Spoel grondig af met schoon water en een schone doek om het middel te verwijderen Sluit de bunkerklep Opmerking het oppervlak van de bunker en de metalen onderdelen kunnen door bepaalde oplossingen worden aangetast Spoel na gebruik van het ontsmettingsmiddel altijd met ruim water na tenzij anders vermeld in de instructies van Hoshizaki 4 Luchtfilter Het kunststof luchtfilter haal...

Page 27: ...3 Zet de bedieningsschakelaar in de stand ICE en start het automatische ijsproductieproces 14 Sluit de deur Plaats het ventilatierooster terug op de juiste locatie 2 VOORDAT U BELT VOOR SERVICE Als de ijsmachine niet goed of helemaal niet werkt controleert u het volgende voordat u een servicemedewerker inschakelt Het apparaat heeft stroom De bedieningsschakelaar moet in de stand ICE staan De water...

Page 28: ...080 Buiten Europa Hoshizaki Singapore TEL 65 6225 2612 FAX 65 6225 3219 Hoshizaki Lancer Pacific TEL 61 8 8268 1388 FAX 61 8 8268 1978 Hoshizaki Suzhou TEL 86 512 62807850 FAX 86 512 62807860 IV VERWIJDERING Houd u aan de lokale voorschriften met betrekking tot de verwijdering van het apparaat wat betreft ontvlambaar koel en blaasgas Verwijder voordat u het apparaat afvoert de klep om te voorkomen...

Page 29: ...richtlijn 2004 108 EC Laagspanningsrichtlijn 2006 95 EG Toegepaste geharmoniseerde Europese normen EN 55014 1 EMC EN 55014 2 EMC EN 61000 3 2 EMC EN 61000 3 3 EMC EN 61000 4 2 EMC EN 61000 4 3 EMC EN 61000 4 4 EMC EN 61000 4 5 EMC EN 61000 4 6 EMC EN 61000 4 11 EMC EN 60335 1 LVD EN 60335 2 24 LVD EN 62233 EMF Eerste toekenning CE markering 2008 Productomschrijving IJsmachine van Hoshizaki Model l...

Page 30: ...so en el exterior La temperatura ambiente de trabajo normal debe situarse entre 7 C y 43 C La temperatura de trabajo normal del agua debe situarse entre 7 C y 35 C La utilización de la máquina de hielo fuera de estos márgenes de temperatura normal por periodos prolongados puede afectar su capacidad de producción 2 La máquina de hielo no debe colocarse cerca de hornos parrillas u otras fuentes de c...

Page 31: ...ambio correcto de la tapa de fusibles desmontable se identifica por el número de referencia del fabricante grabado en la propia clavija Puede obtener tapas de fusibles de repuesto en los centros de repuestos servicio de Hoshizaki Los fusibles deben ser de 10 A y estar homologados según BS 1362 5 SUMINISTRO DE AGUA Y CONEXIONES DE DRENAJE Sólo para el Reino Unido las conexiones deben cumplir los re...

Page 32: ...are la máquina de hielo durante un periodo prolongado de tiempo purgue el agua de las tuberías y quite el hielo de la cuba de almacenamiento La cuba de almacenamiento debe quedar limpia y seca Purgue la máquina de hielo mediante aire o dióxido de carbono para evitar daños en las tuberías de alimentación de agua cuando la temperatura esté por debajo de cero grados Desconecte la máquina de hielo has...

Page 33: ...uina de hielo se reduce Desmonte y limpie el filtro de aire al menos dos veces al mes 1 Incline la rejilla hacia delante y retire el filtro de aire 2 Limpie el filtro de aire con un aspirador Cuando esté muy obstruido utilice agua tibia y un detergente neutro para lavarlo 3 Aclare y seque completamente el filtro de aire y luego vuelva a montarlo en su posición correcta 5 Sistema de agua de fabrica...

Page 34: ...mience con el proceso automático de fabricación de hielo 14 Cierre la puerta Vuelva a montar la rejilla en su posición correcta 2 ANTES DE LLAMAR A UN AGENTE DE REPARACIÓN Si la máquina de hielo no funciona correctamente o no funciona en absoluto antes de llamar al servicio de reparaciones compruebe que La unidad está conectada a la red eléctrica El interruptor de control está en la posición ICE E...

Page 35: ...que el producto no se debe eliminar junto con otros desechos de uso doméstico en todo el territorio de la UE Para evitar el posible daño al medioambiente o a la salud pública provocado por la eliminación no controlada de desechos recíclelos de forma responsable para fomentar la reutilización sostenible de los recursos materiales Para devolver el dispositivo usado utilice los sistemas de devolución...

Page 36: ...E Directiva EMC 2004 108 EC Directiva sobre bajo voltaje 2006 95 EC Normas armonizadas europeas aplicadas EN 55014 1 EMC EN 55014 2 EMC EN 61000 3 2 EMC EN 61000 3 3 EMC EN 61000 4 2 EMC EN 61000 4 3 EMC EN 61000 4 4 EMC EN 61000 4 5 EMC EN 61000 4 6 EMC EN 61000 4 11 EMC EN 60335 1 LVD EN 60335 2 24 LVD EN 62233 EMF Marcado CE fijado 2008 Descripción del producto Máquina de hielo de Hoshizaki Mod...

Page 37: ...ubo flessibile d uscita 1 b Cucchiaio di presa 1 c Adattatore per tubi flessibili 1 d Condotto 1 e Vite 3 f Gamba 4 5 Collegare il condotto al pannello posteriore utilizzando le tre viti in dotazione Vedere Fig 1 2 UBICAZIONE IMPORTANTE 1 La macchina non è idonea all utilizzo all aria aperta La normale temperatura operativa dell ambiente deve essere compresa tra 7 C e 43 C La normale temperatura o...

Page 38: ...on cercare di riutilizzarla Inserire una spina del genere in una qualsiasi altra presa comporta un forte rischio di scosse elettriche La spina non riciclabile non va mai utilizzata senza aver montato un coprifusibile Per individuare il corretto ricambio del coprifusibile smontabile leggere il numero di riferimento della casa costruttrice impresso sulla spina I coprifusibile possono essere reperiti...

Page 39: ...AIN WASH CIRCULATE 2 PREPARAZIONE DELLA MACCHINA PER IL RIMESSAGGIO PROLUNGATO IMPORTANTE Quando si spegne la macchina per un periodo prolungato scaricare completamente l acqua dalla relativa tubazione e rimuovere il ghiaccio dal deposito di raccolta cubetti Il deposito di raccolta cubetti deve essere pulito e asciugato Scaricare l acqua dalla macchina utilizzando aria o anidride carbonica per pre...

Page 40: ...endo così il condensatore da eventuali intasamenti Con l intasarsi del filtro le prestazioni della macchina si riducono Smontare il filtro dell aria e pulirlo almeno due volte al mese 1 Inclinare la griglia di aerazione in avanti e rimuovere il filtro dell aria 2 Pulire il filtro dell aria per mezzo di un aspirapolvere in caso di filtro intasatissimo per lavarlo utilizzare acqua calda assieme a un...

Page 41: ...ti con acqua 13 Spostare l interruttore di comando sulla posizione ICE e avviare la produzione di ghiaccio automatica 14 Chiudere il portello Posizionare la griglia di aerazione nel modo corretto 2 PRIMA DI RIVOLGERSI ALL ASSISTENZA Se la macchina non funziona correttamente o non funziona affatto prima di rivolgersi all assistenza controllare che la macchina riceva l energia elettrica l interrutto...

Page 42: ...itare che i bambini vi possano rimanere intrappolati Smaltimento corretto del prodotto Questo simbolo indica che il prodotto non deve essere smaltito con altri rifiuti domestici all interno dell UE Per evitare possibili danni all ambiente o alla salute derivanti dallo smaltimento incontrollato dei rifiuti riciclare il prodotto in modo responsabile per promuovere il riutilizzo sostenibile delle ris...

Page 43: ...ione 2006 95 CE Standard europei di armonizzazione applicati EN 55014 1 EMC EN 55014 2 EMC EN 61000 3 2 EMC EN 61000 3 3 EMC EN 61000 4 2 EMC EN 61000 4 3 EMC EN 61000 4 4 EMC EN 61000 4 5 EMC EN 61000 4 6 EMC EN 61000 4 11 EMC EN 60335 1 LVD EN 60335 2 24 LVD EN 62233 EMF Anno di prima apposizione del marchio CE 2008 Descrizione prodotto macchina Hoshizaki per la fabbricazione del ghiaccio Modell...

Reviews: